
User's Manual
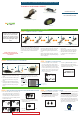
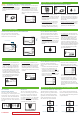

Table Of Contents

The error code indicates the STS R2 Re-
ceiver is not functioning properly. Note the
Error code, use your meter to check your
blood glucose readings, and contact Dex-
com Technical Support at 1-877-DEXCOM4
(339-2664) immediately. Your Continuous
Glucose Monitoring Session is nished and
you should remove the STS-7 Sensor.
© DexCom 2006 All rights reserved
™
The STS R2 Receiver will display screens
that notify you how long you have until the
end of your Continuous Glucose Monitor-
ing Session. You will be notied at 6 hours,
2 hours, 30 minutes before your session
ends, and when your session is nished.
30 minute STS Sensor Expiration Notication
0 hour STS Sensor Expiration Notication
2 hour STS Sensor Expiration Notication
6 hour STS Sensor Expiration Notication
3. Receiver Connection Screen
3. Receiver Connection Screen: The Receiver
Connection Screen will appear on the STS
R2 Receiver while the BG values are being
transferred from the meter to the STS R2
Receiver.
4. 1-Hour Trend Screen
4. 1-Hour Trend Screen: Once the upload is
complete the 1-Hour Trend Screen will
appear. Disconnect the cable from the
meter and STS R2 Receiver. A glucose
value should appear in about 15 minutes
and glucose values will be updated every 5
minutes.
3. Shaded-Out Blood Drop Prompt
New Meter Screen: Indicates that you
have connected a new meter to the STS R2
Receiver. Press OK. You must re-take the
ngersticks and connect the meter to the
STS R2 Receiver.
Connection Failure Screen: Indicates the
meter and STS R2 Receiver are not con-
nected properly. If you see this screen
the meter values will not be transferred
successfully. Clear the alert by pressing
1.
2.
1. New Meter Screen
2. Connection Failure Screen
any button and disconnect the cable from
the STS Receiver. Make sure the meter is
off and reconnect the cable to the STS R2
Receiver (the cable must be plugged into
the meter rst).
Shaded-Out Blood Drop Prompt: Noties
you that 1 more ngerstick is needed for
calibration. Take another ngerstick and
upload it to your STS R2 Receiver.
3.
Press C button to clear the alert and the STS
R2 Receiver will notify the STS-7 Sensor that
the Continuous Glucose Monitoring Session is
complete (00:00:00).
You may see the STS Sensor Removal
Screen during your continuous glucose moni-
toring session. If the screen below appears
your the STS-7 Sensor has notied the STS
R2 Receiver that STS-7 Sensor is no longer
good. Remove the STS-7 Sensor and insert a
new one.
™
STS Sensor Removal
If the STS-7 System is not displaying
glucose values it could be for the following
reasons:
™
Your STS™ T2 Transmitter and STS R2
Receiver are not communicating. The
Antenna Icon will appear in the upper
right hand corner of the screen (there is no
Antenna Icon (Y) in the bottom right hand
corner of the screen). Make sure your STS
R2 Receiver and STS T2 Transmitter are
within 5 ft. of each other.
1.
If you upload a ngerstick to update
calibration you may see the Calibration
Update Screen due to the ngerstick not
closely matching your STS-7 System
glucose readings. Take a ngerstick and
upload it to the STS R2 Receiver to update
calibration.
3.
Your STS-7 Sensor is sending the STS
R2 Receiver “noisy” glucose readings
that the STS R2 Receiver will not display.
2.
Once the “noise” stops, your STS R2 Re-
ceiver will display glucose values again.
™
The device may vibrate and/or beep and dis-
play one of the following screens during use:
Always take a ngerstick before you make any
treatment decisions.
Calibration Update Screen: If the Calibration
Update Screen appears you should clear the
prompt, take a ngerstick using your meter,
and upload the meter value to the STS R2
Receiver.
1.
1. Calibration Update Screen
Low Glucose Alert: The STS R2 Receiver
will vibrate/beep if your current STS-7 Sen-
sor glucose value is below the Low Alert
setting. Press any button on the STS R2
Receiver to acknowledge the alert; if you
do not the STS R2 Receiver will continue
to alert you for the next 10 minutes. The
Factory Low Alert setting is 80 mg/dL. You
should work with your diabetes management
team to determine the best alert setting for
you. (Take a ngerstick before you make
any treatment decisions.)
2.
2. Low Glucose Alert
High Glucose Alert: The STS R2 Receiver
will beep/vibrate if your current STS-7 Sen-
sor glucose value is above the High Alert
setting. Press any button on the STS R2
Receiver to acknowledge the alert; if you
do not the STS R2 Receiver will continue to
alert you for the next 10 minutes. The Fac-
tory High Alert setting is 200 mg/dL. You
should work with your diabetes management
team to determine the best alert setting for
you. (Take a ngerstick before you make
any treatment decisions.)
3.
3. High Glucose Alert
Low Glucose Alarm: In addition to your
personal glucose alert settings, your STS R2
Receiver will beep/vibrate if your glucose
falls below 55 mg/dL. Press any button to
acknowledge the alert if you do not the STS
R2 Receiver will continue to alert you every
5 minutes.
4.
4. Low Glucose Alarm
You can view glucose trends and patterns
using the 1-hour, 3-hour, and 9-hour Glucose
Trends Screens. (See screens below).
Glucose Value
Glucose Trend Screen
Glucose Trend Screen
Press
p
q
Glucose Trend Screen
Press
p
q
Condential
Draft Under FDA Review