
User's Manual
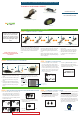
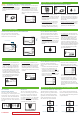

Table Of Contents

STS
TM
-7 Sensor & STS
TM
Applicator
STS
TM
-7 Sensor & STS
TM
T2 Transmitter
STS
TM
R2 Receiver
www.DexCom.com
*MAKE SURE YOUR STS R2
RECEIVER IS CHARGED BEFORE
YOU BEGIN.
Choose a site on your abdomen (belly) to put
the STS-7 Sensor that is a at area and where
you don’t have any scarring or rough patches
of skin and clean the site with an alcohol
swab.
1. Remove the adhesive backing from the STS
Sensor Pod and place the STS-7 Sensor on
the selected site. Pull the safety lock out
from the STS Applicator (pull near the ar-
row).
2. Place 2 ngers under the collar, with your
thumb on the plunger, and push the plunger
down completely.
3. Pull the collar back completely until you
hear a click.
4. Press the tabs on the sides of the STS-7
Sensor and pull off the STS Applicator.
5. The STS Sensor Pod remains adhered
to the skin after the STS Applicator is
removed.
Install STS-7 Transmitter in
STS Sensor Pod
STS-7 Transmitter Installed
STS Transmitter Latch
Remove STS Transmitter Latch
2 3
Place the STS T2 Transmitter into the
STS Sensor Pod with the at side facing
down.
Pull the STS Transmitter Latch up onto
the STS T2 Transmitter to snap it into
place.
Remove the STS Transmitter Latch by
holding the end of the latch and quickly
twisting off the latch away from your
body.
1.
2.
3.
Press any buttons on the STS R2 Receiver
to check for the Antenna Icon (Y) at the
bottom right hand corner of the screen. If
4.
1. Dual Blood Drop Prompt: After 2 hours
the STS R2 Receiver will vibrate and dis-
play the Dual Blood Drop Prompt to alert
you to calibrate the STS-7 Sensor. Press
the C Button to clear the prompt.
the Antenna
Icon appears in
the upper right
hand corner of
the screen, refer
to your User’s
Guide
Press the Down q Arrow 3 times until
you come to the 9-hour Glucose Trend
Screen. Then hold the Down q Arrow for
at least 7 seconds until you see the STS
License Code Screen (If you have already
inserted a STS-7 Sensor, press the Down
q Arrow 1 more time to get to the STS
License Code Screen):
1.
Press the OK button.
The antenna (Y)
should appear here
Use the Up p and Down q Arrows to
enter the STS License Code found in
your shipment and press the OK button to
conrm the STS License Code.
2.
2. Meter Connection Screen: After you take 2
ngersticks using your blood glucose me-
ter, upload the values to your STS R2 Re-
ceiver. Upload the meter values to the STS
R2 Receiver by plugging the connection
cable into the meter rst (the meter must
be off) and then into the STS R2 Receiver.
The Meter Connection Screen (“PC”) will
appear on your blood glucose meter.
1. Dual Blood Drop Prompt
2. Meter Connection Screen
M C
1. Press the Down q Arrow 3 times until you
come to the 9-hour Glucose Trend Screen.
Then hold the Down q Arrow for at least
7 seconds until you see the STS Sensor In-
sertion Screen (If you have already entered
a STS License Code).
2. Press the OK button to conrm Sensor
Insertion and you will see the following
Conrmation Screen:.
3. Your Start-Up Period begins once you
press the OK button.
Condential
Transmitter model number 9400-02
Draft Under FDA Review
Safety Lock Push Plunger Pull Collar
Collar Completely Back
Remove STS Applicator
2 3
Press Tabs
STS Sensor Pod Remains Adhered