
User's Manual

Caution: Investigational device. Limited by Federal (United States) law to investigational use.
CONFIDENTIAL Page 2 of 3
Under FDA Review
The antenna should appear here
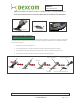
Place the STS™ Transmitter into the STS™ Sensor Pod with the flat side facing down.
Pull the STS™ Transmitter Latch up onto the to STS™ Transmitter to snap it into place.
Remove the STS™ Transmitter Latch by holding the end of the latch and quickly twisting off the latch away from your body.
Press any button on the STS™ Receiver to check for the Antenna icon (Y) before you
continue.
Press the Down Arrow 3 times until you come to the 9-hour Glucose Trend Screen and then press and hold the Down
Arrow for at least 7 seconds until you see the Sensor Insertion Screen.
Press the OK button.
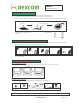
Viewing your Glucose Trends
You can view trends and patterns using the 1-hour, 3-hour, and 9-hour glucose screens. (See screens below).
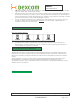
STS™ Receiver Alert Screens
The device may vibrate and/or beep and display one of the following screens during use:
S
TEP
2- Installing Your STS™ Transmitter
S
TEP
3- Beginning your Continuous Glucose Monitoring Session
C
ONTINUOUS
M
ONITORING
Calibration Update
Screen
Out of Calibration
Screen
Low Glucose Alert
High Glucose Alert
Low Glucose Alarm
Error Code
Remove STS™ Transmitter Latch
STS™ Transmitter installed
STS™ Transmitter Latch
Install STS™ Transmitter in STS™
Sensor Pod
Press
Press
1
-
hour
Glucose Trend Screen
3
-
hour
Glucose Trend Screen
9
-
hour
Glucose Trend Screen
Glucose Value