
Supplementary Document

www.powers.com
23
aDhesiVe anchors
INSTALLATION INSTRUCTIONS (SOLID BASE MATERIALS)
TECH MANUAL – ADHESIVE ANCHORS ©2015 POWERS VOLUME 1 – 9/2015 – REV. G
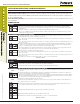
prEpArInG
3- Check adhesive expiration date on cartridge label. Do not use expired product. Review Safety Data Sheet (SDS) before use. Cartridge
temperature must be between 41°F - 95°F (5°C - 35°C) when in use; Consideration should be given to the reduced gel time of the adhesive
in warm temperatures.
• Attach a supplied mixing nozzle to the cartridge. Do not modify the mixer in any way and make sure the mixing element is inside the nozzle.
Load the cartridge into the correct dispensing tool.
• A new mixing nozzle must be used for every working interruption longer than the published working times (reference gel time and curing
time table) as well as for new cartridges.
• Note: Always use a new mixing nozzle with new cartridge of adhesive and also for all work interruptions exceeding the published gel
(working) time of the adhesive.
h
ef
4- Prior to inserting the anchor rod or rebar into the filled bore hole, the position of the embedment depth has to be marked on the anchor.
Verify anchor element is straight and free of surface damage.
3X
5- For new cartridges and nozzles: prior to dispensing into the anchor hole, squeeze out separately a minimum three full strokes of the mixed
adhesive. Discard non-uniform adhesives until the adhesive is a consistent RED color.
• Review and note the published working and cure times (reference gel time and curing time table) prior to injection of the mixed adhesive
into the cleaned anchor hole.
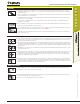
InSTALLATIon
6- Fill the cleaned hole approximately two-thirds full with mixed adhesive starting from the bottom or back of the anchor hole. Slowly withdraw
the mixing nozzle as the hole fills to avoid creating air pockets or voids. For embedment depth greater than 8 inches an extension nozzle
(3/8" dia.) must be used with the mixing nozzle.
• Piston plugs (see adhesive piston plug table) must be used with and attached to the mixing nozzle and extension tube for horizontal and
overhead installations with anchor rod from 3/4" to 1-1/4" diameter and rebar size #6 to #10. Insert piston plug to the back of the drilled
hole and inject as described in the method above. During installation the piston plug will be naturally extruded from the drilled hole by the
adhesive pressure.
• Attention! Do not install anchors overhead without proper training and installation hardware provided by the Powers Fasteners. Contact
Powers for details prior to use.
WITH PISTON PLUG:
7- The anchor should be free of dirt, grease, oil or other foreign material. Push clean threaded rod or reinforcing bar into the anchor hole while
turning slightly to ensure positive distribution of the adhesive until the embedment depth is reached. Air pockets are present when the
threaded rod or rebar springs or air pockets burst during installation. In case of air pockets: remove rod or rebar, let the adhesive harden,
re-drill the hole and repeat the complete installation.
8- Be sure that the anchor is fully seated at the bottom of the hole and that some adhesive has flowed from the hole and all around the top
of the anchor. If there is not enough adhesive in the hole, the installation must be repeated. For overhead applications the anchor must be
secured from moving/falling during the cure time(e.g. wedges). Minor adjustments to the anchor may be performed during the gel time but
the anchor shall not be moved after the final placement and during cure.
CUrInG AnD LoADInG
e.g.
68˚F
8
hrs
9- Allow the adhesive anchor to cure to the specified full curing time prior to applying any load (reference gel time and curing time table).
• Do not disturb, torque or load the anchor until it is fully cured.
T
max
10- After full curing of the adhesive anchor, a fixture can be installed to the anchor and tightened up to the maximum torque (reference gel
time and curing table) by using a calibrated torque wrench.
• Take care not to exceed the maximum torque for the selected anchor.