
User's Manual


3
WiFi Gateway Installation
1. Using a Torx T10 driver, remove the four 3/8” #4
screws into the corners of the enclosure top that
fasten it to the enclosure base.
2. Connect the battery.
3. Press the button on the Gateway, the green LED will
illuminate.
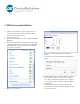
4. The Gateway has become a WiFi Access Point. Using
a laptop or similar device connect to the “DS-Cellio”
network. This is an unsecured connection and does
not require a password.
5. Browse to 192.168.10.1.
6. Locate the desired system and press the Join
button.
7. If required, enter the password for the WiFi Access
Point
8. Reinstall the four 3/8” #4 screws into the corners of
the enclosure top that fasten it to the enclosure
base. The screws must be tightened to a torque of
8.2 +/-0.5 kgf-cm to ensure that the IP68 rating is
maintained.
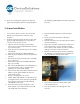
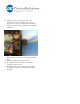
9. Attach the enclosure to a surface. The best RF
performance is obtained by mounting the Gateway
to a vertical service.