
Data Sheet
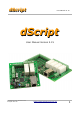


dScript
dScript User Manual v2.15
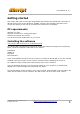
Connecting the hardware
Connect an ethernet cable from your network to the ethernet connector on the dScript module,
then attach a USB cable from the PC to the USB connector on the module. Now plug in the
12vdc power supply into the DC jack connector and switch on. When prompted by windows
navigate to the USBdriver folder and install the USB driver.
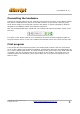
Now run the dScript IDE and it should find your module and report its firmware version in the
tool strip.
If it states “none” please check all your connections and click the white magnifying glass on
the green button next to it. This is the module search button and it will re-scan the com ports.
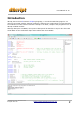
First program
A nice simple and colourful first program is the FlashingLeds example. Click the open button
(or go to File->Open) and navigate to Examples->FlashingLeds and open the FlashingLeds.dsj
file. *.dsj are dScript project files. The white triangle on the green button is the build, load and
run button, click this to compile and run the program on the module. You should see a non-
repeating pattern of Led flashing (well it does repeat, but you'll get bored watching it long
before it does).
Copyright © 2016, Devantech Ltd.
All rights reserved.
www.robot-electronics.co.uk
4