
Instruction manual


RXT Wireless Configuration Tool
RXT WCT Instruction Manual Rev 0.0 Page 29 of 33
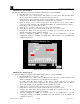
i. Once the configuration of Device 3 is complete, select the Save Device button to save the
configuration settings for the device. The Device section will increment to the next device to
be configured by the user.
Figure 38 Device 3 Analog Sensor
Save Configuration
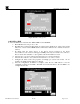
18. Once the configurations for all three tabs (Network/Zone(s), RXT(s), Device(s)) are complete, select
the File Name field to enter a unique file name for the configuration. The default name in this field is
“Config”. For this example, the file name will be “Configuration Example”.
19. Select the Save button at the bottom of the screen to save the configuration file. A pop-up window
will appear that asks “Save all settings. Do you want to continue?”.
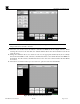
20. Select the OK button to save. A confirmation window will appear and select OK to exit. At this point,
the configuration file has been saved under the file name “Configuration Example”. This will be the
file that will be uploaded to the five RXT-300s from our sample exercise. Use the RXT WCT to find
the five RXTs and upload the configuration file to each.
21. Select the Close button to exit back to the main configuration tool menu.
Find RXTs
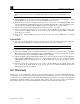
22. Select Wireless Network.
a. At this time, the WCT will connect to the USB SNAP Stick and initialize itself to the current
Channel and Network ID shown in My Network. It will automatically search for other WCTs
on that wireless network and assign an address to itself that does not conflict. The WCT will
then proceed to search for RXTs based upon the Channel and Network ID currently set and
will list the results, if any, in the RXTs in My Network section. For example, in the figure
below, the RXT WCT initialized to the current RF channel 1 and network ID 1. No RXT-
300s were found in this wireless network and none are listed in the RXTs in MY Network
section.