
Instruction manual


RXT Wireless Configuration Tool
RXT WCT Instruction Manual Rev 0.0 Page 28 of 33
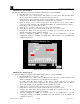
c. Select the RXT field and select “RXT 2_100 Sensor” from the list.
d. Select Done to save selection and exit the RXT screen.
e. Because this device is a 100 series sensor with a fixed Modbus™ address of 1, change the
Device Modbus Address from its default value of “2” to a value of “1”.
f. Configure the alarm events accordingly per section
3.3.3 if needed. In our example, the
default settings will not be changed.
g. Range and Register fields are filled in automatically based on the device type selected, but can
be changed by the user if needed. In our example, the default settings will not be changed.
h. Configure the alarm setpoints accordingly by selecting the corresponding Alarm Setpoint field.
In our example, the default settings will not be changed.
i. Set the ascending or descending parameters by selecting the corresponding Ascending/
Descending button for a particular alarm. In our example, the default settings will not be
changed.
j. Once the configuration of Device 2 is complete, select the Save Device button to save the
configuration settings for the device. The Device section will increment to the next device to
be configured by the user.
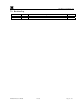
Figure 37 Device 2 100 Sensor
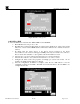
Add Analog Sensor
17. Select the Device Name field and enter “PPM H2S Analog Sensor” for the third device.
a. Select the Device Type field and select “RXT-300” from the list.
b. Select Done to save selection and exit the Device Type screen.
c. Select the RXT field and select “RXT 4 Analog Sensor” from the list.
d. Select Done to save selection and exit the RXT screen.
e. Configure the alarm events accordingly per section
3.3.3 if needed. In our example, the
default settings will not be changed.
f. Range and Register fields are filled in automatically based on the device type selected, but can
be changed by the user if needed. In our example, the default settings will not be changed.
g. Configure the alarm setpoints accordingly by selecting the corresponding Alarm Setpoint field.
In our example, the default settings will not be changed.
h. Set the ascending or descending parameters by selecting the corresponding Ascending/
Descending button for a particular alarm. In our example, the default settings will not be
changed.