
Instruction manual


RXT Wireless Configuration Tool
RXT WCT Instruction Manual Rev 0.0 Page 25 of 33
Add RXT for Alarm Station
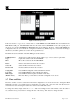
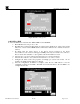
10. Select the RXT Name field and enter “RXT 3 Alarm Station” for the third RXT.
a. Enter 00.85.43 as its Unique Device ID.
b. Select the Slave Device button since it will function as a slave device with an alarm station
attached. This button will turn red to indicate it has been selected.
c. Select the Alarm Station button in the Alarm Stations/Battery section since it will function as
an alarm station. This button will turn red to indicate it has been selected.
d. Select the Battery Attached button in the Alarm Stations/Battery section since it will be
powered by a Detcon battery pack. This button will turn red to indicate it has been selected.
e. Set the the Low Battery Alarm value to 30%.
f. Select the Associated Zones button and select only zone 1 from the list.
g. Select the Done button to save selection and exit the Associated Zones screen.
h. Configure the alarm events and properties accordingly per section
0 if needed. In our
example, the default settings will not be changed.
i. Once the configuration of RXT 3 is complete, select the Save RXT button to save the
configuration settings for the RXT. The RXT section will increment to the next RXT to be
configured by the user.
Figure 33 RXT 3 Alarm Station
Add RXT for Analog Sensor
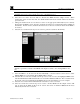
11. Select the RXT Name field and enter “RXT 4 Analog Sensor” for the fourth RXT.
a. Enter 00.90.6E as its Unique Device ID.
b. Select the Slave Device button since it will function as a slave device with an analog sensor
attached. This button will turn red to indicate it has been selected.
c. Do NOT select the Alarm Station or the Battery Attached buttons in the Alarm
Stations/Battery section since it will function as an analog input device. The Low Battery
Alarm value defaults to 1 day regardless, but the field will not be used.
d. Select the Associated Zones button and select only zone 2 from the list.
e. Select the Done button to save selection and exit the Associated Zones screen.
f. Configure the alarm events and properties accordingly per section
0 if needed. In our
example, the default settings will not be changed.
g. Once the configuration of RXT 4 is complete, select the Save RXT button to save the
configuration settings for the RXT. The RXT section will increment to the next RXT to be
configured by the user.