
Instruction manual


RXT Wireless Configuration Tool
RXT WCT Instruction Manual Rev 0.0 Page 19 of 33
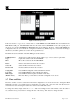
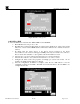
Figure 26 System Date and Time Screen
4.0 Example RXT-320 Configuration
The RXT-320 configuration tool is simple to use and gives the user the ability to add/remove RXT-320s
to/from specific wireless networks based on their Channel and Network ID.
The first step is to identify the serial numbers of the RXT-320s that are of interest and what wireless network
(Channel/Network ID) they need to reside in. In this sample exercise, five RXT-320s residing in different
networks will be added to Channel 10/Network ID 10:
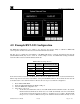
Table 1 RXT-320 Sample Exercise
RXT-320
Serial
Number
New Network
(Channel/Network ID)
RXT 1 03.D2.FF 10/10
RXT 2 03.D3.33 10/10
RXT 3 03.D3.3E 10/10
RXT 4 03.D3.C1 10/10
RXT 5 03.D8.22 10/10
If the current wireless network of an RXT-320 is not known, the WCT can be used to obtain such information.
What is important is to know the serial number of the particular RXT-320 and to know which wireless network
it should reside in. Once this information is known, the user can proceed with the configuration.
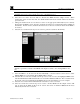
1. Power ON the RXT WCT.
2. Insert the USB SNAP Stick in the WCT’s USB port.
3. Select the RXT-320 configuration tool.
4. Select Wireless Network.
a. At this time, the WCT will connect to the USB SNAP Stick and initialize itself to the current
Channel and Network ID shown in My Network. It will automatically search for other WCTs
on that wireless network and assign an address to itself that does not conflict. The WCT will
then proceed to search for RXTs based upon the Channel and Network ID currently set and