
Use and Care Manual


10
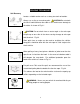
WINCH WORKING DEMONSTRATION
1. Disengage the clutch by turning the clutch to the “CLUTCH OUT” position.
2. Grab the cable assembly (Part# SP0350008) and pull the cable to the desired
length, then attach to item being pulled.
Caution: Always leave at least five turns of cable on the drum; Review winch
safety warnings and precautions on page 2、3 before continuing.
3. Re-engage the clutch by turning the clutch handle to the “CLUTCH IN” position, as
you need.
4. Insert the switch assembly connector onto the control box.
5. Test-run the winch in each direction for one or two seconds.
6. While standing to the side of the tow path, hold and operate the switch assembly
supplied. Wait until the motor stops before reversing directions.
7. When the pulling is complete, remove the switch assembly from the female
connector of the directional valve and replace the female connectors cover.
Note: For D style winch, the winch operation is controlled directly, not through the
control box.
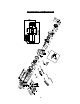
REPLACING THE WIRE ROPE
If the wire rope has become worn or is beginning to show signs of fraying, it must be
replaced before being used again.
1. Turn the clutch to the “CLUTCH OUT” position.
2. Extend cable assembly to its full length. Note how the existing cable is connected
to the drum.
3. Remove old cable assembly and attach new one in just the same way as the old
cable was connected to the drum. Insert the end of the new rope and secure the
screw M6x8(Part# SP0350008).
4. Ensure that the new cable wraps in the same rotation direction as the old one.
The cable should leave from under the drum.
5. Turn clutch to the “CLUTCH IN” position.