
User guide


52
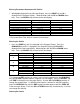
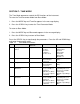
Entering Parameters Common to All Profiles
1. With Cycles displayed in the Message Display, Press the PROF key until A is
displayed in the Program Display. . Make changes with the UP and DOWN arrow
keys. Press the SCROLL key to move to the next display.
Description Message Display Setting In Lower Display
Start On Start On Proc
Go To Go To OFF
Delay Time Delay 0.00
Program Lock Lock Prog ON
Power Fail Recovery Period Recovery 0.01
Power Fail Recovery Type Rec Type Cont
Time of Day *
RTC Time Enter time
Day of Week *
RTC Day Enter Day
* Only used if Real Time Clock is installed in the Control.
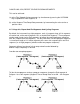
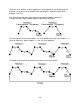
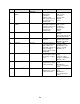
Entering the Profile
1. Press the PROF key until 1 is displayed in the Program Display. Press the
RUN/HOLD key until 1 is displayed in the Segment Display and Final SP is
displayed in the message display. Make changes with the UP and DOWN arrow
keys. Press the SCROLL key to move to the next display.
Segment Description Message Display Setting In Lower Display
Setpoint Final SP 250
#1 Ramp Time Time 0.10
Event Status Event 0001
Setpoint Final SP 250 (or “- - - -“)
#2 Soak Time Time 1.00
Event Status Event 0001
Setpoint Final SP 70
#3 Ramp Time Time 0.25
Event Status Event 0000
Setpoint Final SP
70 (or “- - - -“) *
#4 Time Time End
Event Status Event 0000
* To change an END segment to a ramp, soak, or jump segment press the RUN/HOLD
key until the END segment appears (segment 4 in the sample). Press the SCROLL key
until TIME is displayed in the message display. Use the UP and DOWN arrow keys to
change the segment time. If a different final setpoint is desired on the END segment,
press the RUN/HOLD key until the END segment number appears with the FINAL SP
in the message display. Press the UP and DOWN arrow keys simultaneously. You then
can change the setpoint.
Running the Profile