
User Manual


Table Of Contents
- Revision History
- Table of Contents
- Figures
- Tables
- 1. About This Manual
- Copyright © 2012 by Despatch Industries.
- Printed and bound in the United States of America.
- Table 1. Operating/Environmental Conditions (For indoor use).
- 2. Safety
- 2.1. Safety Information
- 2.1.1. Lockout
- 2.1.1.1. Lockout Requirements
- 2.1.1.2. Lockout Procedure
- 2.2. Provisions for Lifting and Carrying
- 2.3. Maintenance
- 2.4. Electrical Power
- 2.5. Fire
- 2.6. Equipment Lockout Requirements
- 2.6.1. Emergency Stop
- 2.7. Disconnecting Devices
- 2.7.1. Power Requirements
- 2.7.2. Disconnecting Hard-Wired Units
- 2.7.3. Disconnecting Corded Units
- 2.7.4. Disconnecting Units with Optional Disconnect Switch
- 3. Theory of Operation
- Table 2. Control Instrument Explanations.
- Review the Protocol 3 Controller Owner’s Manual for more information.
- Table 3. High Limit Instrument Explanations.
- 4. Assembly & Setup
- 5. Operation
- Table 4. Control Instrument Operating Parameters.
- Table 5. Control Instrument Set-up Parameters.
- Refer to Table 5 to change tuning parameters, if necessary.
- Table 6. High Limit instrument Setup Parameters.
- 6. Maintenance
- 6.1. Checklist
- 6.2. Lubrication
- 6.3. Cleaning and Decontamination
- 6.3.1. Cleaning the LBB Series Oven
- 6.3.2. Decontaminating the LBB Series Oven
- 6.4. Routine Tests
- 6.4.1. Test Control Instrument
- 6.4.2. Test High Limit Instrument
- 6.5. Replacement Parts
- 6.5.1. Replace the Control Instrument
- 6.5.2. Replace High Limit Instrument
- 6.5.3. Replace (Optional) Protocol 3 Controller
- 6.5.4. Replace Heater Unit
- 6.5.5. Replace Fan Motor
- 7. Troubleshooting
- Table 7. Common Technical Issues and Remedies.
- 8. Appendices
- Each oven schematic (Section 0) shows the wiring for this option.
- Each oven schematic (Section 8.4) shows the wiring for this option.
- Each oven schematic (Section 0) shows the wiring for this option.
- Table 8. LBB1-23A-1 Parts.
- Table 9. LBB1-23B-1 Parts.
- Table 10. LBB1-43A-1 Parts.
- Table 11. LBB1-43B-1 Parts.
- Table 12. LBB1-69A-1 Parts.
- Table 13. LBB1-69B-1 Parts.
- Table 14. LBB2-12-1 Parts.
- Table 15. LBB2-18-1 Parts.
- Table 16. LBB2-27-1 Parts.
LBB Series Oven Owner’s Manual MAINTENANCE
Version 15 53
Copyright © 2012 by Despatch Industries.
All rights reserved. No part of the contents of this manual may be reproduced, copied or transmitted in any form or by any
means including graphic, electronic, or mechanical methods or photocopying, recording, or information storage and
retrieval systems without the written permission of Despatch Industries, unless for purchaser's personal use.
a. Remove screws from the heater cover.
b. Remove heater cover from the oven.
5. Loosen setscrews (2) on fan wheel in
middle of oven top. Access the fan wheel
through the heater opening or by
disconnecting and removing the heater
assembly. Refer to Section 6.5.4 for
information on removing the heater unit.
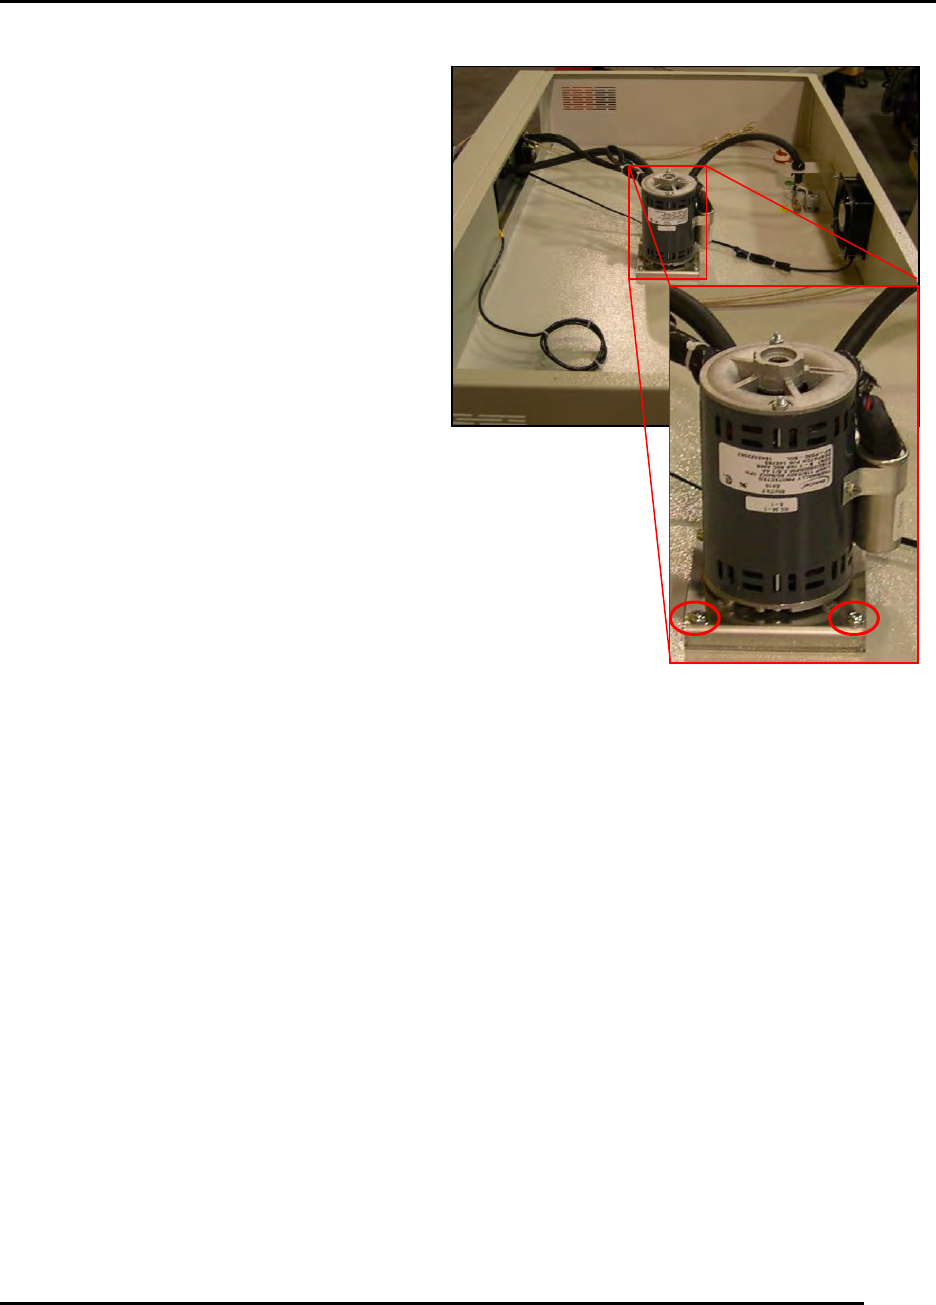
6. Remove top cover to reveal fan motor
(Figure 24).
7. Remove fan motor
a. Disconnect motor leads from circuit
board
b. Unscrew screws (4) holding motor
mounts to body
c. Lift fan motor from oven body.
8. After running at temperature, the fan wheel
may stick to the shaft. Separating the fan
wheel from the fan motor shaft may require
force.
9. Take motor mount off old motor.
10. Put motor mount onto new motor.
11. Replace fan motor.
a. Reattach motor to oven body.
b. Reattach motor lead plug to circuit
board.
12. Replace top cover.
13. Put fan wheel onto shaft from inside of oven.
14. Adjust fan wheel for 3/16-inch clearance between wheel and inlet ring.
15. Tighten setscrews on the fan wheel.
16. Check that setscrews hit the flats machined into the motor shaft.
17. Replace heater pan assembly if removed. Refer to Section 6.5.4 for information on removing
the heater unit.
18. Replace heater cover.
19. Replace side ducts.
20. Replace shelves.
Figure 24. Fan Motor Location and Close-up.