
Installation & Assembly

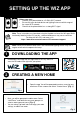

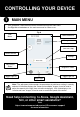


Fig. 7
CONNECTING YOUR FIXTURE
1
PAIRING YOUR DEVICE
• Once you’ve created a room, you will be prompted
to connect your device. Select “Add a Device” from
the home menu. [Fig. 3A]
• If a pop-up appears [Fig. 3B], follow the Bluetooth
pairing steps below.
• Choose “Light,” [Fig. 4] and enter your Wi-Fi password (if
required.) [Fig. 5]
• Following the onscreen instructions, power your light off and
on, then, press “Start” to begin pairing
• When the app connects to your light, a representative icon will
appear on screen. Press “finish.” [Fig. 6]
2
SETTING UP THE LIGHT
• Your light is now connected to the Wiz app.
• Press the settings button located
on the right of the screen, above the
“Brightness and Warmth” sliders. [Fig. 8] (see
next page).
• From this menu [Fig. 7], you can:
A. Rename your light. (to optimize
virtual assistant functionality, keep the
name simple and short)
B. Change room settings.
C. Set Fade in/out.
D. Setup Power Switch.
E. Adjust default brightness
F. Delete the light.
• Setup your device as desired, then proceed to
the next page for information on how to
control your device.
Fig. 3A
Fig. 4
Fig. 5
Fig. 6
A
B
C
E
D
F
Note: To make pairing easier for bluetooth capable lamps, keep bluetooth activated on
your phone during setup.
Bluetooth Pairing
• Some fixtures are able to pair to the Wiz app via bluetooth.
If your fixture is bluetooth enabled, a pop-up will appear
[Fig. 3B].
• Press the “+” button, and follow the onscreen instructions to
pair your fixture.
• If the pop-up does not appear, continue on to the next step.
Fig. 3B