
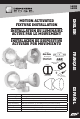
Instructions / Assembly


ENGLISH
INSTALLING THE FIXTURE
Do not remove ANY preinstalled CRIMP CONNECTORS ONLY LOOSE WIRES NEED TO BE CONNECTED
1. Secure the services of a qualied electrician to ensure the installation meets national
and local electrical codes.
2. Use only 120 Volt, 60 Hz power supply
3. The new xture mounts on a standard 4” junction box. Check your junction box size carefully
before attempting to mount xture. If your box is an odd size, you may need to purchase an
additional base in the proper size.
4. To begin installation, take waterproof silicone and place at small bead around the diameter
of the junction box and the back plate of the light xture. The gasket and silicone provide a
double layer of protection against water and future problems.
5. Install the 4” metal strap to your junction box with two screws.
6. Next, slide the black foam gasket over the white, black and green grounding wires.
See diagram
7. Ensure all wire nuts are snug and properly installed
8. Secure the xture to the junction box using the included screw through the center of the
back plate being careful not to pinch any wires. In the event your junction box is deep in
the wall obtain a longer screw from a hardware store. Make sure you match the threads correctly.
9. Adjust the oodlights to the proper angle and tighten the wing nut or locking ring, heads
can usually be tighten or untighten using your ngers
10. Adjust the Motion Sensor to the desired angle and lightly tighten into place. During SET-UP
this most likely will need adjusted again
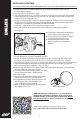
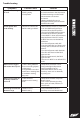
11. Install the water seal gasket (two pieces included)
inside of the lamp holders, see the picture.
12. Install the bulbs.
13. Turn the power back ON by switching the circuit
breaker and wall switch to the ON position
14. The light xture’s circuitry will now warm up and
the ood lights will turn ON and the 4 red
LEDs will be chasing back and forth
15. When complete (approximately 90 seconds) the
ood lights will turn OFF
SCAN to see installation and set-up video or visit:
http://www.colemancable.com/products/product-videos/
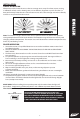
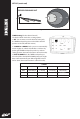
A: Connect the white wire from the xture
to the white wire from the house
B: Connect the black wire from the xture
to the black wire from the house
C: Connect the green wire from the
xture to green (ground) wire from
the house
White to White
Green to Green
Cross Bar
Gasket
Mounting Bolt
Rubber Cap
Black to Black
WARNING: Maintain a minimum of 1.5” (3.8cm) distance
between the light bulbs and motion sensor. Do not point
the bulbs directly at the ceiling due to re hazard. Do not
let bulbs touch ceiling. Keep a minimum of 2” distance
from ceiling.
Water Seal Gasket
4