
Installation Guide


2
Putting Your Fan Together
Hanging Your Ceiling Fan
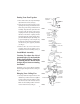
2. Insert the downrod through the center
opening in the canopy and route the motor
leads though the hanger ball/downrod
assembly. Align the clevis pin holes in the
downrod with the holes in the motor
coupling. The clevis pin must pass though
the holes in the motor coupling and the
downrod. Place the washer onto the clevis
pin and install the hairpin clip making sure
to push straight leg of the hairpin clip
through the hole near hanger ball to make
sure the clevis pin is properly installed
(see Fig.2)
1. Securely attach the hanger bracket to the
outlet box by washers and screws supplied.
Connect white wire from ceiling to white
wire from receiver with wire nut. Connect
black wire from ceiling to black wire from
receiver with wire nut (see Fig.5)
1. T
ake off the washer, clevis pin and hairpin
clip from the downrod. (see Fig.1)
3. Remove the 2 set screws in the motor
coupling and securely tighten screws
against the downrod assembly.(see Fig.3)
Install Blade Assembly
Caution: To reduce the risk of
p
ersonal injury. Do not bend the
blade when installing, balancing
or cleaning the fan . Do not insert
foreign objects between rotating
fan blades
Install the screw, washer, blade and blade
bracket toghter & tighten them securely(see
Fig.4)
FIG.1
FIG.2
FIG.3
FIG.4
FIG.5
FIG.6
CANOPY
CANOPY HOLE
COVER
COUPLING
COVER
COUPLING COVER
COUPLING
COVER
WHITE WIRE
BLACK
WIRE
RECEIVER
UNIT
RECEIVER UNIT
HANGER
BRACKET
HANGER
BRACKET
SCREW
SCREW
DOWNROD
WASHER
HAIRPIN
CLIP
HAIRPIN CLIP
CLEVIS PIN
CLEVIS PIN
DOWNROD
ASSEMBLY
DOWNROD
WASHER
WASHER
OUTLET BOX
WASHER
WASHER
WASHER
BLADE
SCREW