
Installation Guide


4
Installing The Light Kit
Caution: Be careful not to touch
t
he glass area of the bulb, hold
with tissue during installation
as oil from your hands can cause
early lamp failure.
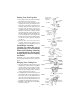
Fan Airflow Direction
2. Plug in the light wires from fan and the
light wires from light kit plate with pin
and plug . Place the light kit plate into
the bottom housing. (see Fig.16)
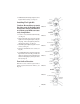
4. P
lug the G9 Bulb into the socket (see
Fig.18)
3. Install the light kit plate using the 3 loosen
screws (see Fig.17)
3. I
nstall the bottom housing using the screws.
Tighten them securely. (see Fig.14)
1. Loosen 3 screws from the bottom housing.
(see Fig.15)
5. C
arefully lift the glass shade up inside the
light fixture as far as it will go. Rotate the
shade in a clockwise (to the right) direction
until it is held tightly in place by the three
tabs (see Fig.19)
Slide the reverse switch to right or left to
obtain opposite direction of airflow. (see
Fig.20)
FIG.14
FIG.15
FIG.16
FIG.17
FIG.18
FIG.19
FIG.20
SCREW
PIN AND PLUG
BULB
SOCKET
LIGHT KIT
PLATE
LIGHT KIT PLATE
SCREW
SCREW
BOTTOM
HOUSING
BOTTOM
HOUSING
BOTTOM
HOUSING
GLASS
COUPLING COVER
REVERSE
SWITCH