
Installation Guide


8
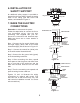
Figure 17
Figure 18
9. ATTACHING THE FAN
BLADES
CAUTION: Remove 5 rubber packing mounts
and discard before installation.
Step 1 Attach the blade to the blade bracket
using the screws and rubber washers as
shown in Figure 17. Start screw into bracket.
Repeat for the two remaining screws.
Step 2 Tighten each screw. Make sure the
blade is straight.
Step 3 Fasten blade assembly to motor using
the screws supplied. (Fig. 17)
10. INSTALLING THE
LIGHT KIT
NOTE: Before starting installation, disconnect
the power by turning off the circuit breaker or
removing the fuse at fuse box. Turning power
off using the fan switch is not sufficient to
prevent electric shock.
1. Remove and discard the plug from the
switch housing. Attach the light kit to the
switch housing by feeding the light kit wires
(black and white) through the hole of switch
housing and then screw it onto the switch
housing by nut & lock washer. Be sure it is
tight enough to prevent light kit from vibrating
loose. (Fig. 18)
2. Locate two single white and blue wires in
the switch housing labeled FOR LIGHT.
Make the polarized plug connections:
- White to white
- Blue to black
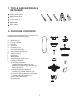
Blade
Blades
bracket
Médaillon
de pale
Screws
Rubber
washers
Screws
Switch housing
Plug
Light kit
Lock washer
Nut