
Installation Guide


9
12. ATTACHING THE
LIGHT BULB AND
GLASS SHADE
WARNING: Shut off the power supply before
removing or replacing lamp. In handling of
halogen bulb, care should be taken not to
touch it with your bare hands. Oil residue will
shorten the life of the halogen bulb. If you
accidentally come into contact, wipe
thoroughly with a clean, lint-free, cotton cloth.
Allow the bulb to cool off for 10 minutes
before changing the bulb. Use light bulb in
accordance with the fan's specification. TO
REDUCE THE RISK OF FIRE DO NOT
EXCEED MAXIMUM WATTAGE RATING.
1. Install 100W halogen bulb J-type (included).
2. Mount the glass shade to the light fixture
by unscrewing partway the thumb screws
on the glass holder, insert the glass, then
gently tighten the thumb screws by hand
evenly to the glass. DO NOT OVER
TIGHTEN. (Fig. 20)
3. Restore power and your light kit is ready
for operation.
Figure 19
Figure 20
11. ATTACHING THE
LIGHT KIT
NOTE: Before starting installation, disconnect
the power by turning off the circuit breaker or
removing the fuse at fuse box. Turning power
off using the fan switch is not sufficient to
prevent electric shock.
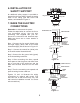
1. Remove the screws from the mounting
plate under the fan motor.
2. While holding the switch housing under
your fan, snap together the wire
connection plug. (Fig. 19)
3. Raise the light kit assembly to the mounting
plate until the holes in switch housing and
mounting plate line up. Reinsert screws to
secure in place. (Fig. 19)
Mount plate
Light kit
assembly
Wire connector
Screws
Glass
shade
Light plate
Bulb
Screws