
Installation Guide


2
Warning : To reduce the risk of fire,
electric shock, or personal injury, mount
to outlet box marked acceptable for fan
support.
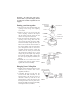
Putting your fan together
1. Pass the three motor leads through the
opening in the canopy and coupling
cover of fan.
2. Remove the two set screws from the
motor coupling. Remove the hairpin
clip & washer from the clevis pin and
remove clevis pin from downrod.
3. Insert the downrod through the center
opening in the canopy and route the
motor leads through the hanger ball/
downrod assembly. Align the clevis pin
holes in the downrod with the holes in
the motor coupling. The clevis pin must
pass through the holes in the motor
coupling and the downrod. Place the
washer onto the clevis pin and install
the hairpin clip making sure to push
straight leg of the hairpin clip through
the hole near hanger ball to make sure
the clevis pin is poroperly installed (see
FIG 1).
4. Reinstall the 2 set screws in the motor
coupling and securely tighten screws
against the downrod assembly.
Hanging Your Ceiling Fan
1. Securely attach the hanger bracket to the
outlet box by washers and screws
supplied (see FIG 2).
2. Carefully lift the fan and seat the
downrod and ball assembly on the
hanger bracket. Be sure the groove in
the ball is lined up with tab on the
hanger bracket. Insert the receiver into
the hanger bracket. Do not pinch wires
between the ball and downrod assembly
and hanger bracket (see FIG 3).
FIG.1
MOTOR LEADS
CANOPY
COUPLING
COVER
WASHER
CLEVIS PIN
HAIRPIN CLIP
COUPLING
METAL UL
LISTED
ELECTRICAL
BOX
HANGER
BRACKET
8-32 ROUND
HEAD
SCREWS
WITH STAR
WASHERS
SUPPLIED
FIG.2
HANGER
BRACKET
DOWNROD
AND BALL
ASSEMBLY
GROOVE IN BALL
METAL UL LISTED
ELECTRICAL BOX
FIG.3
SET
SCREW
FAN
HANGER BALL/
DOWNROD
ASSEMBLY