
User Guide


Chapter 4: Tutorials
A fast way of learning how to control the formatting is to select the Simple
Format button, and then change the various options. The Advanced Format text
is still visible, and it updates every time you make a change to the built-in
formats. Full details are in the Help for this dialog.
Tutorial 11: Setting Up a Microsoft Word Document
When creating a Microsoft Word document containing equations there are
several considerations you should keep in mind. You’ll probably want the body
text to match the equations in terms of fonts and sizes, and you’ll typically want
all equations in the document to use consistent formatting, i.e. the same font and
size settings, as well as any other special settings you may have made in
MathType.
This tutorial shows you how to achieve these goals, and how to update the
document’s equations if you decide to change your fonts and/or sizes.
Word’s Styles
If you’re not familiar with
Word’s styles we urge
you to take a few
minutes to learn how to
use them. In Word’s
Help Contents, search
for styles.
Factory Settings
Click “Factory settings”
to reset the values.
Equation Preferences
The definitions of all the
styles, sizes, and
spacing used in an
equation are referred to
collectively as “equation
preferences”. See
Chapter 7 for more
details.
Although Word and MathType allow you to select text and change its font and
size directly, we strongly recommend that you make use of styles, instead. Both
programs use this approach because it makes modifying the look of a document
or equation very easy. You simply change the definition of a style (e.g. from
Times New Roman to Arial, or from 12 pt plain to 10 pt italic), and your
document or equation is immediately reformatted with the new settings.
Let’s assume that you’re required to produce a document where the body font is
10 pt Times New Roman. The first step is to define MathType’s settings to match
the Word document.
1. In MathType, open the Define Styles dialog and set the main font to Times
New Roman using either the Simple or Advanced pane. Make sure the “Use for
new equations” box is checked, and click OK.
2. Open the Define Sizes dialog and set the Full size to 10 pt. As the other
dimensions are by default expressed as percentages, MathType will calculate
them for you. Again, check the “Use for new equations” option, and click OK.
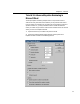
3. Back in Word, choose the Set Equation Preferences command on the
MathType menu. Make sure the “MathType’s ‘New Equation’ preferences”
option is selected. This means that whenever you create a new equation using
the commands on the MathType menu or MathType toolbar, the settings
MathType is currently set to use for new equations are the ones that will be used.
Click OK to close this dialog.
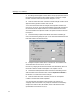
Note: you may not always want to rely on MathType’s ‘New Equation’
preferences. If you tend to change MathType’s size and style definitions quite
often, you may want to create a MathType preference file, and then choose this
file in the Set Equation Preferences dialog. This will copy the file’s preferences
into your Word document, so that no matter what changes you make to
51