
User Guide


MathType User Manual
38
Selecting a Slot
You can double-click in
a slot to select its
contents, or type
CTRL+SHIFT+S.
10.
To save time, we’re going to create the second equation by modifying a copy
of the first one. Select the entire first equation by double-clicking somewhere
near its
≤ sign, copy it to the clipboard, and then paste it into the new empty slot.
You should now have two identical copies of the first equation, one directly
beneath the other. Now just edit the lower copy to produce the second equation.
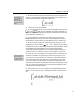
To change the
φ
to a
ψ
, just select the
φ
and press CTRL+G followed by y.
11. Finally, we’re going to experiment with some different ways of aligning the
two equations. You can center or right-justify them by using the Align Center
and Align Right commands on the Format menu. Give this a try, just to see how
it looks.
12. In fact, you will probably want to align these two equations so that their ≤
signs are directly above one another. To do this, we choose the Align at =
command from the Format menu. It will work even though we have
≤ signs
rather than = signs. You can align the equations in other ways by using
alignment symbols. You simply insert an alignment symbol in each equation at
the two points that you’d like to have aligned. (However, note that alignment
symbols inserted into template slots will not work.) Placing an alignment symbol
to the right of each of the two
≤ signs would give the same results as using the
Align at = command, for instance. The alignment symbol is represented by the
icon in the Symbol Palettes — it’s located in the palette.
13. You may also want to adjust the line spacing, or leading, i.e. the amount of
vertical space between the two equations. You can do this by placing the
insertion point somewhere in the outermost slot of the second equation (not
within a template), or by selecting the second equation, and choosing the Line
Spacing command from the Format menu. When you’ve arranged them to your
liking, the equations are complete.
Now that we’re done with these equations, it’s time to choose Select All from the
Edit menu and press B
ACKSPACE to clear your window for the next tutorial.
Tutorial 7: A Simple Matrix
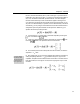
In our next tutorial, we illustrate MathType’s powerful capabilities for laying out
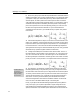
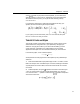
matrices. We will construct the following matrix equation:
11 12
21 22
() det( )
aa
p
aa
λ
λλ
λ
−−
=−=
−−
IA
The matrix is a fairly simple one, and we’ll be able to create it very easily by
using a matrix template. If you need more flexible formatting capabilities for
matrices and tabular layouts, you should use tabs, as illustrated in Tutorial 11.
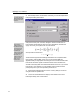
1. Type the first few terms of the equation, up to the second equals sign.
MathType will recognize that “det” is an abbreviation for the determinant