
User Guide


Chapter 4: Tutorials
37
Show Nesting
The Show Nesting
command on the View
menu shows the
different slots and can
help you avoid making
mistakes.
One-Shot Shortcuts
The shortcuts that affect
just the next character
typed are described in
more detail in Chapter 7.
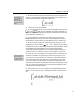
3.
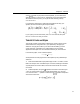
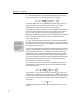
Move the insertion point out of the integrand slot, into the position shown
below. You must do this for the alignment commands to work properly. Don’t
create the rest of the equation within the integrand slot.
4. Click on the ≤ sign in the Small Bar.
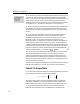
5. Now we want to build the “lim sup” structure. We begin by clicking on the
icon in the
Palette. This icon represents an underscript template: any
characters entered in the upper slot will be full size, and those in the lower slot
will be reduced to “subscript” size.
6. The insertion point is positioned in the upper slot, so you can type in
limsup. MathType will use your “Function” style (probably a plain style) for
these characters, and will insert a thin space between the “lim” and the “sup”.
7. Move the insertion point down into the lower slot by clicking in it or by
pressing the T
AB key, and enter n→∞. The → and ∞ symbols are very common
in mathematics, so they’ve been added to MathType’s default Small Bar. They’re
also available in the Symbol Palettes, of course. Following typesetting
conventions (as always), MathType will not create any spacing around the
→
symbol, since it is in a “subscript,” but you can insert spaces, if you want to.
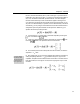
8. Press TAB to move the insertion point out of the lower slot, and type in the
rest of this first equation. The speedy way to do this is to just type C
TRL+G f
C
TRL+L n TAB ( a ). If you like the CTRL+G shortcut, you may be interested to
know that there are a few others that work in a similar fashion. If you press
C
TRL+U, for example, the next character you type will be assigned the User 1
style that you have defined with the Define command on the Style menu. In this
way, you can access any character in any font with just two keystrokes, even if
it’s not present in the Symbol Palettes.
9. Press the ENTER key. This will create a new line directly beneath the first
equation, so now you have a “pile” consisting of two lines. It should look like
this: