
User Guide


Chapter 3: Basic Concepts
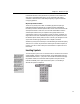
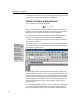
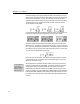
The equations in the first row below show four different insertion point
positions, and the four pictures in the second row show the result of typing an m
into the expression in each case:
Moving the Insertion Point
As described previously, you can use the TAB key to move the insertion point
through all of an equation’s slots. Holding down the S
HIFT key moves the
insertion point in the reverse direction. You can also use the arrow keys for
moving the insertion point more precisely.
The rules for using the arrow keys are somewhat tedious to describe (and to
read, no doubt) — it’s easier to experiment with a couple of equations to
understand the behavior. Here’s a quick guide to how they work.
Roughly speaking, pressing the L
EFT ARROW key moves the insertion point one
character to the left, and R
IGHT ARROW moves one character to the right. If the
next character is a template, the insertion point moves into the template’s first
slot. If there are no more characters in a template slot to move over, the insertion
point will move out of the template.
If you hold down the C
TRL+SHIFT key combination while pressing the arrow
keys, the insertion point will move over templates; it will not move into a
template’s first slot.
The U
P ARROW and DOWN ARROW keys move the insertion point up and down
between lines or template slots. The up and down directions are generally
determined by the physical location of each slot, but when templates are nested
within templates, the template hierarchy may take precedence, and not every
slot may be passed through.
The H
OME key moves the insertion point to the beginning of the current slot, the
E
ND key moves it to the end. The PAGE UP and PAGE DOWN keys scroll the
MathType window up and down respectively, but do not actually move the
insertion point.
17