
User Guide


MathType User Manual
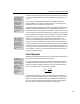
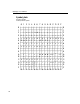
Using the same example, there are three possible settings for fence alignment:
3
A
B
M
PR
H
Q
+
+
−
−
or
3
A
B
M
PR
H
Q
+
+
−
−
or
3
A
B
M
H
PR
Q
+
+
−
−
Changing Alignment
You can also change
alignment by placing the
insertion point inside the
fence template, and
typing CTRL-SHIFT-A.
Use this keyboard
shortcut to rotate among
all three options,
stopping on the one that
looks best.
Use the Toolbar
Drag characters that you
expect to use a lot onto
the toolbar. Once on the
toolbar, you can insert a
character by just clicking
on it.
Notice the positions of the math axis outside of the braces, the math axis inside
of the braces, and the center of the brace character itself. Each choice has its own
advantages and disadvantages, and the correct selection will most likely depend
on the expression inside the braces and its relationship with the rest of your
equation.
You can also choose the fence alignment setting that will be used for new fence
templates using the Fence Alignment command. Remember, no matter which
fence alignment setting a template starts out with, you can still change it later on
a template-by-template basis.
Changing the Font of Individual Characters
The fonts used in equations are generally based on MathType’s system of styles,
but you can also assign any font available on your computer to specific
characters in an equation. For example, you may want to incorporate characters
such as the M or X from Euclid Fraktur into your equations. Or, you may have
some font containing technical symbols used occasionally in your documents.
You can incorporate special fonts into your equations by using the User 1 and
User 2 styles, or the Other command on the Style menu. Assigning the font to
one of the User styles is often the more convenient approach, because you can
then access the font by choosing the corresponding style from the Style menu,
perhaps via a keyboard shortcut. The User 1 and User 2 styles are described
further in Chapter 7.
The Other command on the Style menu allows you to assign any font to selected
(or subsequently typed) characters. When you choose the command, a dialog box
appears with a list of available fonts. You simply select the desired font and then
choose the OK button. For example, suppose you wanted to insert the !
character from the Wingdings font. This character corresponds to the v keystroke
in this font (see the next paragraph). So, to insert the character, you would type a
v and select it, then choose Other from the Style menu and select Wingdings.
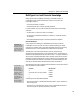
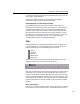
The Insert Symbol command on the Edit menu can help you determine the
keystrokes corresponding to characters in a given font. The Insert Symbol dialog
displays a table of all the characters in a specified font. When you click on a
character, the corresponding keystroke is indicated in the lower right-hand
corner of the window. Some of the keystrokes are of the form “A
LT+0123” with
various numbers in the place of 0123. This means that to insert the character, you
106