
User's Manual


17
Connected Blu-Ray Disc Player
www.insigniaproducts.com
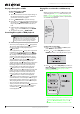
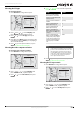
3 Press or to select BD-Live Internet Access,
then press ENTER.
4 Press one or more times to select the access
level you want. You can select:
• Limit Access—Allows Internet access with
valid “BD-Live” network access approval.
• Always Allow Access—Always allows BD-Live
Internet access.
• Prohibit Access—Never allows BD-Live
Internet access.
5 Press to go to the previous menu, or press
SETUP to return to the root menu.
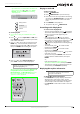
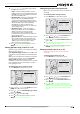
Viewing available BD-Live storage space
To view available BD-Live storage space:
1 Press SETUP. The Settings menu opens.
2 Press , press or to select System, then
press ENTER. The System menu opens. The
available storage space is displayed next to
BD-Live Storage.
3 Press to go to the previous menu, or press
ENTER to access the option and and delete
stored information. Review comment said to
change the text in red above to "to select
Internal or USB.” This does not seem to make
sense. Please explain.
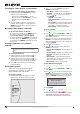
Erasing BD-Live storage
To erase BD-Live storage:
1 Press SETUP. The Settings menu opens.
2 Press , press or to select System, then
press ENTER. The System menu opens.
3 Press or to select Erase BD-Live Storage,
then press ENTER.
4 Press or to select OK, then press ENTER. All
bookmarks and BD-live content saved in
memory are deleted.
5 Press to go to the previous menu, or press
SETUP to return to the root menu.
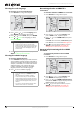
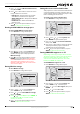
Setting the screen saver activation time
Your player has a screen saver feature that turns the
screen black when your player is inactive. You can
set the amount of time you want your player to wait
before activating the screen saver.
To set the screen saver activation time:
1 Press SETUP. The Settings menu opens.
2 Press , press or to select System, then
press ENTER. The System menu opens.
3 Press or to select Screen Saver Duration,
then press ENTER.
4 Press one or more times to select the amount
of time you want the player to wait before
activating the screen saver feature.
5 Press to go to the previous menu, or press
SETUP to return to the root menu.
Turning HDMI CEC support on or off
Depending on the TV, you may be able to use the
TV remote control to control some of your player’s
functions and the player’s remote control to
controls some of the TV’s functions. To use this
feature, turn HDMI CEC support on.
To turn HDMI CEC support on or off:
1 Press SETUP. The Settings menu opens.
2 Press , press or to select System, then
press ENTER. The System menu opens.
3 Press or to select CEC Support, then press
ENTER.
4 Press or to select On or Off.
5 Press to go to the previous menu, or press
SETUP to return to the root menu.
Settings
System
Opt ical Disc Auto Play
BD- Live Internet Access
BD- Live Storage
Erase B lu-ray Storage
Scr een Saver D urat ion
CEC support
Reset Settings
Update Via Netwo rk
On
Always Allow
Internal (12 MB Free)
5 M inutes
O
Required St orage:84 MB
Language
Audio
Parent al
System
Network
Displa y