
DIRECT-VENT FIREPLACE OWNER'S OPERATION AND INSTALLATION MANUAL PENINSULA MODELS (V)DVF36 TPNA-A(-HA)/TPNPA-A/TPNEA-A/TPNPEA-A SEE-THRU MODELS (V)DVF36 TSTA-A(-HA)/TSTPA-A/TSTEA-A/TSTPEA-A


www.desatech.com
56131-F14
VENTING INSTALLATION
INSTRUCTIONS
Continued
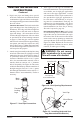
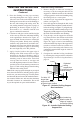
For vinyl siding,
stucco, or wood exteriors, a siding standoff
must be installed between the vent cap and
exterior wall. The siding standoff prevents
excessive heat from damaging siding materials.
Siding materials must be cut to accommodate
standoff. Bolt the vent cap to the standoff.
Apply non-hardening mastic around outside
edge of the standoff. Position the standoff/cap
assembly in the center of the square hole and
attach to exterior wall with wood screws pro-
vided (see Figure 20). The siding standoff must
sit ush against the exterior fascia material.
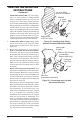
5. Slide
interior wall restop over vent pipe before
connecting horizontal run to vent cap (see
Figure 21).
6. Make final connection to vent terminal.
Flush or recessed with short vent system:
Vent system may be pre-sized. Check for nal
t and slide unit into framing with restop in
place. This is helpful when using rigid pipe
and round vent termination. Vent may be
preconnected and slipped through restop.
Make sure the 45° connection at unit is tight
and does not come loose before unit is nailed
to framing.
Vent
pipe must be manipulated at outer end to make
nal connection. Manually secure pipe inside
open framing. If this is a retrot installation in
an inaccessible space, you may have to secure
the outer end of vent pipe with wall straps and
tap screws at outer end.
When using tap screws with rigid pipe, be sure
that screws do not penetrate inner pipe. These
procedures may also be followed by exible
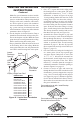
pipe installations. To use exible pipe, vent
must be drawn through end restop, cut back
to 6"-8" to permit easy connection of ex
termination and connection must be slipped
back into and secured to installation. You
must use an adequate number of spring spac-
ers at ends and closest bend to termination to
prevent kinks or collapsing on the re. Do not
use screws with ex pipe. Vent system must
be code inspected and released before adding
dry wall or other surface treatments.
Figure 20 - Installing Vinyl Siding
Standoff (Combustible Exterior Wall)
Cut Vinyl Siding
Away to Fit Standoff
Wood
Screw
Bolt
Standoff
Vent
Cap
Apply Mastic
to All Four Sides
Vent Cap
(Horizontal Termination)
Interior Wall
Surface
Interior Wall Firestop
(Combustible
Exterior Wall Only)
Horizontal
Vent Pipe
Figure 21 - Connecting Vent Cap with
Horizontal Vent Pipe
Screw