VENTED DECORATIVE NATURAL GAS LOGS OWNER’S OPERATION AND INSTALLATION MANUAL TESTED AND LISTED BY RGA 2-72 APPROVED BRENTWOOD MODELS LCF18 AND LCF24 WARNING: If the information in this manual is not followed exactly, a fire or explosion may result causing property damage, personal injury or loss of life. — Do not store or use gasoline or other flammable vapors and liquids in the vicinity of this or any other appliance. — WHAT TO DO IF YOU SMELL GAS • Do not try to light any appliance.
WARNING: Improper installation, adjustment, alteration, service or maintenance can cause injury or property damage. Refer to this manual for correct installation and operational procedures. For assistance or additional information consult a qualified installer, service agency or the gas supplier. WARNING: This appliance is for installation only in a solid-fuel burning masonry or UL127 factory-built fireplace, constructed of noncombustible material and connected to a working flue.
SAFETY INFORMATION WARNING: This product contains and/or generates chemicals known to the State of California to cause cancer or birth defects or other reproductive harm. WARNING: Keep flue open when operating unit. IMPORTANT: Read this owner’s manual carefully and completely before trying to assemble, operate or service this log set. Improper use of this log set can cause serious injury or death from burns, fire, explosion, electrical shock and carbon monoxide poisoning.
SAFETY INFORMATION Continued 1. If you smell gas • shut off gas supply • do not try to light any appliance • do not touch any electrical switch; do not use any phone in your building • immediately call your gas supplier from a neighborʼs phone. Follow the gas supplierʼs instructions • if you cannot reach your gas supplier, call the fire department 2.
UNPACKING INSTALLATION CAUTION: Do not remove the data plates from the burner pan. The data plates contain important product information. CAUTION: Do not remove the data plates attached to the burner pan. The data plates contain important warranty information. 1. Remove logs, hearth kit, pan materials, and hardware from carton. 2. Remove all protective packaging applied to logs and base for shipment. 3. Check all items for any shipping damage.
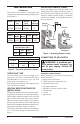
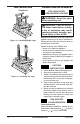
INSTALLATION INSTALLING DAMPER CLAMP Continued The fireplace must include a working flue and venting system with the minimum openings shown in the Figure 2. Model Burner Description BTU Input (Natural Gas) Min. Vent Opening LCF18 18" Dual 55,000 8" LCF24 24" Dual 60,000 8" Secure the damper stop clamp provided to the leading edge of the damper as shown in Figure 3.
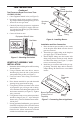
INSTALLATION Continued CAUTION: Use only new, black iron or steel pipe. Internally-tinned copper tubing may be used in certain areas. Check your local codes. Use pipe of 1/2" diameter or greater to allow proper gas volume to log set. If pipe is too small, undue loss of volume will occur. Installation must include a equipment shutoff valve, union, and plugged 1/8" NPT tap. Locate NPT tap within reach for test gauge hook up. NPT tap must be upstream from log set (see Figure 4).
INSTALLATION Nut Continued Test Pressures Equal To or Less Than 1/2 PSIG (3.5 kPa) 1. Close equipment shutoff valve (see Figure 5). 2. Pressurize supply piping system by either using compressed air or opening main gas valve located on or near gas meter. 3. Check all joints from gas meter to equipment shutoff valve (see Figure 5). Apply noncorrosive leak detection fluid to gas joints. Bubbles forming show a leak. 4. Correct all leaks at once.
INSTALLATION INSTALLING THE GRATE AND LOGS Continued OPTIONAL GA9050A ON/OFF SAFETY VALVE/PILOT KIT For additional convenience and safety, or for propane/LP conversion, an optional ON/OFF safety valve/pilot kit is available. See Accessories, page 18. WARNING: You must use a ON/OFF safety valve/pilot kit for propane/LP conversion. TESTING BURNER FOR LEAKS 1. Generously apply noncorrosive leak detection fluid to all connections. WARNING: Never check for gas leaks with open flame. 2.
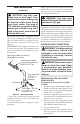
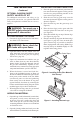
OPERATING APPLIANCE INSTALLATION Continued FOR YOUR SAFETY READ BEFORE LIGHTING WARNING: Keep flue open when operating unit. WARNING: If you do not follow these instructions exactly, a fire or explosion may result causing property damage, personal injury or loss of life. Figure 10 - Installing Middle Logs BEFORE LIGHTING smell all around the appliance area for gas. Be sure to smell next to the floor because some gas is heavier than air and will settle on the floor.
OPERATING APPLIANCE Continued Shutting Off Appliance Turn gas shutoff valve clockwise OFF position. to the CURING LOGS During the 2-3 hour appliance break-in period, you may detect an odor from the appliance as the various paints and compounds used in the manufacturing of this log set cure. This is a normal and temporary situation that is not cause for alarm. However, you may want to provide extra ventilation to the room during this time.
CLEANING AND MAINTENANCE • Keep the area around the log set clean and clear of debris. • Occasionally, you may use a soft bristle brush to clean logs. • Once every year a qualified agency or certified chimney sweep should examine and clean the venting system of the fireplace. SERVICE HINTS When Gas Pressure is Too Low • pilot will not stay lit • burners will have delayed ignition • appliance will not produce specified heat You may feel your gas pressure is too low.
TROUBLESHOOTING WARNING: Turn off log set and let cool before servicing. Only a qualified service person should service and repair log set. Note: All troubleshooting items are listed in order of operation. OBSERVED PROBLEM POSSIBLE CAUSE REMEDY Log set is smoking/sooting ex- 1. Poor fuel quality cessively (Note: It is natural and unavoidable for vented gas log 2. Fireplace venting system not sets to produce moderate levels drafting properly of carbon (soot) where flames 3.
TROUBLESHOOTING Continued OBSERVED PROBLEM POSSIBLE CAUSE REMEDY When ignitor button is pressed, 1. Gas supply turned off or equipthere is spark at pilot but no igniment shutoff valve closed 2. Control knob not in PILOT tion (GA9050A Only) position 3. Control knob not pressed in while in PILOT position 4. Air in gas lines when installed 1. Turn on gas supply or open equipment shutoff valve 2. Turn control knob to PILOT position 3. Press in control knob while in PILOT position 4.
TROUBLESHOOTING Continued WARNING: If you smell gas • Shut off gas supply. • Do not try to light any appliance. • Do not touch any electrical switch; do not use any phone in your building. • Immediately call your gas supplier from a neighbor’s phone. Follow the gas supplier’s instructions. • If you cannot reach your gas supplier, call the fire department. IMPORTANT: Operating log set where impurities in air exist may create odors.
ILLUSTRATED PARTS BREAKDOWN MODELS LCF18 AND LCF24 16 18 19 17 15 20 14 9 9 10 7 12 11 5 1 6 4 13 16 8 3 2 www.desatech.
PARTS LIST This list contains replaceable parts used in your log set. When ordering parts, follow the instructions listed under Replacement Parts on page 12 of this manual. KEY NO. PART NUMBER LCF18 LCF24 DESCRIPTION QTY.
ACCESSORIES Purchase these log set accessories from your local dealer. If they can not supply these accessories, call DESA at 1-866-672-6040 for referral information. You can also write to the address listed on the back page of this manual. INDIVIDUAL SPLIT LOG - GA9550A (Not Shown) For decorative purposes only. Not to be used as additional logs on unit. PINE CONES - GA9650A (Not Shown) For all models. Use for additional decoration only. (3 pine cones per box).
NOTES _____________________________________________________ ______________________________________________________ ______________________________________________________ ______________________________________________________ ______________________________________________________ ______________________________________________________ ______________________________________________________ ______________________________________________________ ______________________________________________________ ___________
WARRANTY INFORMATION KEEP THIS WARRANTY Model Serial No. Date Purchased Always specify model and serial numbers when communicating with the factory. We reserve the right to amend these specifications at any time without notice. The only warranty applicable is our standard written warranty. We make no other warranty, expressed or implied.