Industrial Endoscope DS600 Multi-Language User Manual
Catalog EN 01 - 06 DE 07 - 12 IT 13 - 18 FR 19 - 24 ES 25 - 30 JP 31 - 36
EN Product manual DEPSTECH® DS600 industrial endoscope was featured as a cost efficient industrial endoscope with 4.3” digital screen, which was invented to help car maintenance or pipeline repairing. We hope that you can use this efficient tool to enable you to finish the job more rapidly and help you discover the delights of miniature worlds. Battery Please do not try to change the built-in battery yourself, it may raise the risks of leading the battery overheat or get people harmed.
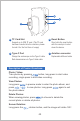
Product introduction 1 7 2 6 4 1 Power Button 5 3 2 “ Hold this button for 2s to power on / off the endoscope.
9 10 8 11 8 TF Card Slot Support up to 32G TF card. (The TF card has been inserted into the machine, please format it for the first time of usage) 9 Type-C Port 10 Reset Button Short click the reset button with the reset pin to shut down the device.
Lens Switching (only applicable to double-lens products): Long press the dual-lens. button to switch among main lens, side lens and Lens LED Brightness Adjustment: Click the key to lower the brightness, and click the increase the brightness. key to Screen freeze: When previewing the interface, click the button to freeze the frame. Copy photo and video files to computer: 1. Use a TF card reader to copy data directly 2. Use a Type-C cable to connect to computer for copying Setting path a.
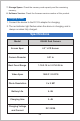
. Storage Space: Check the memory card capacity and the remaining memory; 8. Software Version: Check the firmware version number of this product. Charging Guide: 1. Connect the device to the DC 5V adapter for charging; 2. The red indicator light flashes when the device is charging, and is always on when fully charged. Specifications Model DS600 Dual Camera Screen Spec 4.3” LCD Screen Camera Diameter 0.31 in Best Focal Range 1.18-3.15 in / 0.79-2.
FAQ Q1: The image quality wasn't that good as advertised? A1: Please adjust the length between the camera and the object that you’re observing into the focal range. The focal range should be 1.18”~3.15” for single camera version, and 1.18”~3.15” / 0.79”~2.36” in for dual camera version. Besides, it’s essential to adjust the brightness of your endoscope for the best image quality. It will do a great help if you wipe the lens of the camera regularly after used.
DE Produkthandbuch Das DEPSTECH® DS600 Inspektionskamera wurde als kosteneffizientes Inspektionskamera mit 4,3" - Digitalbildschirm entwickelt, das bei der Wartung von Autos oder der Reparatur von Rohrleitungen eingesetzt werden kann. Wir hoffen, dass dieses effiziente Werkzeug Ihre Arbeiten vereinfachen und Ihnen bei der Entdeckung der Miniaturwelten helfen kann.
Produkteinführung 1 7 2 6 4 1 Power-Taste 3 5 2 “ Halten Sie die Taste für 2 Sekunden gedrückt, um das Endoskop einzuschalten / auszuschalten.
9 10 8 11 8 TF-Kartensteckplatz 9 Typ-C-Port Unterstützt bis zu 32G TF-Karten.
Einstellung der LED-Helligkeit des Objektives: Klicken Sie auf die Taste, um die Helligkeit zu verringern, drücken Sie die Taste, um die Helligkeit zu erhöhen. Bildschirm einfrieren: Klicken Sie die Taste , um das Echtzeitbild einzufrieren. Foto- und Videodateien auf den Computer kopieren: 1. verwenden Sie einen TF-Kartenleser, um Daten direkt zu kopieren 2. verwenden Sie ein Typ-C-Kabel zum Anschluss an einen Computer zum Kopieren Einstellungspfad a. Schließen Sie das Gerät an Ihren Computer an. b.
6. Zeiteinstellung: Rufen Sie die Schnittstelle für Zeiteinstellung auf, drücken Sie , um das Jahr, den Monat, den Tag, die Stunde, die Minute und die Sekunde auszuwählen, die eingestellt werden sollen, drücken Sie die / Taste, um die Zeit einzustellen, und drücken Sie die Taste, um die Einstellung zu verlassen; 7. Speicherplatz: Die Kapazität der Speicherkarte und der verbleibende Speicherplatz können angezeigt werden; 8.
Meist gestellte Fragen F1: Die Bildqualität war nicht so gut wie beworben? A1: Bitte passen Sie die Distanz zwischen der Kamera und dem zu beobachtende Objekt, an den Brennweitenbereich an. Der Brennweitenbereich soll bei der Ein-Kamera-Version 3~8 cm betragen und 3~8 cm / 2~6 cm bei der Dual-Kamera-Version betragen. Außerdem ist es wichtig, dass Sie die Helligkeit Ihres Endoskops für die beste Bildqualität einstellen.
IT Manuale del prodotto L’endoscopio industriale DEPSTECH® DS600 è stato presentato come un endoscopio industriale economico con schermo digitale da 4.3 pollici, che è stato inventato per aiutarti per la manutenzi_x0002_one dell’auto o la riparazione delle condutture. Speriamo che tu possa utilizzare questo strumento di efficienza per risparmiare un po 'di tempo da solo, oltre ad aiutarti a scoprire un po 'di felicità intorno a te.
Introduzione al prodotto 1 7 2 6 4 1 Pulsante di accensione 3 5 2 “ Si prega di tenere premuto questo pulsante per 2 secondi per accendere / spegnere 3 ” Pulsante OK / Riproduci Conferma la scelta / premere a lungo per entrare nell'album o uscire dall'album / fare clic per riprodurre o mettere in pausa; 4 a: Regolazione dell'ora b: Nella modalità menu, seleziona la directory successiva c: Fare clic per attenuare la luminosità del LED d: Premere 2 secondi per ruotare l'immagine di 180° 5 “ a: R
9 10 8 11 9 Porta di tipo C 8 Slot per schede TF Supporta schede TF fino a 32 GB. (La scheda TF è stata inserita nella macchina, formattarla per la prima volta di utilizzo) Caricare l'endoscopio tramite il cavo di tipo C Trasmissione dati tramite cavo dati di tipo C 10 Pulsante di ripristino Fare clic brevemente sul pulsante di ripristino con il pin di ripristino per spegnere il dispositivo 11 Porta di ricarica micro-USB Caricare l'endoscopio tramite cavo micro-USB.
Regolazione della luminosità del LED dell’obiettivo: Fai clic sul pulsante per diminuire la luminosità, fai clic sul pulsante per aumentare la luminosità. Blocco schermo: Durante l'anteprima dell'interfaccia, fare clic sul pulsante bloccare la cornice. per Copia i file di foto e video sul computer: 1. Utilizzare un lettore di schede TF per copiare direttamente i dati 2. Utilizzare un cavo Type-C per connettersi al computer per copiare Percorso di impostazione a.
6. Impostazione dell’ora: accedi all’interfaccia di impostazione dell’ora, premi il pulsante per selezionare l’anno, il mese, il giorno, l’ora, i minuti e i secondi da regolare, premi il pulsante / per regolare l’ora, al termine dell’impostazione, puoi premere il pulsante per uscire. 7. Spazio di archiviazione: è possibile controllare la capacità della scheda di memoria e la memoria rimanente. 8. Versione software: è possibile visualizzare il numero di versione del firmware di questo prodotto.
Domande Frequenti Q1: La qualità dell’immagine non era buona come pubblicizzata? A1: Regola la lunghezza tra la fotocamera e l’oggetto che stai osservando nella gamma focale. La gamma focale dovrebbe essere 3~8 cm per la versione con telecamera singola e 3~8 cm / 2~6 cm per la versione con doppia fotocamera. Inoltre, è essenziale regolare la luminosità del tuo endoscopio per la migliore qualità dell’immagine. Sarà di grande aiuto se pulisci regolarmente l’obiettivo della fotocamera dopo l’uso.
FR Manuel du produit l'Endoscope Industriel de DS600 de DEPSTECH® est un endoscope industriel économique doté d'un écran numérique de 4,3 pouces, dont le but est d'aider à l'entretien des voitures ou à la réparation des pipelines. Nous espérons que cet outil amusant vous permettra de terminer votre travail plus rapidement et vous aidera à découvrir le plaisir du monde miniature. Batterie Veuillez ne pas essayer de changer la batterie interne par vous-même.
Présentation du produit 1 7 2 6 4 5 1 Bouton d'alimentation 3 2 “ 3 “ ” Button 4 “ a: Réglage de l'heure b: Dans le mode menu, sélectionnez le répertoire suivant c: Cliquez pour diminuer la luminosité de la LED d: Appuyez 2 secondes pour faire pivoter l'iamge à 180° 5 “ ” Bouton OK / Lecture Confirmez le choix / Appuyez longuement pour entrer dans l'album ou quitter l'album / Cliquez pour lire ou mettre en pause Maintenez ce bouton enfoncé pendant 2 secondes pour allumer / éteindre l'endoscope
9 10 8 11 8 Emplacement pour carte TF 9 Port de type C Prend en charge une carte TF jusqu'à 32G.
Réglage de la luminosité de LED de l'objectif: Appuyez sur le bouton de une fois pour baisser la luminosité. Appuyez sur le bouton de pour élever la luminosité. Gel de l'écran: Lors de la prévisualisation de l'interface, cliquez sur le bouton figer le cadre. pour Copiez les fichiers photo et vidéo sur l'ordinateur: 1. utiliser un lecteur de carte TF pour copier directement les données 2. utiliser un câble Type-C pour se connecter à un ordinateur pour la copie. Chemin de réglage a.
6. Réglage de temps: Entrez à l’interface de réglage de temps. Pressez le bouton d’ pour sélectionner l’année, le mois, le jour, l’heure, la minute et la seconde à régler. Pressez sur le bouton de / pour régler le temps. Après l’achèvement de réglage, vous pouvez quitter en pressant le bouton de . 7. Espace de stockage: Vous pouvez vérifier la capacité de la carte de mémoire et la mémoire restante. 8. Version de logiciel: Vous pouvez vérifier le numéro de version du microprogramme de ce produit.
FAQ Q1: La qualité d'image n'était-elle pas aussi bonne que celle annoncée? A1: Veuillez ajuster la longueur entre la caméra et l'objet à observer dans la plage de focales. La plage de longueur focale de la version à caméra unique doit être de 3~8 cm, et la plage de longueur focale de la version à double caméra doit être de 3~8 cm / 2~6 cm. De plus, la luminosité de l'endoscope doit être ajustée pour obtenir la meilleure qualité d'image.
ES Manuel du produit El endoscopio industrial DEPSTECH® DS600 se presentó como un endoscopio industrial rentable con pantalla digital de 4,3 ”, que se inventó para ayudar al mantenimiento del automóvil o la reparación de tuberías. Esperamos que pueda utilizar esta eficaz herramienta para permitirle terminar el trabajo más rápidamente y ayudarle a descubrir las delicias de los mundos en miniatura.
Introducción del producto 1 7 2 6 4 5 3 1 Botón de encendido Mantenga presionado este botón durante 2 segundos para encender / apagar el endoscopio.
9 10 8 11 9 Puerto tipo C 8 Ranura para tarjeta TF Cargue el endoscopio a través del cable tipo C Transmisión de datos mediante cable de datos tipo C Admite tarjetas TF de hasta 32G. (La tarjeta TF se ha insertado en la máquina, formatéela por primera vez) 10 Botón de reinicio Haga clic corto en el botón de reinicio con el pin de reinicio para apagar el dispositivo.
Congelación de pantalla: Al obtener una vista previa de la interfaz, haga clic en el botón Aceptar para congelar el marco. Copie archivos de fotos y videos a la computadora: 1. Utiliza un lector de tarjetas TF para copiar los datos directamente 2. Utiliza un cable Type-C para conectarte al ordenador para copiar Ruta de ajuste a. Conecte el producto a su ordenador b. Pulse el botón "MENU" para entrar en el menú c. Seleccione "Transmisión de datos". d.
5. Reinicio del sistema: Ingrese a la interfaz de reinicio del sistema, elija si desea restaurar la configuración de fábrica y luego presione para confirmar. 6. Configuración de la hora: Ingrese a la interfaz de configuración de la hora, presione la tecla para seleccionar el año, mes, día, hora, minuto y segundo a ajustar, presione la tecla / para ajustar la hora, después de completar la configuración, puede presionar la tecla para salir. 7.
Preguntas más frecuentes P1: ¿La calidad de la imagen no fue tan buena como se anunciaba? R1: Ajuste la distancia entre la cámara y el objeto que está observando en el rango focal. El rango focal debe ser de 3~8 cm para la versión de una sola cámara, y 3~8cm / 2~6 cm adentro para la versión de cámara dual. Además, es esencial ajustar el brillo de su endoscopio para obtener la mejor calidad de imagen. Será de gran ayuda si limpia la lente de la cámara con regularidad después de su uso.
JP 製品マニュアル DEPSTECH® DS600工業用内視鏡は、4.
製品説明 1 7 2 1 電源ボタン 6 4 3 5 このボタンを 2 秒間押し続けると、内視鏡の電源がオン / オフになります。 2 3 5 OK / 再生ボタン 選択を確認 / 長押ししてアルバムに入るか、 アルバムを終了します / クリック して再生または一時停止します。 a: 時間調整 b: メニューモードで、次のディレクトリを選 択します c: クリックして LED の明るさを暗くします d: 2 秒間押して画像を 180° 回転させます 4 写真撮影 / ビデオ録画ボタン a: 時間調整 b: メニューモードで、前のディレ クトリを選択します c: クリックして LED の明るさを 明るくします d: 2 秒押してレンズを変更します このボタンを長押ししてビデオ録画を開始し、1 回押すと写真を撮る / 終了します。 ビデオ記録。 6 メニュー ボタン クリックしてメニューに入り、 さらに設定を行います。 7 充電ステータス LED インジケーター 赤色LEDインジケーター点滅:充電状態 赤色のLEDインジケーターが点灯したまま:充電が終了しました 緑色のL
9 10 11 8 TF カード スロット 最大 32G の TF カードをサポートします。 (TF カードはマシンに挿入されています。 初めて使用する場合はフォーマットしてく ださい) 10 リセットボタン 8 9 Type-Cポート Type-Cケーブルを介して内視 鏡を充電します Type-Cデータケーブルを介し たデータ伝送 リセットピンでリセットボタンを短くクリックして、 デバイスをシャットダウンします 11 航空コネクタ 交換可能な別のケーブル 製品機能説明: 撮影/録画: ボタンを押すと撮影、長押しで録画を開始、1回押すと録画を終了。 写真の表示: プレビューモードで キーを長押ししてアルバムに入り、 / キーを押して写真を表示、 アルバムを終了するには再び キーを長 押しする。 写真削除: キーを押すと、現在の写真を削除するか、 すべての写真を削 除するかを選択でき、 キーを再び押すと、 アルバムに戻る。 画面回転: キーを長押しすると、 メイン/サブレンズとダブルレンズが同時 に表示される。 レンズ切り替え(デュアルレンズ製品のみ): ボタンを長押ししてメイン
レンズの輝度調整: キーをクリックして輝度を下げ、 上げる。 キーをクリックして輝度を 画面がフリーズする: インターフェイスをプレビューするときは、 レームをフリーズします。 ボタンをクリックしてフ 写真とビデオのファイルをパソコンにコピーする: 1. TFカードリーダーを使用してデータを直接コピーする 2. Type-Cケーブルを使用してコンピュータに接続してコピーします 設定パス a. 本製品をパソコンに接続してください b.「MENU」ボタンを押すと、 メニューに入ります c.「データ転送」を選択 d.「OK」 キーを押してコンピュータへのコピーを開始します パソコンと接続していない場合、設定画面の 「データ転送 」をクリッ クすると、USBのロゴが表示されますので、 「MENU」ボタンを押して 終了してください。 メニュー画面紹介: メニューインターフェイスに入る: キーを1回押してメニューインターフェイスに入る。 / キー を押してオプションを選択し、 キーを押してオプションインターフェ イスに入る。終了するには、 キーをもう一度1回押す。 1.
5. システムリセット:システムのリセットインターフェイスで、工場出荷 時の設定に戻すかどうかを選択し、 を押して確認。 6. 時間設定:時間設定インタフェースに入り、 キーを押して調整が 必要な年月日時分秒を選択し、 / キーを押して時間を調整で き、設定が終わったら キーを押して終了。 7. 記憶空間:メモリカードの容量とメモリ残量を確認できる。 8. ソフトウェアバージョン:この製品のファームウェアバージョン番号を 確認できる。 充電ガイド: 1. 充電のためにデバイスを DC 5V アダプターに接続します。 2. デバイスが充電中は赤いインジケータライトが点滅し、完全に充電され ると常に点灯します。 型番 仕様 DS600 Dデュアルカメラ 4.3インチ液晶画面 スクリーンスペック カメラ直径 7.
よくある質問と答え Q1: 宣伝されているほど画質が良くなかったのですか? A1: カメラと観察対象物の間の距離を焦点距離に合わせて調整してくだ さい。焦点範囲は、 シングルカメラバージョンの場合は3~8 cm、 デュア ルカメラバージョンの場合は3~8 cm / 2~6 cmです。さらに、最高の画 質を得るには、内視鏡の明るさを調整することが不可欠です。使用後 は定期的にカメラのレンズを拭くと大変助かります。 Q2: 内視鏡の電源が入らなかったのですか? A2: 特に寒冷地では、 バッテリー残量が少ないことが原因である可能性が あります。 バッテリー残量が少ない状態を解除するには、内視鏡を完 全に充電する必要があります。内視鏡を4~5時間充電し、もう一度オ ンにしてみてください。 Q3: 内視鏡は写真を撮ったりビデオを録画したりできませんか? A3: まず、TFカードが本機に挿入されているかどうかを確認してください。 次に、初回使用時にTFカードをフォーマットしたことを確認します。 以下の手順に従ってください。 1. メニューを短く押します。 2.
※ FCC Requirement: Changes or modifications not expressly approved by the party responsible for compliance could void the user’s authority to operate the equipment. This device complies with Part 15 of the FCC Rules. Operation is subject to the following two conditions: (1) this device may not cause harmful interference, and (2) this device must accept any interference received, including interference that may cause undesired operation.
Customer Services Please contact us if you have any questions, we love to hear from you www.depstech.com support@depstech.com support.uk@depstech.com support.de@depstech.com support.jp@depstech.com Facebook Official Page: @DEPSTECH. FANS Shenzhen Deepsea Innovation Technology Co., Ltd. Room 1901-1902, Jinqizhigu Building, No.