
Operation Manual


Swap: Swap two channels' position.
Select the channel, and press RED button, then select the channel you want to swap, and
press ENTER button to swap.
Insert: Insert a channel.
Select the channel, and press Green button to pick-up, then select the position you want the
channel to be inserted to, and press ENTER button.
Copy: Copy a channel.
Select the channel, and press YELLOW button to copy, then select the position you want the
channel to be copied to, and press ENTER button.
Delete: Delete a channel.
Select the channel, and press BLUE button to delete the channel.
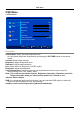
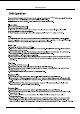
5. PC menu
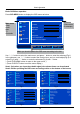
Channel Freq System Name Skip
1 - - - - - - - - - On
2 90.75 B/G - - - On
3 - - - - - - - - - On
4 - - - - - - - - - On
5 - - - - - - - - - On
6 - - - - - - - - - On
7 - - - - - - - - - On
8 - - - - - - - - - On
Program Edit
Select Back
Adjust
MENU
/ENTER
Swap Insert Copy Delete
Program Edit: Select a channel to manual scan as the picture below.
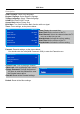
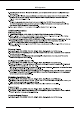
Video
Audio
Misc
TV
Geometric
Select Back Adjust
MENU
/ENTER
H/V Position: Adjust the transverse/vertical position of the screen.
Manual Clock : Adjust the pixel clock frequency, until the image size is maximized for the screen.
Phase: Adjust the phase of the ADC sampling clock relative to the sync signal, until a stable
image is obtained.
Auto Setting: Press button to setup the parameter of the screen automatically
.
H Position 0
V Position 50
Manual Clock 50
Phase 50
Auto Setting
OSD Menu
15