26” Wide Screen LCD TV with DVD player TFD-2622 USER’S MANUAL
Contents Contents Caution Safety Information 2 3 Unit and Accessories Product Feature 4 4 Introduction 1. Front View 2. Rear View 3. Remote Control 5-8 5 6 7 Basic Operation 9-10 OSD Menu 1. Video menu 2. Audio menu 3. Misc menu 4. TV menu 5.
Caution Caution 7KH OLJKWHQLQJ ÀDVK ZLWK DUURZKHDG V\PERO ZLWKLQ DQ HTXLODWHUDO WULDQJOH is intended to alert the user to the presence of un-insulated "dangerous YROWDJH ZLWKLQ WKH SURGXFWV HQFORVXUH WKDW PD\ EH RI VXI¿FLHQW PDJQLWXGH to constitute a risk of electric shock to the persons.
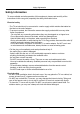
Safety Information Safety Information 7R HQVXUH UHOLDEOH DQG VDIH RSHUDWLRQ RI WKLV HTXLSPHQW SOHDVH UHDG FDUHIXOO\ DOO WKH LQVWUXFWLRQV LQ WKLV XVHU JXLGH HVSHFLDOO\ WKH VDIHW\ LQIRUPDWLRQ EHORZ Electrical safety 7KH 79 VHW VKRXOG RQO\ EH FRQQHFWHG WR D PDLQV VXSSO\ ZKLFK PDWFKHV WKDW VWDWHG RQ WKH ODEHO RQ WKH PDLQV DGDSWRU 7R SUHYHQW RYHUORDG GRQ W VKDUH WKH VDPH PDLQV VXSSO\ VRFNHW ZLWK WRR PDQ\ RWKHU LWHPV RI HTXLSPHQW 'R QRW SODFH DQ\ FRQQHFWLQJ ZLUHV ZKHUH WKH\ PD
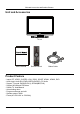
Unit and Accessories and Product Feature Unit and Accessories TV set User's manual Remote control Mains Cable Product Feature - Inputs: RF, VIDEO, S-VIDEO, VGA, YPbPr, SCART, HDMI1, HDMI2, DVD - Audio Input: Audio R/L(YPbPr/VIDEO/SVIDEO), PC Audio - Support TV mode: PAL(B/G,D/K,I), SECAM(B/G,D/K) - Support NICAM and FM Stereo - Search TV: Auto/Manual - Auto-shutting down - Program exchange and edit - Speaker output: 2x6W - Power(AC 100-240V 50/60Hz) 4
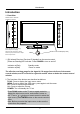
Introduction Introduction 1. Front View Please insert a 12cm disc according to the silk PLAY: Play/Pause the disc playing STOP: Stop the disc playing NEXT: Play the next track or chapter PREV: Play the previous track or chapter Remote control window(keep clear) Power Led indicator EJECT: Eject the disc 1. (IR) Infrared Receiver: Receives IR signals from the remote control. (Power on/Standby)LED Indicator: Press POWER to turn on and off.
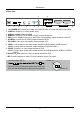
Introduction 2. Rear View 7 8 Pb AC POWER IN 1 SWITCH 2 USBfor update 3 Pr 4 5 6 R in L in Video R in L in Y 9 1 2 10 1. 2. 3. 4. 5. 6. 7. 8. AC POWER IN: Connect to an earth 100-240V,50-60Hz AC outlet with the Power Cable. SWITCH: Switch on or off the power suply. USB-for update:Software update. HDMI1/2: Connect it to the HDMI of DVD or other equipment. VGA: For PC display.Connect it to the D-Sub 15 pins analog output connector of the PC.
Introduction 1. POWER: Turn the TV on or turn it standby 2. MUTE: Silence status or cancel 3. TV/AV: Source select 4. 0-9, -/--: Choose channel 6. DISPLAY: Display playing status 7. RETURN: Do to play the latest program 8. VOL+/-: Volume up/down 9. CH+/-: Channel up/down CH+/-, : Cursor buttons for OSD operation ENTER: Confirmation 10. SYS MENU: TV system menu 11. SYS-EXIT: Exit from the OSD menu 12. SOUND: Select the sound mode 13. PICTURE: Select the picture mode 14. TIMER: Time shutting down 12.
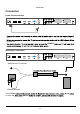
Connection Connection Power Cord Connection Pb AC POWER IN SWITCH USBfor update Pr R in L in Video R in L in Y 1 2 1 2 on. 5) lights red.
Basic Operation Basic Operation Power on/off 1. Connect to the power with a power code, and turn on the switch. 2.-To turn on the TV Press POWER button on the TV or remote control. -To turn off the TV Press POWER button on the TV or remote control. Main: Input Source select Press TV/AV button on the TV set or remote control to display the input source menu, and use P+/- button on the TV set or / button on remote control to select the input source, press ENTER button on the remote control to enter.
Basic Operation Basic OSD Menu operation Press SYS-MENU button to display the OSD menu as below: Video Main menu Video Audio Misc TV Geometric Audio Misc Picture Mode Vivid Contrast 65 Brightness 53 Saturation 72 Submenu (Video menu for example) Hue TV Geometric Sharpness 4 Color Temperature Normal Advance Picture Adjust Select Back Adjust MENU /ENTER Hint---you should operate the OSD menu according to the hint.
OSD Menu OSD Menu 1. Video menu Video Audio Misc Picture Mode Vivid Contrast 65 Brightness 53 Saturation 72 Hue TV Geometric Sharpness 4 Color Temperature Normal Advance Picture Adjust Select Back Adjust MENU /ENTER Description Picture Mode: Select your desired picture mode. You may select the picture mode directly by pressing the PICTURE button on the remote control. Contrast: Adjust image contrast. Brightness: Adjust image black level. Saturation: Adjust image saturation.
OSD Menu 2. Audio menu Video Audio Misc Sound Mode User Bass 50 Treble 50 Balance 0 Surround Off TV Geometric Select Back Adjust MENU /ENTER Description Sound Mode: Select your desired picture mode. You may select the sound mode directly by pressing the SOUND button on the remote control. Bass: Adjust the level of the lower-pitched sounds. Treble: Adjust the level of the higherpitched sounds. Balance: Adjust the audio output between left and right speakers.
OSD Menu Description OSD Language: Select OSD language. Region Language: Select Region Language. Teletext Language: Select Teletext language. SCART1/2: Select SCART mode . Aspect Ratio: Adjust Picture Size. Blue Mute: Turn on/off the Blue Back function while no signal. Timer: Timer settings, as the picture below. Time 00:13:24 Start Time 00:00:00 Start Channel 001 Start Activate 0ff Start Time Stop Activate 00:00:00 Off Time: Display the current time. Start Time: Set the on time of the TV.
OSD Menu 4. TV menu Video Audio Misc Region Selection Auto Search Manual Scam Update Search Program Edit TV Geometric Select Back Adjust MENU /ENTER Region Selection: Select Region Language. Auto Search: Start auto searching. Note: When the TV is auto tunning, you could press SYS-MENU button to stop auto tunning and return to preview menu. Searching 0 46.87 MHz 0% Stop MENU Manual Scan: Select a channel to manual scan as the picture below. Manual Scan 1 45.
OSD Menu Program Edit: Select a channel to manual scan as the picture below. Program Edit Channel Freq System Name Skip 1 --- --- --- On 2 90.75 B/G --- On 3 --- --- --- On 4 --- --- --- On 5 --- --- --- On 6 --- --- --- On 7 --- --- --- On 8 --- --- --- On Swap Insert Select Copy Back Delete MENU Adjust /ENTER Swap: Swap two channels' position.
DVD Operation TV/AV EJECT 16
DVD Operation 17
DVD Operation 18
DVD Operation 19
DVD System Operation ENTER ENTER 20
DVD System Operation 21
Disc Care 22
Simple Troubleshooting Simple Troubleshooting ,I WKH GLVSOD\ IDLOV RU SHUIRUPDQFH GUDPDWLFDOO\ GHWHULRUDWHV FKHFN WKH 'LVSOD\ LQ DFFRUGDQFH ZLWK WKH IROORZLQJ LQVWUXFWLRQV 5HPHPEHU WR FKHFN WKH SHULSKHUDOV WRSLQSLRQW WKH VRXUFH RI WKH failure. ,I WKH GLVSOD\ VWLOO IDLOV WR SHUIRUP DV H[SHFWHG FRQQHFW \RXU KHOSOLQH IRU DVVLVWDQFH No power - Check all connections to the TV.
Electric and electronic equipment and included batteries contains materials, components and substances that can be hazardous to your health and the environment, if the waste material (discarded electric and electronic equipment and batteries) is not handled correctly. Electric and electronic equipment and batteries is marked with the crossed out trash can symbol, seen below.