24” LED TV WITH DVD & MPEG2 DVBT Model NO.
Contents Contents Caution Safety Information 2 3 Introduction 1. Front View 2. Rear View 3. Remote Control 4-7 4 5 6-7 Basic Operation 8 OSD Menu 1. PICTURE menu 2. SOUND menu 3. FUNCTION menu 4. TV menu 5.
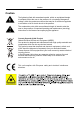
Caution Caution The lightening flash with arrowhead symbol, within an equilateral triangle is intended to alert the user to the presence of un-insulated "dangerous voltage" within the products enclosure that may be of sufficient magnitude to constitute a risk of electric shock to the persons. The exclamation point within an equilateral triangle is intend to alert the user to the presence of important operating and maintenance (servicing) instructions in the literature accompanying the appliance.
Safety Information Safety Information To ensure reliable and safe operation of this equipment, please read carefully all the instructions in this user guide, especially the safety information below. Electrical safety • The TV set should only be connected to a mains supply which matches that stated on the label on the mains adaptor • To prevent overload, don't share the same mains supply socket with too many other items of equipment.
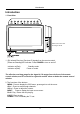
Introduction Introduction 1. Front View Please insert a 12cm disc according to the silk 1. (IR) Infrared Receiver: Receives IR signals from the remote control. (Power on/Standby)LED Indicator: Press POWER to turn on and off. Indicator on(Red) Indicator on(Null) Standby mode Power on mode The effective receiving range for the signal is 5-8 metres from the front of the remote control window, and 300 to the left or right side and 200 above or below the remote control window. 2.
Introduction 2. Rear View USB SCART POWER: Connect to the mains adaptor. USB: For software upgrade only. HDMI: Connect it to the HDMI of DVD or other equipment. VGA: For PC display.Connect it to the D-Sub 15 pins analog output connector of the PC. PC-IN: Connect it to the audio output terminal of PC. SCART: Connect them to the SCART video output terminal of DVD.(used in component source) Headphone: Connect it to your headphone or other audio equipment. Coax: Digital coaxial output.
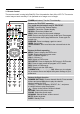
Introduction 3. Remote Control The remote control is using Infra-Red(IR). Point it towards the front of the LCD TV. The remote control may not work correctly if it is operated out of range or out of angle. POWER(red button): Turn the TV on/standby. TV/AV Buttons for TELETEXT operating You could use the buttons only in TELETEXT . TV/TXT: Turn off/on the Teletext display. CANCEL: Cancel the Teletext display. REVEAL: Reveal any hidden text. HOLD: Hold or carry on the current subpage.
Introduction TV/AV Buttons for DVD functions : Eject the disc. : Play/pause DVD program. : Stop DVD program. : DVD fast reverse. : DVD fast forward. : DVD previous chapter. : DVD next chapter. LANGUAGE: Select DVD disc language. ZOOM: Adjust picture size in DVD mode. SUBTITLE: Select DVD disc subtitle. MENU (PBC): DVD play list/Disc menu ANGLE: Select DVD picture angle. TITLE: DVD title. GOTO: Play your favorite title/chapter/track. PROGRAM: Edit the program and play.
Basic Operation Basic Operation Power on/off 1. Connect to the power supply with a power code and an adaptor(page 9). 2.-To turn on the TV Press POWER button on the TV or remote control. -To turn off the TV Press POWER button on the TV or remote control.
OSD Menu OSD Menu 1. PICTURE menu(TV mode for example) PICTURE PICTURE MODE PERSONAL BRIGHTNESS 50 CONTRAST 50 COLOUR 50 SHARPNESS 5 TINT 50 COLOUR TEMPERRATURE MOVE NORMAL ADJUST MENU EXIT Description PICTURE MODE: Select between STANDARD, MOVIE, MILD, GAME, PERSONAL. You may select the picture mode directly by pressing the PICTURE button on the remote control. Personal: You can adjust the Brightness ,Contrast, Colour, Sharpness to your own taste.
OSD Menu 2. SOUND menu(TV mode for example) SOUND SOUND MODE PERSONAL BASS 50 TREBLE 50 BALANCE 0 MOVE ADJUST MENU EXIT Description SOUND MODE: Select between: STANDARD, MUSIC, VOICE, THEATRE, PERSONAL. You may select the sound mode directly by pressing the SOUND button on the remote control. BASS: Low frequencies intensity. TREBLE: High frequencies intensity. BALANCE: Left and right stereo audio channels balance.
OSD Menu 3. FUNCTION menu(TV mode for example) FUNCTION LANGUAGE ENGLISH VIDEO SIZE FULL TT LANGUAGE WEST EURO SLEEP TIME OFF OSD TIME Press ∧ / ∨ button 30 SECONDS BLUE SCREEN the items hidden. to display ON RESET MOVE ADJUST MENU EXIT CHILD LOCK INSTALLATION HOTEL MODE Description LANGUAGE: Select the OSD language. VIDEO SIZE: Select screen size between FULL, 4:3,or AUTO(Auto could be select only in SCART mode). TT LANGUAGE: Select TEXT language(Used in TV mode only).
OSD Menu INSTALLATION: Enter the FIRST TIME INSTALLATION menu by pressing > button on the item. Change the settings according to your actual conditions, and select "YES" item to start auto tuning, or select "NO" to cancel.
OSD Menu 4. TV menu(TV mode) TV COUNTRY OTHER AUTO TUNING MANUAL TUNING CHANNEL EDIT MOVE ADJUST MENU EXIT Description COUNTRY: Select Country for tuning. AUTO TUNING: Pressing > button on the item, then select "YES" and press OK button to start auto tuning, or select "NO" to cancel. MANUAL TUNING: Enter the MANUAL TUNING menu by pressing > button on the item. MANUAL TUNING CHANNEL 001 SOUND SYSTEM BG COLOUR SYSTEM PAL AFT OFF MANUAL TUNING 800.
OSD Menu FAV,SKIP,LOCK: Select the desired channel with ∧ / ∨ button, and operate with GREEN, YELLOW, BLUE buttons, press the color button again to cancel the operation. FAV: Press GREEN button on the remote control to set the channel as favorite channel. SKIP: Press YELLOW button on the remote control to skip the channel. The channel that is skipped can not be programed when you scan channels with CH+/button. LOCK: Press BLUE button on the remote control to lock the channel.
OSD Menu 5. DTV menu(DTV mode) DTV CH. MANAGE AREA OTHER AUTO TUNING MANUAL TUNING ADVANCED SETTING TIMER NATIVE GAME MOVE ADJUST MENU EXIT Description CH. MANAGE: Enter the CH.MANAGE menu by pressing > button on the item. DTV\CHANNEL MANAGE CH. ORGN. CH. SORT CH. GROUP DEL TV CH. DEL RADIO CH CH. ORGN: Enter the Channel Organizer menu by pressing > button on the item. Fav: Set the favorite channel by RED button. Del: Delete the channel by GREEN button.
OSD Menu CH.GROUP: Enter the Channel Grouping menu by pressing > button on the item. You could grouping the channels by selecting the group number (1-8) you can see on the right. DEL TV CH.: Press OK button and select YES to delete all TV channels, or select NO to cancel. DEL RADIO CH.: Press OK button and select YES to delete all radio channels, or select NO to cancel. AREA: Select the suitable area.
OSD Menu 6. HDMI/YPbPr menu(HDMI/YPBPR mode) HDMI/YPBPR H POCITION V POSITION POSITION RESET MOVE ADJUST MENU EXIT Description H POSITION: Adust the horizon position of the picture. V POSITION: Adust the vertical position of the picture. POSITION RESET: Press > button to reset the setings above. 7. PC menu(PC mode) PC H POCITION V POSITION PHASE CLOCK AUTO SYNC MOVE ADJUST MENU EXIT Description H POSITION: Adust the horizon position of the picture.
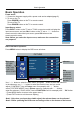
Media operation Media operation 1. Connect the USB device to the USB jact on the back of the TV(page 6), 2. Press INPUT button on the TV set or remote control to display the input source menu, and use CH+/- button on the TV set or ∧ / ∨ button on remote control to select "MEDIA", press OK button on the remote control to enter, and the screen will display as the picture below. Use < / > button to select between MOVIE, MUSIC, PHOTO. and press OK button to enter.
Media operation FILE MANAGER: Press OK button to enter the FILE MANAGE menu. You can play the file by press RED button; Delete the file by pressing GREEN button; Delete all files by pressing YELLOW button; Press BLUE button to zoom the picture or out of ZOOM. DEVICE LIST: Press OK button to enter the DEVICE LIST menu to see the device information. SUBSCRIBE: Press OK button to enter the WAKEUP TIMER menu to set the Wakeup Timer. 1. Select the channel group from the tabel; 2.
DVD Operation DVD Basic Operation Turn on your TV then use the TV/AV button on the remote control or on the TV to select DVD mode. If there is no disc in the DVD players the screen will show “NO DISC”. Place a disc Insert a disc according to the silk. Do not touch the playing surface. automatically draw the disc into the player. To "Eject" the disc, press the " " (EJECT)button on the remote control or on the TV.
DVD Operation Subtitles 1. Compatible with DVD, SVCD discs. 2. Press the Subtitle button on the remote once, and the subtitle info banner appears 3. When a DVD or SVCD is recorded with subtitles, you can use the Subtitle feature to view the subtitles on-screen. By default, subtitles are off. The info banner will display Subtitle Off. 4. To display subtitles, press the Subtitle button again.
DVD Operation DVD System Setup change them again. General Steps of Setup Menu 1. Pause or Stop the player. Press DVD-SETUP on the remote control. The main menu will be shown as below. 2. Press the ∧ / ∨ button to select the Icon of the desired section, e.g. “TV System" and press > button to open that section. 3. Press ∧ / ∨ to select the desired feature and again press > button to open that section. 4. Press ∧ / ∨ to select the desired feature and then press "OK" to select the new setting.
DVD Operation "0000". Using the ∧ / ∨ button, move the highlight to "PASSWORD", press > the button and enter "0000". You will see the padlock symbol open. You may now change the RATING or put in a new password number. If the Lock symbol is BLUE you must press > the button to enter the Please remember or write down the new Password and keep safe. RATING The Rating feature is a rating limit feature, like movie ratings. This helps you to control what DVD the family watches.
Simple Troubleshooting Simple Troubleshooting If the display fails or performance dramatically deteriorates check the Display in accordance with the following instructions.Remember to check the peripherals topinpiont the source of the failure. If the display still fails to perform as expected,connect your helpline for assistance. No power - Check all connections to the TV. - Press either the power button or the Standby button on the Remote control.
Electric and electronic equipment and included batteries contains materials, components and substances that can be hazardous to your health and the environment, if the waste material (discarded electric and electronic equipment and batteries) is not handled correctly. Electric and electronic equipment and batteries is marked with the crossed out trash can symbol, seen below.