
Operation Manual


102
5
Enter the setting.
The Option Setup Menu reappears.
CH SEL
ENTER
(Main unit) (Remote control unit)
1
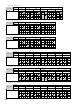
1.Channel Setup
2.Power Amp Assign
3.Volume Control
4.Trigger Out
5.AC Outlet Assign
6.Setup Memory/Lock
Exit
7.Option Setup
Select “Power Amp Assign” at the Option Setup
Menu.
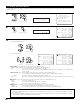
2
Display the Power Amp Assign screen.
Normal
*P.Amp Assign
P.Amp Assign
*Option Setup
CH SEL
ENTER
(Main unit) (Remote control unit)
CH SEL
ENTER
(Main unit) (Remote control unit)
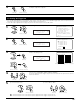
3
Select the Amp Assign mode according to the speaker system you want to achieve.
One of the following modes can be selected: “Normal”, “+Zone2”, “+Zone3”, “+Zone4”,
“+Zone2/3”, “+Zone3/4”, “+Zone2/4”, “+Zone2/3/4”, “Bi-Amp Front”, “Bi-Amp”,
“Advanced” and “Adv+Front B”.
For details of the “Amp Assign Mode”, see page 103.
CH SEL
ENTER
(Main unit) (Remote control unit)
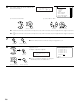
4
If “Advanced” or “Adv+Front B” is selected at step 3, the power amplifiers can be assigned freely to the desired channels.
q Select the power amplifier to be assigned. w Select which channel to assign the power
amplifier to.
CH SEL
ENTER
(Main unit) (Remote control unit)
CH SEL
ENTER
(Main unit) (Remote control unit)
7−2.Power Amp Assign
Amp Assign Mode
Advanced
L1: FL R1: FR
L2: C R2: −−−−
L3: SL A R3: SR A
L4: SL B R4: SR B
L5: SBL R5: SBR
L1: FL
*P.Amp Assign
7−2.Power Amp Assign
Amp Assign Mode
Normal
L1: FL R1: FR
L2: C R2: −−−−
L3: SL A R3: SR A
L4: SL B R4: SR B
L5: SBL R5: SBR
NOTE:
• Selectable mode will vary, depending on the numbers of free amplifiers.