
User's Guide


110
7
Select “Exit” then press the ENTER button at the AC
Outlet screen.
The Option Setup Menu reappears.
Exit
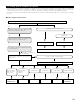
*AC Outlet
AC Outlet 1
AC Outlet 2
AC Outlet 3
Default
Exit
7−5.AC Outlet
Ye s
(Main unit)
CH SEL
ENTER
(Remote control unit)
CH SEL
ENTER
(Main unit)
(Remote control unit)
If “Yes” is selected for “Default”, the setting are
automatically reset to the default values.
7-6. Protecting the setting and memory backup
1
1.Channel Setup
2.Power Amp Assign
3.Volume Control
4.Trigger Out
5.AC Outlet Assign
6.Setup Memory/Lock
Exit
7.Option Setup
Select “Setup Memory / Lock” at the Option Setup
Menu.
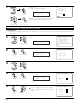
2
Display the Setup Memory / Lock screen.
User Memory
Setup Lock
Exit
7−6.Setup Memory/Lock
User Memory
*Memory/Lock
Memory/Lock
*Option Setup
CH SEL
ENTER
(Main unit) (Remote control unit)
CH SEL
ENTER
(Main unit) (Remote control unit)
3
Select “User Memory” at the Setup Memory / Lock screen.
[1] User Memory
• The currently set settings (system setup, surround parameters, etc.) can be stored in the memory. The stored settings can be called out
when needed.
CH SEL
ENTER
(Main unit) (Remote control unit)
4
Switch to the User Memory screen.
Save
Exit
7−6.User Memory
Ye s
Save : Yes
*User Memory
CH SEL
ENTER
(Main unit) (Remote control unit)
5
To store the settings in the memory, select “Yes”.
Once the settings are stored in the memory,
“Load” is displayed and the settings can be
loaded.
CH SEL
ENTER
(Main unit) (Remote control unit)
Load
Save
Exit
7−6.User Memory
Ye s
Ye s