AV SURROUND RECEIVER AVR-1306 OPERATING INSTRUCTIONS BEDIENUNGSANLEITUNG MODE D’EMPLOI ISTRUZIONI PER L’USO INSTRUCCIONES DE OPERACION GEBRUIKSAANWIJZING BRUKSANVISNING
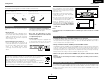
SVENSKA CAUTION RISK OF ELECTRIC SHOCK DO NOT OPEN CAUTION: ESPAÑOL ITALIANO FRANCAIS The exclamation point within an equilateral triangle is intended to alert the user to the presence of important operating and maintenance (servicing) instructions in the literature accompanying the appliance. TO REDUCE THE RISK OF FIRE OR ELECTRIC SHOCK, DO NOT EXPOSE THIS APPLIANCE TO RAIN OR MOISTURE.
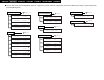
ENGLISH DEUTSCH FRANCAIS ITALIANO ESPAÑOL NEDERLANDS SVENSKA 2 System setup menu / Systemsetup-Menü / Menu de configuration système / Menu di configurazione del sistema / Menú System Setup / System Setup-menu / Systeminställningsmeny Speaker Configuration *Front *Center *Surr. page 11, 12 Subwoofer Mode Crossover Frequency page 13 Auto Surround Mode page 15 *Auto Surr. ON Large *SW Mode Norm *Cr.Over 180Hz Small Ext. In Subwoofer Level page 15 Small *Ext.
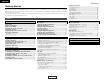
ENGLISH Getting Started Getting Started Thank you for choosing the DENON AVR-1306 A/V Surround Receiver. This remarkable component has been engineered to provide superb surround sound listening with home theater sources, such as DVD, as well as providing outstanding high fidelity reproduction of your favorite music sources. As this product is provided we recommend with an immense array of features, before you begin hookup and operation that you review the contents of this manual before proceeding.
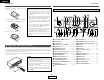
ENGLISH Getting Started Getting Started Accessories Cautions on installation Noise or disturbance of the picture may be generated if this unit or any other electronic equipment using microprocessors is used near a tuner or TV. If this happens, take the following steps: • Install this unit as far away as possible from the tuner or TV. • Run the antenna wires from the tuner or TV away from this unit’s power supply cord and input/output connection cables.
ENGLISH Getting Started Getting Started Inserting the batteries Part names and functions q Remove the remote control unit’s rear cover. w Set two R6P/AA batteries in the battery compartment in the indicated direction. e Put the rear cover back on. Notes on batteries: • Replace the batteries with new ones if the set does not operate even when the remote control unit is operated nearby the unit. (The included batteries are only for verifying operation.
ENGLISH Getting Started Remote control unit Easy Operation For details on the functions of these parts, refer to the pages given in parentheses ( ).
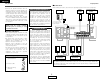
ENGLISH Easy Operation Easy Operation 2 Connections Speaker connections When making connections, also refer to the operating instructions of the other components. • Connect the speaker terminals with the speakers making sure that like polarities are matched (< with <, > with >). Mismatching of polarities will result in weak central sound, unclear orientation of the various instruments, and the stereo image being impaired.
ENGLISH Easy Operation Easy Operation Connecting a DVD player and monitor TV Connecting the power supply cord • To connect the digital audio output from the DVD player, you can choose from either the coaxial or optical connections. If you choose to use the coaxial connection, it needs to be assigned. For more information about Digital Input Assignment ( page 15).
ENGLISH Easy Operation INPUT SELECTOR SPEAKER A POWER ON/STANDBY Easy Operation Turning on the power Playing the input source MASTER VOLUME SELECT SURROUND MODE ON/SOURCE 1 2 3 Turn on your subwoofer. 1 Select the input source to be played. Example: DVD Turn on your monitor (TV). Press the POWER switch. ¢ ON: The power turns on and the indicator lights. Set the POWER switch to this position to turn the power on and off from the included remote control unit.
ENGLISH Connecting Other Sources Connecting Other Sources Cable indications The hookup diagrams on the subsequent pages assume the use of the following optional connection cables (not supplied).
ENGLISH Connecting Other Sources Connecting Other Sources Connecting a TV/DBS tuner Connecting a video camera or video game To connect the digital audio output from the TV or DBS tuner, you can choose from either the coaxial or optical connections. If you choose to use the coaxial connection, it needs to be assigned. For more information about Digital Input Assignment ( page 15).
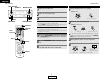
ENGLISH Connecting Other Sources Connecting Other Sources Connecting a tape deck, CD recorder or MD recorder Connecting the antenna terminals An FM antenna cable plug can be connected directly to the unit. Tape deck / CD recorder / MD recorder Direction of broadcasting station AM loop antenna (Supplied) AUDIO OUT A L L L R R R FM antenna AUDIO IN A L L R R L 75 Ω/ohm COAXIAL cable R NOTE: • Do not connect two FM antennas simultaneously.
ENGLISH System Setup Setting the Speaker Configuration System Setup The composition of the signals output to each channel and the frequency response are adjusted automatically according to the combination of speakers actually being used. Use System Setup to customize a variety of settings to suit your listening environment. For the contents of a system menu and the initial setting of this unit ( page 16). Front display • You can change the settings using the buttons on the remote control unit.
ENGLISH System Setup 4 System Setup Press the CURSOR F or G button to select your subwoofer setting, then press the ENTER or CURSOR H button to enter the settings and switch to the Delay Time setting. *Subwoofer Yes Yes Setting the Delay Time Input the distance between the listening position and each speaker to set the delay time for the surround playback. Preparations: Measure the distances between the listening position and the speakers.
ENGLISH System Setup System Setup 2 Crossover Frequency Setting the Subwoofer Mode and Crossover Frequency Set the subwoofer mode and crossover frequency mode according to the speaker system being used. 1 Press the CURSOR F or G button to select the subwoofer mode, then press the ENTER or CURSOR H button to enter the setting and switch to the crossover frequency setting.
ENGLISH System Setup System Setup Setting the Test Tone • Use this setting to adjust to that the playback level between the different channel is equal. • From the listening position, listen to the test tones produced from the speakers to adjust the level. • The level can also be adjusted directly from the remote control unit. 1 the CURSOR F button to switch the test tone mode. • Press the ENTER or CURSOR H button to switch to the digital input (COAXIAL) setting.
ENGLISH System Setup System Setup Setting the Digital In Assignment Setting the Ext. In Subwoofer Level This setting assigns the digital input terminals of the AVR-1306 for the different input sources. 1 Press the CURSOR F or G button to assign the input function connected to the COAXIAL 1 input terminal, then press the ENTER or CURSOR H button to switch the COAXIAL 2 input setting.
ENGLISH System Setup System Setup System setup items and default values (set upon shipment from the factory) System Setup 1 Speaker Configuration 2 Delay Time Default settings Input the combination of speakers in your system and their corresponding sizes (SMALL for regular speakers, LARGE for full-size, full-range) to automatically set the composition of the signals output from the speakers and the frequency response.
ENGLISH Basic Operation Playback using the external input (EXT. IN) terminals Basic Operation The signals being input to the external decoder input terminals are played without passing through the surround circuitry. Playback INPUT MODE ANALOG MASTER VOLUME Playing the input source 1 SPEAKER EXT. IN PHONES SURROUND MODE SELECT INPUT SELECTOR Select the input source to be played. Example: CD (Main unit) 2 Press the EXT. IN button to select the external input.
ENGLISH Basic Operation Basic Operation Listening over headphones Connect the headphones to the PHONES jack. • The speaker output is automatically turned off when headphones are connected. Checking the currently playing program source 2 Front panel display Press the STATUS button. NOTE: • To prevent hearing loss, do not raise the volume level excessively when using headphones.
ENGLISH Basic Operation Basic Operation 2 Input mode display STANDARD • In the AUTO mode STANDARD DIRECT Depending on the input signal. ENTER • In the DIGITAL PCM mode CURSOR F STEREO SURROUND PARAMETER CURSOR G DIRECT/STEREO SURROUND PARAMETER SELECT • In the DIGITAL DTS mode Surround Playing audio sources (CDs and DVDs) 2-channel playback modes • In the ANALOG mode • The AVR-1306 is equipped with 2-channel playback modes exclusively for music. • Select the mode to suit your tastes.
ENGLISH Basic Operation 4 Basic Operation Turn the SELECT knob, and press the CURSOR F or G button to select the optimum mode for the source. (Pro Logic II Cinema mode) (Pro Logic II Music mode) (Pro Logic II Game mode) (Dolby Pro Logic mode) 5 Press the SURROUND PARAMETER button to select the various parameters. The mode switches as shown below each time the button is pressed. 6 Turn the SELECT knob, and press the CURSOR F or G button to set the various surround parameters.
ENGLISH Basic Operation Basic Operation STANDARD INPUT MODE • CINEMA EQ setting: INPUT SELECTOR SELECT CINEMA EQ OFF ON OFF • CENTER IMAGE setting SURROUND PARAMETER CURSOR G ENTER CURSOR F STANDARD SURROUND PARAMETER INPUT SELECTOR C.IMAGE 0.3 0.0 0.3 1.0 • TONE DEFEAT setting INPUT MODE TONE DEF. ON DTS NEO:6 mode 1 Press the STANDARD button to select the DTS NEO:6 mode. The mode switches as shown below each time the button is pressed.
ENGLISH Basic Operation Basic Operation 2 Surround parameters w DTS NEO:6 Mode: • Cinema: This mode is optimum for playing movies. Decoding is performed with emphasis on separation performance to achieve the same atmosphere with 2-channel sources as with 6.1-channel sources.
ENGLISH Basic Operation 2 Surround parameters e CINEMA EQ. (Cinema Equalizer): The Cinema EQ function gently decreases the level of the extreme high frequencies, compensating for overly-bright sounding motion picture soundtracks. Select this function if the sound from the front speakers is too bright. This function only works in the Dolby Pro Logic II, Dolby Digital, DTS Surround and DTS NEO:6 modes. (The same contents are set for all operating modes.) D.COMP.
ENGLISH Basic Operation Basic Operation DENON original surround modes This unit is equipped with a high performance DSP (Digital Signal Processor) which uses digital signal processing to synthetically recreate the sound field. One of 7 preset surround modes can be selected according to the program source and the parameters can be adjusted according to the conditions in the listening room to achieve a more realistic, powerful sound.
ENGLISH Basic Operation Basic Operation SURROUND MODE SELECT SURROUND MODE 4 Press the CURSOR F or G button to set the various parameters. • ROOM SIZE setting: SURROUND PARAMETER CURSOR G ENTER CURSOR F ROOM SIZE MED SMALL SURROUND PARAMETER 2 To operate the surround mode and the surround parameters from the remote control unit Select the surround mode for the input channel. 2 Press the SURROUND PARAMETER button to enter the surround parameter setting mode. 10 15 DELAY 0ms 30ms 110ms • D.
ENGLISH Basic Operation Basic Operation 2 Operating the surround mode and the surround parameters from the main unit’s panel • DEFAULT setting DEFAULT YES Y/N Y/N NO Select “YES” to reset to the factory defaults. 5 1 Turn the SELECT knob to select the surround mode. When turned clockwise: DIRECT Press the ENTER button to finish the surround parameter mode.
ENGLISH Basic Operation Basic Operation SELECT CH VOL CH SELECT CURSOR F TONE DEFEAT CURSOR G TONE CONTROL Tone control setting Channel Level The tone control function will not work in the DIRECT mode. You can adjust the channel level either according to the playback sources or to suit your taste, as described below. 1 1 2 Adjusting the sound quality (tone) Press the TONE CONTROL button. The tone switches as follows each time the TONE CONTROL button is pressed.
ENGLISH Basic Operation INPUT SELECTOR Basic Operation Auto tuning PRESET • TUNING TUNER MODE POWER ON/STANDBY BAND BAND TUNING This unit is equipped with a function for automatically searching for FM broadcast stations and storing them in the preset memory. Hold the PRESET • button and press the POWER switch on the main unit. • The unit automatically begins searching for FM broadcast stations.
ENGLISH Basic Operation Basic Operation INPUT SELECTOR PRESET RDS (Radio Data System) PTY MODE MEMORY SHIFT RDS RT BAND TUNING Manual tuning 1 2 3 Set the input source to “TUNER”. Watching the display, press the BAND button to select the desired band (AM or FM). Press the MODE button to set the manual tuning mode. Check that the display’s “AUTO” indicator turns off. 4 Press the TUNING (+) or (–) button to tune in the desired station.
ENGLISH Basic Operation Basic Operation RDS search PTY search Use this function to automatically tune to FM stations that provide the RDS service. 1 Set the input source to “TUNER”. (Main unit) 2 3 (Remote control unit) Press the RDS button until “RDS SEARCH” appears on the display. Press the PRESET • (+) or ª (–) button. • The search for RDS stations begins automatically. If no RDS stations are found with the above operation, all the reception bands are searched.
ENGLISH Advanced Operation Advanced Operation OFF ON/SOURCE 3. Tuner system buttons 1. CD player (CD), CD recorder and MD recorder (CDR/MD) system buttons NUMBER MODE 1 MODE 2 Remote control unit Operating DENON audio components 1 Set the MODE 1 switch to “AUDIO”. 2 Set the MODE 2 switch to the position for the component to be operated (CD, CDR/MD or TAPE). 6, 7 2 1 8, 9 3 DISC SKIP + Manual search (forward and reverse) Stop Play Auto search (cue) Pause Switch discs (for CD changers only) 2.
ENGLISH Advanced Operation Advanced Operation Preset memory • DENON and other makes of components can be operated by setting the preset memory. • This remote control unit can be used to operate components of other manufacturers without using the learning function by registering the manufacturer of the component as shown in the list of preset codes ( End of this manual). • Operation is not possible for some models. 1 Set the MODE 1 switch to “AUDIO” or “VIDEO”.
ENGLISH Advanced Operation 1. Digital video disc player (DVD) system buttons ON/SOURCE : Power on/standby OFF : DENON DVD power off 6, 7 : Manual search (forward and reverse) 2 : Stop 1 : Play 8, 9 : Auto search (to beginning of track) 3 : Pause 0 ~ 9, +10 : Number DISC SKIP + : Disc skip (for DVD changer only) DISPLAY : Switch display MENU : Menu RETURN : Return SETUP : Setup •, ª, 0, 1 : Cursor up, down, left and right ENTER : Enter setting Advanced Operation 2.
ENGLISH Advanced Operation 4. Digital broadcast satellite (DBS) tuner and cable (CABLE) system buttons Advanced Operation 5. Monitor TV (TV) system buttons DVD/VDP POWER TV POWER NUMBER MODE 1 MODE 2 Punch through “Punch Through” is a function allowing you to operate the PLAY, STOP, MANUAL SEARCH and AUTO SEARCH buttons on CD, TAPE, CDR/MD, DVD/VDP or VCR components when in the DBS/CABLE or TV mode. By default, nothing is set.
ENGLISH Advanced Operation Advanced Operation Initialization of the microprocessor INPUT SELECTOR If the indication on the display is not normal or if the operation of the unit is not correct, then the microprocessor should be reset by the following procedure. POWER SPEAKER Other functions Recording the program source (recording the source currently being monitored) 1 2 3 Select the input source to be played. Select the input mode and play (surround) mode.
ENGLISH Troubleshooting Symptom Troubleshooting If a problem should arise,first check the following. 1. Are the connections correct? 2. Have you operated the receiver according to the operating instructions? 3. Are the speakers, turntable and other components operating property? If this unit is not operating properly, check the items listed in the table below. Should the problem persist, there may be a malfunction. Disconnect the power immediately and contact your store of purchase.
ENGLISH Additional Information Additional Information Speaker setting examples Here we describe a number of speaker settings for different purposes. Use these examples as guides to set up your system according to the type of speakers used and the main usage purpose. [1] Basic setting Use this setting if your main purpose is to listen to movie music and when using one set (two speakers) of regular single-way or two-way speakers as the surround speakers.
ENGLISH Additional Information Additional Information Surround The AVR-1306 is equipped with a digital signal processing circuit that lets you play program sources in the surround mode to achieve the same sense of presence as in a movie theater. 2 Dolby Digital compatible media and playback methods Symbol indicating Dolby Digital compatibility: The following are general examples. Also refer to the player’s operating instructions.
ENGLISH Additional Information Additional Information [2] DTS Digital Surround Digital Theater Surround (also called simply DTS) is a multichannel digital signal format developed by Digital Theater Systems. DTS offers the same “5.1” playback channels as Dolby Digital (front left, front right, center, surround left and surround right) as well as the stereo 2-channel mode.
ENGLISH Additional Information Additional Information Surround modes and parameters Signals and adjustability in the different modes When playing Dolby Digital and DTS signals Channel output Mode DIRECT STEREO EXTERNAL INPUT DOLBY PRO LOGIC II DTS NEO:6 DOLBY DIGITAL DTS SURROUND 5CH STEREO ROCK ARENA JAZZ CLUB VIDEO GAME MONO MOVIE MATRIX VIRTUAL FRONT L/R CENTER SURROUND L/R SUBWOOFER C C C C C C C C C C C C C C E E B B B B B B B B B B B E E E B B B B B B B B B B B E B B B B B B B B B B B B B
ENGLISH Specifications 2 General Specifications Power supply: Power consumption: 2 Audio section • Power amplifier Rated output: Output terminals: • Analog Input sensitivity / input impedance: Frequency response: S/N: Maximum external dimensions: Mass: Front: 75 W +75 W (8 Ω/ohms, 20 Hz ~ 20 kHz with 0.08% T.H.D.) 110 W + 110 W (6 Ω/ohms, 1 kHz with 0.7% T.H.D.) Center: 75 W (8 Ω/ohms, 20 Hz ~ 20 kHz with 0.08% T.H.D.) 110W (6 Ω/ohms, 1 kHz with 0.7% T.H.D.
DEUTSCH Erste Schritte Erste Schritte Wir danken Ihnen für die Wahl dieses DENON AVR-1306 Surround A/V-Receivers. Diese bemerkenswerte Komponente liefert eine fantastische Surround-Klangwiedergabe von Heimkino wie z.B. DVD’s. Darüber hinaus wird Ihre Lieblingsmusik mit einer hervorragenden Wiedergabequalität reproduziert.
DEUTSCH Erste Schritte Erste Schritte Zubehör Vorsichtsmaßnahmen zur Installation Stellen Sie sicher, dass die nachfolgend aufgeführten Zubehörteile dem Hauptgerät beiliegen: q Betriebsanleitung....................................1 w Kundendienstverzeichnis ........................1 e Fernbedienung (RC-1014) .......................
DEUTSCH Erste Schritte Erste Schritte Einlegen der Batterien Bezeichnung der Teile und deren Funktionen q Entfernen Sie die rückwärtige Abdeckung der Fernbedienung. w Legen Sie die zwei R6P/AA-Batterien in der angegebenen Richtung in das Batteriefach ein. e Setzen Sie die rückwärtige Abdeckung wieder auf. Hinweise zu Batterien: • Tauschen Sie die Batterien durch neue aus, falls das Gerät selbst beim Verwenden der Fernbedienung in der unmittelbaren Nähe des Gerätes nicht mehr bedient werden kann.
DEUTSCH Erste Schritte Fernbedienung Einfacher Betrieb Einzelheiten zu den Funktionen der einzelnen Bauteile finden Sie auf den in Klammern ( ) angegebenen Seiten.
DEUTSCH Einfacher Betrieb Einfacher Betrieb 2 Anschlüsse Lautsprecher-Anschlüsse • Schließen Sie die Lautsprecher an die Lautsprecher-Anschlussklemmen an. Achten Sie dabei unbedingt auf die richtige Ausrichtung der Polaritäten (< mit <, > mit >). Eine Missachtung der Polaritäten resultiert in schwachem Mittelklang, einer unklaren Orientierung der verschiedenen Instrumente und darüber hinaus zu einer Verschlechterung des Stereorichtungsgefühls.
DEUTSCH Einfacher Betrieb Einfacher Betrieb Anschluss eines DVD-Players und eines Fernsehbildschirms Anschluss des Netzkabels • Sie können einen koaxialen oder optischen Anschluss auswählen, um den digitalen Audioausgang des DVD-Players anzuschließen. Wenn die den koaxialen Anschluss auswählen, muss dieser zugewiesen sein. Für weitere Informationen über die Digital-Eingangszuweisung ( Seite 15).
DEUTSCH Einfacher Betrieb INPUT SELECTOR SPEAKER A POWER ON/STANDBY Einfacher Betrieb Einschalten der Stromversorgung Wiedergabe der Eingangsquelle MASTER VOLUME SELECT SURROUND MODE ON/SOURCE SURROUND MODE INPUT SELECTOR 1 2 3 1 Wählen Sie die Eingangsquelle für die Wiedergabe an. Beispiel: DVD Schalten Sie Ihren Monitor (Fernsehgerät) ein. Drücken Sie den POWER-Schalter. (Hauptgerät) ¢ ON: Das Gerät schaltet sich ein und die Anzeige leuchtet.
DEUTSCH Anschluss anderer Quellen Anschluss anderer Quellen Kabelkennungen Die Bauteileschaltpläne auf den nachfolgenden Seiten setzen Sie Verwendung der folgenden optionalen Anschlusskabel (kein Lieferumfang) voraus.
DEUTSCH Anschluss anderer Quellen Anschluss anderer Quellen Anschluss eines TV/DBS-Tuners Anschluss einer Videokamera oder einer Videospiel Sie können einen koaxialen oder optischen Anschluss auswählen, um den digitalen Audioausgang des Fernsehgerätes oder DBS-Tuners anzuschließen. Wenn Sie den koaxialen Anschluss auswählen, muss dieser zugewiesen sein. Für weitere Informationen über die DigitalEingangszuweisung ( Seite 15).
DEUTSCH Anschluss anderer Quellen Anschluss anderer Quellen Anschluss eines Tapedeck, CD-Recorders oder MD-Recorders Anschluss der Antennenanschlüsse Ein UKW-Antennenkabelstecker kann direkt angeschlossen werden. Tape deck / Tapedeck CD recorder / / CD-Recorder MD recorder MD-Recorder Ausrichtung auf den Sender MWRahmenantenne (Lieferumfang) AUDIO OUT A L L L R R R UKW-Antenne AUDIO IN A L L R R L 75 Ω/OhmKOAXKabel R HINWEIS: • Schließen nicht zwei UKW-Antennen gleichzeitig an.
DEUTSCH Systemsetup Einstellung der Lautsprecher-Konfig. Systemsetup Sie können eine Reihe von Systemsetup-Optionen kundenspezifisch einstellen, so dass die Einstellungen auf Ihre Hörumgebung angepasst werden. Inhalt des Systemsetup-Menüs und der Anfangseinstellung dieses Gerätes ( Seite 16). Die Zusammensetzung der zu den einzelnen Kanälen ausgegebenen Signale und der Frequenzgang werden automatisch entsprechend der Kombination der derzeit verwendeten Lautsprecher eingestellt.
DEUTSCH Systemsetup 4 Systemsetup Einstellung der Verzögerungszeit Drücken Sie die CURSOR F- oder G-Taste, um Ihre Subwoofer-Einstellung auszuwählen, drücken Sie anschließend die ENTER- oder CURSOR HTaste, um die Einstellungen vorzunehmen und zur Verzögerungszeit-Einstellung zu zuschalten. *Subwoofer Yes Yes Geben Sie die Entfernung zwischen der Hörposition und den einzelnen Lautsprechern ein, um die Verzögerungszeit für die Surround-Wiedergabe einzustellen.
DEUTSCH Systemsetup Systemsetup Einstellung des Subwoofer-Modus und der Überschneidungsfrequenz Stellen Sie den Subwoofer-Modus und die Überschneidungsfrequenz entsprechend des verwendeten Lautsprechersystems ein. 1 Drücken Sie die CURSOR F- oder G-Taste, um die Subwoofer-Modus auszuwählen, drücken Sie die ENTER- oder CURSOR H-Taste, um die Einstellung einzugeben und zur Einstellung der Überschneidungsfrequenz umzuschalten.
DEUTSCH Systemsetup Systemsetup Einstellung des Prüftons • Führen Sie diese Einstellung so aus, daß der Wiedergabepegel zwischen den verschiedenen Kanälen identisch ist. • Hören Sie sich von der Zuhörposition aus den von den Lautsprechern ausgegebenen Testton an und stellen Sie den Pegel entsprechend ein. • Der Pegel kann auch direkt vom Fernbedienungsgerät aus eingestellt werden. 1 Sie die CURSOR F-Taste, um den Prüfton-Modus umzuschalten.
DEUTSCH Systemsetup Systemsetup Einstellung der Digital In-Zuweisung Diese Einstellung ordnet die digitalen Eingangsbuchsen des AVR1306 den verschiedenen Eingangsquellen zu. 1 Drücken Sie die CURSOR F- oder G-Taste, um die an den COAXIAL-Eingangsanschluss 1 angeschlossene Eingangsfunktion zuzuweisen, drücken Sie die ENTER- oder CURSOR H-Taste, um zur COAXIALEingangseinstellung 2 umzuschalten.
DEUTSCH Systemsetup Systemsetup Systemsetup-Punkte und Standard-Werte Systemsetup 1 Speaker Configuration 2 Delay Time Geben Sie die in Ihrem System verwendete LautsprecherKombination und die Größen der entsprechenden Lautsprecher (SMALL für herkömmliche Lautsprecher, LARGE für große, Gesamtbereich-Lautsprecher) ein, um die Zusammensetzung der von den Lautsprechern ausgegebenen Signale und den Frequenzgang automatisch einzustellen.
DEUTSCH Grundlegender Betrieb Wiedergabe mit Hilfe der externen Eingangsanschlüsse (EXT. IN) Grundlegender Betrieb Die an den Eingangsanschlüssen des externen Decoders eingehenden Signale werden ohne Durchlaufen der SurroundSchaltung wiedergegeben. Wiedergabe INPUT MODE ANALOG MASTER VOLUME Wiedergabe der Eingangsquelle 1 Wählen Sie die Eingangsquelle für die Wiedergabe an. Drücken Sie die EXT. IN-Taste, um zum externen Eingang umzuschalten. Beispiel: CD SPEAKER EXT.
DEUTSCH Grundlegender Betrieb Kopfhörer-Betrieb Schließen Sie die Kopfhörer an die PHONES-Buchse an. • Die Lautsprecherausgabe wird automatisch ausgeschaltet, wenn Kopfhörer angeschlossen werden. HINWEIS: • Zur Vermeidung von Gehörschäden sollte die Lautstärke nicht übermäßig hoch eingestellt werden. Kombinieren des aktuellen Wiedergabetons mit einem beliebigen Bild (VIDEO SELECT) Grundlegender Betrieb Überprüfen der gegenwärtig wiedergegebenen Programmquelle usw.
DEUTSCH Grundlegender Betrieb Grundlegender Betrieb 2 Eingangsmodus-Display STANDARD • Im AUTO-Modus STANDARD DIRECT Je nach Eingangssignal. ENTER • Im DIGITAL PCM-Modus CURSOR F STEREO SURROUND PARAMETER CURSOR G DIRECT/STEREO SURROUND PARAMETER SELECT • Im DIGITAL DTS-Modus Surround Wiedergabe von Audioquellen (CDs und DVDs) 2-Kanal-Wiedergabemodi • Im ANALOG-Modus • Der AVR-1306 verfügt allein für die Musikwiedergabe über 2Kanal-Wiedergabe-Modi.
DEUTSCH Grundlegender Betrieb 4 Grundlegender Betrieb Drehen Sie den SELECT-Knopf, drücken Sie die CURSOR F- oder G-Taste, um den optimalen Modus für die Quelle auszuwählen. (Pro Logic II Cinema-Modus) (Pro Logic II Music-Modus) 6 Drehen Sie den SELECT-Knopf, drücken Sie die CURSOR F- oder G-Taste, um die verschiedenen Surround-Parameter einzustellen.
DEUTSCH Grundlegender Betrieb Grundlegender Betrieb STANDARD INPUT MODE • CINEMA EQ Einstellung INPUT SELECTOR SELECT CINEMA EQ OFF ON OFF • CENTER IMAGE Einstellung SURROUND PARAMETER CURSOR G ENTER CURSOR F STANDARD SURROUND PARAMETER INPUT SELECTOR C.IMAGE 0.3 0.0 0.3 1.0 • TONE DEFEAT Einstellung INPUT MODE TONE DEF. ON DTS NEO:6-Modus 1 Drücken Sie die STANDARD-Taste, um den DTS NEO:6-Modus auszuwählen. Bei jeder Betätigung der Taste ändert sich der Modus wie nachfolgend gezeigt.
DEUTSCH Grundlegender Betrieb Grundlegender Betrieb 2 Surround-Parameter w DTS NEO:6-Modus: • Cinema: Dieser Modus eignet sich optimal für die Filmwiedergabe. Die Verschlüsselung wird durch Verstärkung der Trennleistung ausgeführt, um mit 2-Kanal-Quellen dieselbe Atmosphäre wie mit 6.1-Kanal-Quellen zu erzielen.
DEUTSCH Grundlegender Betrieb 2 Surround-Parameter e CINEMA EQ. (Cinema-Equalizer): Die Cinema EQ-Funktion senkt auf sanfte Art den Pegel der extrem hohen Frequenzen, um den überlagernden hellen Klang in Film-Soundtracks zu kompensieren. Wählen Sie diese Funktion, wenn der Klang von den Frontlautsprechern zu hell ist. Diese Funktion kann nur in den Dolby Pro Logic II-, Dolby Digital-, DTS Surround- und DTS NEO:6-Modi angewendet werden (für alle Betriebsarten werden dieselben Inhalte eingestellt). D.COMP.
DEUTSCH Grundlegender Betrieb Grundlegender Betrieb DENON’s Original-Surround-Modi Dieses Gerät ist mit einem Hochleistungs-DSP (Digitaler Signalprozessor) ausgestattet, der mit Hilfe digitaler Signalbearbeitung ein synthetisches Klangfeld erzeugt. Entsprechend der Programmquelle können Sie zwischen 7 voreingestellten Surround-Modi wählen und die Parameter können entsprechend der im Zuhörraum herrschenden Bedingungen eingestellt werden, um einen realistischeren, kraftvolleren Klang zu erzielen.
DEUTSCH Grundlegender Betrieb Grundlegender Betrieb SURROUND MODE SELECT SURROUND MODE 4 Drehen Sie den CURSOR F- oder G-Taste, um die verschiedenen Surround-Parameter einzustellen. • ROOM SIZE Einstellung SURROUND PARAMETER CURSOR G ENTER CURSOR F ROOM SIZE MED SMALL SURROUND PARAMETER 2 Zum Betrieb der Surround-Modi und SurroundParameter mithilfe der Fernbedienung Wählen Sie den Surround-Modus für den Eingangskanal an.
DEUTSCH Grundlegender Betrieb Grundlegender Betrieb 2 Zum Betrieb der Surround-Modi und SurroundParameter vom Hauptgerät • DEFAULT Einstellung DEFAULT YES Y/N Y/N NO Wählen Sie “YES”, um auf die werkseitigen StandardEinstellungen zurückzusetzen. 5 1 Drehen Sie den SELECT-Knopf, um den SurroundModus auszuwählen. Wenn Sie im Uhrzeigersinn drehen: DIRECT STEREO MONO MOVIE Drücken Sie die ENTER-Taste, um den SurroundParameter-Modus zu beenden.
DEUTSCH Grundlegender Betrieb Grundlegender Betrieb SELECT CH VOL CH SELECT CURSOR F TONE DEFEAT CURSOR G TONE CONTROL Einstellung der Klangsteuerung Kanalpegel Die Klangsteuerungsfunktion ist im DIRECT-Modus nicht aktiv. Sie können den Kanalpegel wie unten beschrieben entweder den Wiedergabequellen oder Ihren Wünschen entsprechend einstellen. 1 1 2 Einstellen der Tonqualität (Ton) Drücken Sie die TONE CONTROL-Taste.
DEUTSCH Grundlegender Betrieb INPUT SELECTOR Grundlegender Betrieb Automatische Sendereinstellung PRESET • TUNING TUNER MODE POWER ON/STANDBY BAND 1 BAND TUNING Stellen Sie die Eingangsfunktion auf “TUNER“. (Hauptgerät) (Fernbedienung) 2 Sehen Sie auf das Display und wählen Sie mit der BAND-Taste das gewünschte Empfangsband (MW (AM) oder UKW (FM)). 3 Drücken Sie die MODE-Taste, um den automatischen Sendereinstellungsmodus einzustellen.
DEUTSCH Grundlegender Betrieb INPUT SELECTOR Grundlegender Betrieb PRESET RDS (Radio-Data-System) PTY MODE MEMORY SHIFT RDS RT BAND TUNING Manuelle Sendereinstellung 1 2 3 Stellen Sie die Eingangsfunktion auf “TUNER”. Sehen Sie auf das Display und wählen Sie mit der BAND-Taste das gewünschte Empfangsband (MW (AM) oder UKW (FM)). Drücken Sie die MODE-Taste, um den manuellen Sendereinstellungsmodus einzustellen. Prüfen Sie, ob die “AUTO”-Anzeige des Displays ausgeschaltet wird.
DEUTSCH Grundlegender Betrieb Grundlegender Betrieb RDS-Suche Programmtyp-Suche (PTY) Verwenden Sie diese Funktion, um automatisch UKW-Sender zu empfangen, die den RDS-Service aufweisen. 1 Stellen Sie die Eingangsquelle auf “TUNER”. (Hauptgerät) 2 3 (Fernbedienung) Drücken Sie die RDS-Taste bis “RDS SEARCH” auf dem Display erscheint. Drücken Sie die PRESET • (+)- oder ª (–)-Taste. • Der RDS-Suchbetrieb beginnt automatisch.
DEUTSCH Erweiterter Betrieb Erweiterter Betrieb OFF 3. Tuner-Systemtasten ON/SOURCE 1. CD-Player- (CD), CD-Recorder- und MD-Recorder- (CDR/MD) Systemtasten NUMBER MODE 1 MODE 2 Fernbedienung Betrieb von DENON-Audiokomponenten 1 Stellen Sie den MODE 1-Schalter auf “AUDIO”. 2 Stellen Sie den MODE 2-Schalter auf die Position der Komponente, die Sie betreiben möchten.
DEUTSCH Erweiterter Betrieb Erweiterter Betrieb Vorwahlspeicher • Sowohl Komponenten von DENON als auch von anderen Herstellern können betrieben werden, indem der Vorwahlspeicher auf den verwendeten Hersteller eingestellt wird. • Mit diesem Fernbedienung können Komponenten von anderen Herstellern ohne Anwendung der Lernfunktion gesteuert werden. Der Hersteller der Komponente wird einfach wie in der nachfolgenden “Liste von voreingestellten Codes” ( Ende eines Buches) aufgeführt, gespeichert.
DEUTSCH Erweiterter Betrieb 1.
DEUTSCH Erweiterter Betrieb Erweiterter Betrieb 4. Digitalen Sendesatelliten-Tuner (DBS) und Kabel (CABLE) 5. Systemtasten für Monitor TV (TV) DVD/VDP POWER TV POWER NUMBER MODE 1 MODE 2 Überbrückung (Punch Through) “Punch Through” ist eine Funktion, die es Ihnen ermöglicht, die PLAY-, STOP-, MANUAL SEARCH- und AUTO SEARCH-Tasten auf den CD-, TAPE-, CDR/MD-, DVD/VDP- oder VCR-Komponenten zu bedienen, wenn der DBS/CABLE- oder TV-Modus eingeschaltet ist. Als Standardvorgabe ist nichts eingestellt.
DEUTSCH Erweiterter Betrieb Erweiterter Betrieb Initialisierung des Mikroprozessors INPUT SELECTOR Wenn die Anzeigen auf dem Display abnormal erscheinen oder der Betrieb des Gerätes nicht die gewünschten Resultate erzielt, ist die Initialisierung des Mikroprozessors entsprechend des nachfolgend beschriebenen Verfahrens erforderlich.
DEUTSCH Fehlersuche Symptom Fehlersuche Überprüfen Sie bei Auftreten einer Störung zunächst die nachfolgend aufgeführten Punkte. 1. Sind alle Anschlüsse richtig? 2. Haben Sie den Receiver entsprechend der Betriebsanleitung bedient? 3. Funktionieren die Lautsprecher, der Plattenspieler und die anderen angeschlossenen Komponenten ordnungsgemäß? Sollte die Funktion dieses Gerätes nicht einwandfrei sein, überprüfen Sie bitte die in nachfolgender Tabelle aufgeführten Punkte.
DEUTSCH Wissenswerte Zusatzinformationen Wissenswerte Zusatzinformationen Lautsprecher-Aufstellungsbeispiele Hier werden verschiedene Lautsprecher-Aufstellungen für verschiedene Verwendungszwecke beschrieben. Betrachten Sie diese Beispiele als Hilfe bei der Aufstellung und Einrichtung Ihres Systems entsprechend der Art der verwendeten Lautsprecher und des hauptsächlichen Verwendungszweckes.
DEUTSCH Wissenswerte Zusatzinformationen Wissenswerte Zusatzinformationen Surround Der AVR-1306 ist mit einer digitalen Signalbearbeitungsschaltung ausgestattet, die die Wiedergabe von Programmquellen im Surround-Modus ermöglicht, um Ihnen das Gefühl zu verleihen, sich inmitten eines Filmtheaters zu befinden.
DEUTSCH Wissenswerte Zusatzinformationen Wissenswerte Zusatzinformationen [2] DTS-Digital Surround Digitaler Theater Surround (einfach DTS) ist ein von Digital Theater Systems entwickeltes mehrkanaliges DigitalsignalFormat. DTS bietet die gleichen “5.1” Wiedergabe-Kanäle wie Dolby Digital (vorn links, vorn rechts und Mitte, Surround links und Surround rechts) sowie den Stereo 2-Kanal-Modus.
DEUTSCH Wissenswerte Zusatzinformationen Wissenswerte Zusatzinformationen Surround-Modi und Parameter Signale und Einstellbarkeit in den unterschiedlichen Modi Bei der Wiedergabe von Dolby Digitalund DTS-Signalen Kanalausgang Modus DIRECT STEREO EXTERNAL INPUT DOLBY PRO LOGIC II DTS NEO:6 DOLBY DIGITAL DTS SURROUND 5CH STEREO ROCK ARENA JAZZ CLUB VIDEO GAME MONO MOVIE MATRIX VIRTUAL FRONT L/R CENTER SURROUND L/R SUBWOOFER C C C C C C C C C C C C C C E E B B B B B B B B B B B E E E B B B B B B B B
DEUTSCH Technische Daten 2 Allgemeines Technische Daten Netzteil: Stromaufnahmen: 2 Audio-Teil • Leistungsverstärker Nennausgang: 75 W + 75 W (8 Ω/Ohm, 20 Hz bis 20 kHz mit 0,08 % Klirrfaktor) 110 W + 110 W (6 Ω/Ohm, 1 kHz mit 0,7 % Klirrfaktor) Mittel: 75 W (8 Ω/Ohm, 20 Hz bis 20 kHz mit 0,08 % Klirrfaktor) 110 W (6 Ω/Ohm, 1 kHz mit 0,7 % Klirrfaktor) Surround: 75 W + 75 W (8 Ω/Ohm, 20 Hz bis 20 kHz mit 0,08 % Klirrfaktor) 110 W + 110 W (6 Ω/Ohm, 1 kHz mit 0,7 % Klirrfaktor) Front: A oder B 06 ~ 16 Ω/
ENGLISH DEUTSCH FRANCAIS ITALIANO ESPAÑOL NEDERLANDS SVENSKA 2 List of preset codes / Liste von voreingestellten Codes / Liste de codes préréglés / Lista dei codici pre-regolati / Lista de códigos pre-ajustados / Lijst van vooringestelde codes / Förteckning över förinställda koder Audio Dynamic 005, 085 014, *[111] Audiovox 088 Aiwa 009 Beaumark 087 Jensen Hitachi 010 Broksonic 086, 093 JVC JVC 006, 011 Calix 088 Konka 012, 013 Candle 006, 087, 088, 089, 090 Magnavox 005 Cano
SVENSKA NEDERLANDS ESPAÑOL ITALIANO FRANCAIS DEUTSCH ENGLISH Optonica 021 Sylvania 009, 015, 016, 017, 041, 049, 094 Bauer 155 Panasonic 024, 049, 064, 066, 067, 068, 069, 107 Symphonic 009, 094 Belcor 047 Perdio 009 Tandy 009 Bell & Howell 045, 118 Pentax 009, 013, 023, 058, 090 Tashiko 009, 088 Bradford 061 Philco 015, 016, 049 Tatung 004, 026, 030 Brockwood 003, 047 Philips 015, 021, 042, 049, 105 Teac 004, 009, 026, 094 Candle Pilot 088 Technics 024, 049 Pio
ENGLISH DEUTSCH FRANCAIS ITALIANO ESPAÑOL NEDERLANDS SVENSKA Futuretech 004 Minutz 066 SBR 015 GE 020, 036, 037, 040, 044, 058, 066, 088, Mitsubishi 001, 016, 039, 048, 056, 057, 058, 065, Schneider 015 081, 082, 083, 105 Scott 062 000, 015, 029, 031, 039, 048, 051, 056, Montgomery Ward 011, 020, 144, 145, 146 Sears 008, 014, 021, 022, 023, 024, 025, 040, 057, 067, 068, 069, 116 Motorola 121, 147 Grundy 062 MTC 031, 034, 039, 048, 095 Hitachi 029, 031, 051, 052, 070, 111,
SVENSKA CABLE NEDERLANDS ESPAÑOL ITALIANO FRANCAIS DEUTSCH DBS (SATELLITE) Emerson 004, 005, 006, 007 003, 008, 009, 010 ABC 006, *[007], 008, 009 Alphastar 054 Fisher Archer 010, 011 Chaparral 035, 036 JVC 018, 019 011, 012, 013, 014, 017 006, 015, 035 Century 011 Dishnet 053 Kenwood Citizen 011 Drake 037, 038 Magnavox Colour Voice 012, 013 Echostar Dish 062, 066 Marantz 016, 028, 035 Comtronic 014 GE 048, 055, 056 MCS 016, 024 Eastern 015 General Instruments 0
ENGLISH DEUTSCH FRANCAIS Magnavox 002 Marantz 002 Onkyo 016, 018 Optimus 007, 008 Panasonic 012 Philips 002 Pioneer 007, 008, 009 Sony 013, 014, 015 Technics 012 Victor 004 Wards 007 Yamaha 010, 011 ITALIANO ESPAÑOL NEDERLANDS SVENSKA *[ ] : Preset codes set upon shipment from the factory. *[ ] : Sie Voreinstellungscodes wurden vor der Auslieferung werkseitig eingestellt. *[ ] : Les codes préréglés diffèrent en fonctiom des livraison de l’usine.
TOKYO, JAPAN www.denon.com Denon Brand Company, D&M Holdings Inc.