
Operating instructions


When watching a DVD or other video source, the picture on the monitor may seem delayed with respect to the sound In this case, adjust the
audio delay to delay the sound and synchronize it with the picture
The audio delay setting is stored separately for each input source.
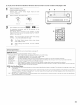
1
_} Select the input source
_N_UT _E_ECTOR
0 %
(Mainunit) (Remotecontrolunk}
(2} Set the input mode to "AUTO"
INPUT
MODE
{Main u/it) (Remote control unit}
(3) Select the Dolby/DTS Surround
DOLBY DTS
SURROUND SURROUND[_]_ __
{Main unit) (Remote control unit}
(4_ Play a program source (DVD, etc.)
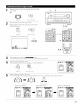
Press the SYSTEM SETUP button and display the System
Setup Menu screen.
{Remote control uTlit}
System Setup Menu
_Speaker Configuration
Delay Time
Channel Level
THX Audio Setup
S=bwooferPeak Limit Lev.
Digital In Assignment
Video Input Mode
1-@
2,7
1-@} 1-®
o ':::.........©
o .....oo
L_J L_J
1-@
^v_p_geN_
<3 FUNCTION,_S _>
E]E3
E2B
E2E3
Av_p._
SeTTINO3/5
__ 3,4,
5,6
Select "Audio Delay" on the System Setup Menu screen
{Remote control ullit}
System Setup Menu
rAudio Delay
Multi Zone Control
Auto Surround Mode
Ext. In Setup
Digital Multi Ch In
On Screen Display
Auto Tuner Presets
Setup Lock
Press jog stick "ENTER" to switch to the Audio Delay
adjustment screen.
r._m
%
{Remote control uTlit}
Audio Delay 4 0ms
Set the delay time (O ms _ 200 ms)
Fum_r_
{Re ¥_ote control unit}
Audio Delay _ 200ms
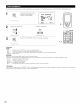
With a movie source, for example, adjust so that the
movement of the actors' lips is synchronized with the sound.
Press jog stick "ENTER" to return to the System Setup Menu
screen.
Press the SYSTEM SETUP button to complete the setting.
NOTE:
The audio delay setting does not apply when playing in the EXT IN
mode or in the analog input direct mode or stereo mode (only when
the crossover frequency is set to "FIXED _ THX" or front speaker is
set to "Large")
56