PHOENIX TM PHOENIXTM 44 Laminator Pouch / Roll Laminator Operators Manual Model ML44 REV C
TABLE OF CONTENTS S • OVERVIEW 3 • SAFETY INFORMATION 4 • SET-UP AND ELECTRICAL REQUIREMENTS 5 • STAND ASSEMBLY (OPTIONAL) 6 • ROLLER KIT INSTALLATION (OPTIONAL) 7 • ROLLER GAP CONTROL KNOB, REAR PANEL 8 • OPERATIONAL CONTROL PANEL 9 • MOUNTING USING A HEAT ACTIVATED MOUNTING BOARD 10 • MOUNTING AND LAMINATING USING A POUCH BOARD 11 • ENCAPSULATING USING A FLEXIBLE POUCH 12 • USING ROLL FILMS IN A PHOENIX 13 • CLEANING YOUR PHOENIX LAMINATOR 14 • TROUBLESHOOTING GUIDE 1
Owner’s Manual Overview Thank you for purchasing a PHOENIX laminator. We have designed the PHOENIX Laminator to give you years of reliable service. As you become familiar with the PHOENIX laminator, you will appreciate the high quality of its production and the excellence in its engineering design. By following the guidelines for proper care and use of the PHOENIX laminator, you can depend on many years of trouble-free profitability from your investment.
SAFETY INFORMATION When using electrical appliances, basic precautions should always be taken to reduce the risk of electrical shock and injury to persons, including the following: 1. Read all instructions before connecting or operating this unit. 2. Retain this Owners Manual for future reference. For technical assistance beyond what is covered in this manual contact Technical Service. 3.
SET-UP AND ELECTRICAL REQUIREMENTS The PHOENIX 44 is a professional laminator designed for ease of use. The process speed and temperature have been preset to eliminate operator guesswork. The factory setting will facilitate good quality results using the Flexible Pouches and Pouch Boards using low temperature adhesives. The PHOENIX 44 can handle Flexible Pouches and Pouch Boards up to 44 inches (1120mm) wide.
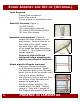
STAND ASSEMBY AND SET-UP (OPTIONAL) Tools Required Philips head screwdriver 4mm Allen wrench 14mm wrench or adjustable wrench Stand Kit Contents (Figure 1) (2) Side frames (2) Cross straight supports (8) 14mm Phillips screws & nuts (4) 4mm Allen screws Assemble cross supports (Figure 2) Attach the cross supports to the side frames. Position the nuts on the inside of the stand. Leave the bolts finger tight until all of the stand has been assembled in Figure 3. Then tighten all of the screws securely.
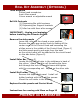
ROLL KIT ASSEMBLY (OPTIONAL) Tools Required Philips head screwdriver 4mm Allen wrench 14mm wrench or adjustable wrench Roll Kit Contents (1) Dispensing Bar with tensioner (2) Dispensing bar Support brackets (1) Idler bar with 4mm allen screws Figure 1 IMPORTANT! - Unplug you laminator before installing the Phoenix Roll Kit Remove the side panels Figure 2 Lower the rollers to the closed or zero position.
ROLLER GAP CONTROL KNOB The Control Knob (see figure 1A) is located on the right hand side of the laminator and should be operated from this side. The control knob is used to adjust the height of the rollers. The Nip Settings are 1/4"(6mm), 3/16" (5mm), 1/8" (3mm) and 1/16" (1.5mm) correspond to Pouch Board thickness. There is also a closed position - 0" (0mm) for film and paperboard applications. Select the setting that indicates the thickness of the material you are using.
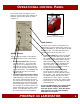
OPERATIONAL CONTROL PANEL The Control Panel (see Figure 3) is located on the top right of the machine. A diagram of the Control Panel is shown in Figure 2. Figure 3 Location of Control Panel Heat Control Figure 2 The Heat of the rollers is controlled in the HEAT section of the Control Panel. When you turn the PHOENIX on, the heat will be off and the rollers cold. The LED Light above the ‘On/Off’ switch will be the color red.
MOUNTING WITH HEAT ACTIVATED BOARDS Using a Heat Activated Mounting Board Refer to the instruction sheet packed with each box of Mounting Boards for specific information on mounting with a heat activated Boards. All boards can not be thicker than 1/4” inch and must use low temperature adhesive. Also, refer to the instruction sheet for information on Compatible Media, Process Conditions and technical information.
LAMINATING WITH Refer to the instruction sheet packed with each box of Pouch Boards for specific information on mounting/laminating with a Pouch Boards. In addition, refer to the instruction sheet for information on Compatible Media, Process Conditions and technical information. Carefully examine the board to determine which edge is sealed. There is a 1/8" (3mm) sealed edge where the laminate film is attached to the board.
ENCAPSULATING WITH FLEXIBLE FILM POUCHES Refer to the instruction sheet packed with each box for specific information on encapsulating Flexible Film Pouches. In addition, refer to the instruction sheet for information on Compatible Media, Process Conditions and technical information. The Flexible Pouch consists of two pieces of film that are hinged at one end, along a short side. Separate the two pieces starting at the end opposite the hinge. Take care not to break the hinged seal. 1.
LAMINATING WITH Refer to the instruction sheet packed with each box for specific information on the roll film you are using. We recommend using low temperature adhesives on either a 3 or 5 mil construction. The Phoenix is designed for roll films to laminate one side of a print, over-laminate a mounted print, or simultaneously mount and laminate using heat activated board. If you are laminating one-side of a print, place your print on a sled or non-stick board. Phoenix sleds are all 3/16” thick.
CLEANING YOUR PHOENIX LAMINATOR Cleaning the Outside of the Laminator: Cleaning the Rollers CAUTION! Disconnect the laminator from the power supply before cleaning. The laminating rollers of your PHOENIX should be periodically cleaned of adhesive build up that might occur during normal operation. The laminator may be cleaned with a lintfree cloth, lightly dampened with a mild soap and water solution. Do not use a spray-on cleaner. Do not immerse any part of the laminator in water or other liquid.
TROUBLE-SHOOTING / TECHNICAL SERVICE PROBLEM POSSIBLE CAUSE The Red LED Light above the The Power cord is not rollers does not come on in- plugged in fully. dicating the Main power switch is turned on. The main breaker is tripped. SOLUTION Check the Power cord. Turn the breaker to the on. The circuit breaker is tripped. Reset the circuit breaker. Pouch Board is not being pulled into the PHOENIX or the motor is making a louder humming noise or is stalling.
SPARE PARTS / TECHNICAL SERVICE Technical Service If the machine does not reach temperature or you do not get the results you desire, please contact your Technical Service Representative. When calling for Technical Service, please have the Laminator Serial Number available. Servicing and replacement parts Service and maintenance must be performed fully in accordance with the instructions. Servicing by any unauthorized technician voids the warranty.
MOUNTING & LAMINATING TERMS Cleaning Board: Board used to capture any adhesive that may be clinging to the rollers. Mounting Board: An adhesive coated board used for mounting images. Cold Mode: Heat is off. Nip: The spot where the top and bottom rollers meet. Cover Sheet: Release paper to be placed on the surface of mounting boards. Roller Gap Control Knob: Adjusts the space between the rollers on the PHOENIX 44. Flashing Temperature Light: The machine has not reached temperature.
PHOENIX SPECIFICATIONS Dimensions Height Width Length 15.25” 17” 56” Roll Dimension 4” Net Weight Shipping weight 145 pounds 200 pounds Operating Standards Minimum Speed Maximum Speed 6”/minute 12”/minute Minimum temperature Maximum temperature 195° Fahrenheit 300° Fahrenheit Roll Core size 3” Inside Dimension (ID) Maximum Roll size 6” Diameter Roller Gap/Nip Settings 0 Closed (Rolls touch) 1/16” 1/8” 3/16” 1/4” Stand Height 30” Electrics U.S. Version U.S.
1 2 3 4 QA AC110V L 1 L N 2 N Text XB Kr Text solid state relay N N 5 8 2 SR 11 3 speed setting plate 7 4 control panel RT 1 7 5 20 18 16 6 14 t 13 C heating tube 9 Temp.
PHOENIX Laminator Parts Identification 18 26 22 21 5 19 20 24 23 6 15 10 16 15 14 13 12
4 11 8 3 9 17 1 2 7
25 PHOENIX LAMINATOR PARTS IDENTIFICATION Part No.
LIMITED WARRANTY The Manufacturer warrants to the original consumer purchaser that each new PHOENIX Laminator which proves defective in materials or workmanship within the applicable warranty period will be repaired at our option or replaced without charge. The Applicable Warranty period for the New PHOENIX Laminators shall be one year on parts and three months on labor and rollers from date of purchase.
Phoenix Pouch Mounting Supplies We have the widest range of pouch boards to use on any pouch mounter-laminator. The pouch boards listed on this page are our standard pouch boards. We can also make pouch boards from a variety of boards. We can also customize the adhesive to be compatible with the most medias. Whatever your customer’s need, the chances are great that you can meet their needs with your pouch mounter-laminator.
Mounting Supplies Wide Format Pouch Film Supplies PHOENIX Film Pouches Film pouches for roll-up and flexible graphics including items such as blueprints, menus, maps, banners and other flexible graphics. Low temperature adhesive safe for use with inkjet media. A Sled is included with each box of 18”x24”, 25”x37” and 36”x48” film pouches. Smooth Matte finish has a write-able surface and the matte laminate has a textured surface. 25 pouches/box. Size Gloss 9”x11.5”(50) 12”x 18” (50) 18.5”x24.