
Installation Guide


33
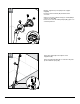
Insert 6 mm support anchor (W) in each hole location.
The anchors should fit securely into drilled holes.
If needed, a rubber mallet can be used to insert
anchors. To reduce risk of property damage, metal
hammers are not recommended to be used.
If needed, use drill to slightly enlarge the opening of
the hole.
NOTE: Wall anchors MUST be used. For ceramic tile,
use the included tile wall anchors.
Inserte un anclaje de apoyo de 6 mm (W) en cada
ubicación de orificio. Los anclajes deben encajar
firmemente dentro de los orificios perforados.
De ser necesario, puede utilizar un martillo de goma
para insertar los anclajes. Para reducir el riesgo de
daños a la propiedad, no se recomienda el uso de
martillos metálicos.
De ser necesario, utilice la broca para ampliar un poco
la abertura del orificio.
NOTA: DEBE utilizar los anclajes de pared. Para
azulejos de cerámica, utilice los anclajes de pared de
azulejos incluidos.
46
W
1
47
2
Y
GG
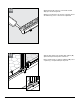
Attach support ring (GG) to shower using support bar
screws (Y) such that attachment screw is vertical as
shown in figure 47.
Hand tighten to fully secure.
Fije el apoyo circular (GG) a la ducha usando los
tornillos de la barra de apoyo (Y) de manera que el
tornillo de fijación esté vertical como se muestra en la
figura 47.
Ajuste a mano hasta que quede completamente
firme.