The Innovation Behind Broadband Wireless IP-based Broadband Wireless Access (BWA) System EasyWiFi WiFi Extension Module for the EasyST Unit Hardware Installation Guide Connecting the World
Pub. No. 01 02 Date Dec-05 03-06 Revision Record: EasyWiFi Update Description First edition. Author: MD Additional Input: Author: MF Publication No. : 18120511-01 © Copyright by Airspan Networks Inc., 2005. All rights reserved worldwide. The information contained in this document is proprietary and is subject to all relevant copyright, patent and other laws protecting intellectual property, as well as any specific agreement protecting Airspan Networks Inc. rights in the aforesaid information.
EasyWiFi
This page is intentionally left blank.
EasyWiFi Contents Contents About this Guide .................................................................................................... iii 1. Introduction .............................................................................................. 1-1 2. Physical Description ................................................................................ 2-1 2.1. Physical Dimensions ........................................................................... 2-1 2.2. Ports ..................
EasyWiFi Contents This page is intentionally left blank. 18120511-01 Airspan Networks Inc.
About this Guide This chapter describes the purpose, targeted audience, referenced documentation, and typographical conventions of this document. Purpose This guide provides a description of the EasyWiFi extension module as well as instructions for installing the module. Targeted Audience This guide is intended for the end-user installing the EasyWiFi extension module for the EasyST. This device requires no professional installation.
EasyWiFi Contents Customer Service For service and support for your EasyWiFi, contact your regional Airspan representative or Airspan's Technical Assistance Center (TAC) at: Web site (Support Request Form): http://www.airspan.com/Ultra/ContactForm/airspansupportform.asp Americas: (+1)-561-893-8679 International: (+44)-1895-467 467 18120511-01 Airspan Networks Inc.
Introduction 1 The EasyWiFi extension module allows you to add extra functionality to your EasyST unit: WiFi capabilities based on 802.11b and 802.11g Four Ethernet LAN switches (10/100BaseT) DC power The EasyST is easily plugged onto the EasyWiFi extension module by means of a 30-pin IDC connector. The EasyWiFi is powered by an AC/DC adapter that is plugged directly into a standard electrical wall outlet (110/220 VAC).
EasyWiFi Introduction This page is intentionally left blank. 18120511-01 Airspan Networks Inc.
Physical Description 2 This chapter provides a physical description of the EasyWiFi extenson module. 2.1. Physical Dimensions The physical dimensions of the EasyWiFi are listed in the table below: Table 2-1: EasyWiFi physical dimensions Parameter Value Dimensions (height x width x length) 30 x 125 x 125 mm Weight 210 grams 18120511-01 Airspan Networks Inc.
EasyWiFi Physical Description 2.2. Ports The EasyWiFi provides various ports on its side panel, as described in the table below: Table 2-2: Easy WiFi port descriptions Port Label 8-pin RJ-45 (x four) lan1, lan2, lan3, lan4 10/100BaseT Ethernet LAN DC power jack power 6 VDC power (supplied by AC/DC power adapter) Reset button reset Resets configuration settings to factory default 30-pin IDC socket -- Interfaces with EasyST, providing: • 802.
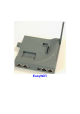
EasyWiFi Physical Description Figure 2-1 display the EasyWiFi ports. Figure 2-1: EasyWiFi ports (side and top panels) 18120511-01 Airspan Networks Inc.
EasyWiFi Physical Description 2.3. WiFi Antenna The EasyWiFi provides an integral WiFi antenna located on its side panel that can be orientated in the vertical pane, from 0° (i.e. antenna closed) to 180°. Two positions are used: 90° when EasyWiFi mounted horizontally; and 180° when EasyWiFi mounted vertically on a wall. Figure 2-2: EasyWiFi integral WiFi antenna 18120511-01 Airspan Networks Inc.
EasyWiFi Physical Description 2.4. Mounting Parts The EasyWiFi unit provides built-in wall-mounting brackets, desktop-mounting feet, as well as locking latches for mounting (attaching) the EasyST to the EasyWiFi extension module. Figure 2-3: EasyWiFi mounting parts (bottom panel) 18120511-01 Airspan Networks Inc.
EasyWiFi Physical Description 2.5. LEDs The EasyWiFi provides LEDs for indicating the status of various operations. These LEDs are located on the top panel for easy viewing, as shown in the figure below: Figure 2-4: EasyWiFi LEDs (top panel) 18120511-01 Airspan Networks Inc.
EasyWiFi Physical Description The EasyWiFi LEDs are described in the table below: Table 2-3: EasyWiFi LED descriptions LED power wlan wan lan1, lan2, lan3, lan4 18120511-01 Color Status Red On Unit receiving power Flashing Unit is booting up Off No power On WiFi link with one user or more Flashing Active WiFi link (i.e.
EasyWiFi Physical Description This page is intentionally left blank. 18120511-01 Airspan Networks Inc.
Attaching EasyST 3 The EasyWiFi interfaces with the EasyST by means of a 30-pin connector, located on the EasyWiFi's top panel. For securing the connection of the EasyST to the EasyWiFi, the EasyWiFi provides two latches that locks and unlocks the EasyST from the EasyWiFi. The latches are located on the EasyWiFi's bottom and side panels. Figure 3-1: EasyST attached to EasyWiFi 18120511-01 Airspan Networks Inc.
EasyWiFi At t a c h i n g E a s y S T To attach the EasyST to the EasyWiFi: 1. Align the EasyST with the EasyWiFi by aligning the following: EasyST 30-pin female connector with EasyWiFi's 30-pin male connector EasyST RJ-45 port with EasyWiFi RJ-45 port labeled lan2 2. Press the EasyST firmly onto the EasyWiFi so that the 30-pin connectors contact and plug into one another. Figure 3-2: Aligning EasyST with EasyWiFi 18120511-01 Airspan Networks Inc.
EasyWiFi At t a c h i n g E a s y S T 3. Lock the EasyST to the EasyWiFi using the two latches: a. On the bottom panel, use your thumb to push the latch towards the locking direction (indicated by the "lock" label). b. On the bottom-side panel, use a tool with a pointed edge to move the latch into the EasyST's mounting bracket by inserting the pointed egde into the latch's hole, and then dragging the latch into the EasyST's mounting bracket until it is firmly in place.
EasyWiFi At t a c h i n g E a s y S T Figure 3-4: EasyWiFi latches (lock position) 18120511-01 Airspan Networks Inc.
Connecting to LAN 4 EasyWiFi provides four 8-pin RJ-45 ports for 10/100BaseT (Fast Ethernet) interface with the subscriber's network. These LAN ports are located on the back panel and labeled lan1, lan2, lan3, and lan4. The LAN ports support Half and Full duplexing mode, Auto-Negotiation, and Auto-MDIX.
EasyWiFi C o n n e c t i n g t o L AN The figures below illustrate the EasyWiFi-to-computer cable connection: Figure 4-1: Connecting EasyWiFi to subscriber's LAN 18120511-01 Airspan Networks Inc.
5 Mounting Warning: The EasyWiFi is an indoor unit and therefore, must be mounted indoors. Warning: To prevent a fire hazard caused by overheating, do not place the EasyWiFi on a carpeted surface where airflow is restricted. EasyWiFi is a self-installable indoor unit, requiring no professional installation by a technician. EasyWiFi must be mounted indoors in a location that provides the following: High quality RF reception with the Internet service provider (i.e.
EasyWiFi Mounting 5.1. Desktop Mounting The EasyWiFi offers quick-and-easy mounting by allowing you to simply place it horizontally on a desktop (as shown in the figure below). The EasyWiFi contains integrated rubber feet (pads) on its bottom panel, providing cushioning as well as insulation from static electricity. Figure 5-1: Desktop mounting EasyWiFi 18120511-01 Airspan Networks Inc.
EasyWiFi Mounting 5.2. Wall Mounting When EasyST implements the window-mount, external antenna (i.e. no clip-on antenna), the EasyWiFi can be mounted either on a desk (i.e. desktop mounting) or a wall. The figure below shows a wall-mounted EasyWiFi. The EasyST is connected to an RF cable that connects to the external antenna (i.e. clip-on antenna is removed).
EasyWiFi Mounting To wall mount the EasyWiFi: 1. On the wall, mark the position with a pencil where you want to drill the two holes for the screws onto which the two EasyWiFi mounting hooks will later by guided. The distance between the two wall-mounting hooks (from their centers) is approxiamtely 83 mm (3.27 inches). Ensure that the holes are aligned and level using a spirit level. 2. Drill holes for each hole that you marked in the step above using a no. 6 twist-drill bit. 3.
EasyWiFi Mounting 4. Drive the two 0.75-inch screws (supplied) into the wall anchors. Ensure that at least 0.08-inch gap is exposed between the screw head and the wall anchor to allow insertion into the EasyWiFi mounting hooks. 5. Align the screws with the entrance to the two EasyWiFi mounting hooks, and then pull down the EasyWiFi to lock the screws into the mounting hooks. Figure 5-3: Inserting screws into wall mounting hooks 18120511-01 Airspan Networks Inc.
EasyWiFi Mounting This page is intentionally left blank. 18120511-01 Airspan Networks Inc.
Connecting Power 6 EasyWiFi is powered by an AC/DC power supply adapter, supplying 6 VDC and 4 Amperes. The AC/DC adapter is plugged into a standard electrical wall outlet (110/240 VAC; 50/60 Hz). The power adapter also provides interchangeable prongs (e.g. American vs. European) that can be replaced to suit country electrical standards in which the EasyWiFi is being installed. To view the AC/DC power adapter specifications, see Appendix C, "Power Adapter Specifications".
EasyWiFi Connecting Pow er 6.1. Changing the AC/DC Power Adapter's Prongs The AC/DC power adapter provides interchangeable prongs to suit electrical wall outlet sockets in the country in which the EasyWiFi is being installed. To change the plug prongs: 1. Remove the prongs by first moving (with the help of a pen) the LOCK/OPEN switch to OPEN position, and then gently sliding the prongs upwards, away from the power cord. 2.
EasyWiFi Connecting Pow er 6.2. Connecting AC/DC Power Adapter Once you have attached the plug prongs suitable to your country's electrical wall socket, you are ready to connect the EasyWiFi to the electrical wall outlet. To connect the EasyWiFi to the power supply: 1. Before plugging the power cord into the electrical wall outlet, plug the AC/DC power adapter's power cable (i.e. DC power jack) into the EasyWiFi's DC power socket (labeled power). 2.
EasyWiFi Connecting Pow er This page is intentionally left blank. 18120511-01 Airspan Networks Inc.
Resetting EasyWiFi 7 The EasyWiFi provides a button that enables you to reboot the EasyWiFi as well as reset the EasyWiFi settings to default. This button is located on the EasyWiFi's back panel and labeled reset. To reboot or reset to default the EasyWiFi: 1. Using a tool with a pointed edge, insert the edge into the hole labeled reset (located on the back panel next to the DC power jack). Figure 7-1: Resetting EasyWiFi to default using reset button 18120511-01 Airspan Networks Inc.
EasyWiFi Resetting EasyWiFi 2. Push the the tool into the hole until you feel a button being pushed. To reboot the EasyWiFi: push the button once and then remove the tool To reset the EasyWiFi to default settings: keep the button pressed for at least 7 seconds 18120511-01 Airspan Networks Inc.
A FCC Interference Statement Federal Communication Commission Interference Statement This equipment has been tested and found to comply with the limits for a Class B digital device, pursuant to Part 15 of the FCC Rules. These limits are designed to provide reasonable protection against harmful interference in a residential installation.
EasyWiFi FCC Interference Statement This equipment complies with FCC radiation exposure limits set forth for an uncontrolled environment. This equipment should be installed and operated with minimum distance 20cm between the radiator & your body. This transmitter must not be co-located or operating in conjunction with any other antenna or transmitter. 18120511-01 Airspan Networks Inc.
B Glossary BS Base station BWA Broadband wireless access dB Decibel dBm Power ratio in dB (decibel) of the measured power referenced to one milliwatt FTP File Transfer Protocol GHz Gigahertz.
EasyWiFi Glossary RF Radio frequency Rx Receive SNMP Simple network management protocol SNR Signal-to-noise ratio ST Subscriber terminal (interchangeable with CPE) SW Software Tx Transmit VoIP Voice over Internet protocol WiFi Wireless Fidelity WiMAX WiMAX is a wireless industry coalition whose members are organized to advance IEEE 802.16 standards for broadband wireless access (BWA) networks 18120511-01 Airspan Networks Inc.
C EasyWiFi Specifications The EasyWiFi specifications are listed in the table below: Table B-1: EasyWiFi specifications Parameter Radio technology Networking Frequency operation 2412-2472 MHz Wireless modulation • (IEEE802.11g) Orthogonal Frequency Divisional Multiplexing (OFDM) • (IEEE802.11b) Direct Sequence Spread Spectrum (DSSS) WiFi protocols • IEEE 802.11b • IEEE 802.11g Japanese Standard ARIB STDT66 WiFi antenna Gain: 1 dBi Clients • No. of concurrent assigned users: 1,024 • No.
EasyWiFi EasyWiFi Specifications Parameter Management Environmental Conditions Mechanical 18120511-01 Value Environmental ETS 300 019 (ETSI) EMC EN 301489 (ETSI) FCC Part 15 Sub Class B Radio • FCC Part 15 15.247- 2.4 GHz • EN 300 328 2.
D Power Adapter Specifications The specifications of the AC/DC power adapter are listed in the table below: Table C-1: AC/DC power adapter specifications Parameter Input Output General 18120511-01 Value Input voltage 90 to 264 VAC Input frequency 47 to 63 Hz Input inrush current • 30 A at 115 VAC • 60 A at 230 VAC Earth leakage • 0.4 mA max. @ 115 VAC • 0.8 mA max. @ 230 VAC Output rating 6V / 4A Output voltage accuracy ± 2% max. Max. output power 24W Line regulation ± 1% max.
EasyWiFi P ow e r Ad a p t e r S p e c i f i c a t i o n s Parameter Environmental 18120511-01 Value Hold-up time 5 ms @ 115 VAC full load EMI / RFI VDE and FCC Class B limits Dielectric withstand Input/output: 3000 Vac Input/Ground: 1500 Vac Safety meet UL/CUL UL60950 CE EN55022 Switching frequency 100 kHz Connector for radio Input: interchangeable prongs Output: DC power jack Cable length 1.
EasyWiFi P ow e r Ad a p t e r S p e c i f i c a t i o n s This page is intentionally left blank. 18120511-01 Airspan Networks Inc.
How to find out more about Airspan products and solutions For more information about Airspan, its products and solutions, please visit our Web site: www.airspan.com Or write to us at one of the addresses below. We will be delighted to send you additional information on any of our products and their applications around the world.