Dual-Band Wireless A+G Router Share your broadband Internet connection ������������ User Manual ��� ���� �� �������� ������������������������ F6D3230-4
Table of Contents 1 Introduction . . . . . . . . . . . . . . . . . . . . . . . . . . . . . . . . . . . . . . . . . . . 1 Advantages of a Wireless Network . . . . . . . . . . . . . . . . . . . . . . . . . . 1 Placement of your Router for Optimal Performance . . . . . . . . . . . . . 2 2 Overview . . . . . . . . . . . . . . . . . . . . . . . . . . . . . . . . . . . . . . . . . . . 6 Product Features . . . . . . . . . . . . . . . . . . . . . . . . . . . . . . . . . . . . . . . . .
Introduction • Share one high-speed Internet connection with all the computers in your home • Share resources, such as files and hard drives among all the connected computers in your home • Share a single printer with the entire family • Share documents, music, video, and digital pictures • Store, retrieve, and copy files from one computer to another • Simultaneously play games online, check Internet email, and chat 1 2 3 4 5 6 7 8 9 Advantages of a Wireless Network • Mobility – you no longer
Introduction Placement of your Router for Optimal Performance Important Factors for Placement and Setup Your wireless connection will be stronger the closer your computer is to your Router. Typical indoor operating range for wireless devices is between 100 and 200 feet. In the same way, your wireless connection and performance will degrade somewhat as the distance between your Router and connected devices increases. This may or may not be noticeable to you.
Introduction Avoid Obstacles and Interference Avoid placing your Router near devices that may emit radio “noise”, such as microwave ovens. Dense objects that can inhibit wireless communication include: • Refrigerators • Washers and/or dryers • Metal cabinets • Large aquariums • Metallic-based UV tinted windows 3 5 6 7 Cordless Phones If the performance of your wireless network is impaired after attending to the above issues, and you have a cordless phone: 4.
Introduction manual), and move your Router and computers to a channel as far away from other networks as possible. • Experiment with more than one of the available channels, in order to find the clearest connection and avoid interference from neighboring cordless phones or other wireless devices. • For Belkin wireless networking products, use the detailed Site Survey and wireless channel information included with your wireless network card. See your network card’s user guide for more information.
Introduction A second alternative is to change your computer’s power management settings so it does not go to sleep; however, this may not be appropriate for portable computers. To change your power management setting in Windows, see the “Power Options” item in the Control Panel. 1 2 3 4 If you continue to have difficulty with Secure Connections, VPNs, and AOL, please review the steps above to be sure you have addressed these issues.
Overview Product Features In minutes you will be able to share your Internet connection and network your computers. The following is a list of features that make your new Belkin Dual-Band Wireless A+G Router an ideal solution for your home or small office network. Works with Both PCs and Mac® Computers The Router supports a variety of networking environments including Mac OS ® 8.x, 9.x, X v10.x, AppleTalk®, Linux®, Windows® 95, 98, Me, NT ®, 2000, and XP, and others.
Overview Support for VPN Pass-Through If you connect to your office network from home using a VPN connection, your Router will allow your VPN-equipped computer to pass through the Router and to your office network. Built-In Dynamic Host Configuration Protocol (DHCP) Built-In Dynamic Host Configuration Protocol (DHCP) on-board makes for the easiest possible connection of a network. The DHCP server will assign IP addresses to each computer automatically so there is no need for a complicated networking setup.
Overview Belkin Parental Control allows you to set up your own policies and block any website you want. There is also an optional reporting feature (fee-based) that allows you to get a report showing you every website that was visited from your network (refer to your Parental Control User Manual for more information). MAC Address Filtering For added security, you can set up a list of MAC addresses (unique client identifiers) that are allowed access to your network. Every computer has its own MAC address.
Overview 2. 1 Wireless Network Icons 3. OFF Wireless network is OFF Slow Blinking Wireless network is ready Fast Blinking Indicates wireless activity LAN Port-Status LEDs These icons are labeled 1–4 and correspond to the numbered ports on the rear of the Router. When a computer is properly connected to one of the LAN ports on the rear of the Router, the icon will light when a device is connected. When information is being sent over the port, the icon blinks rapidly. 4.
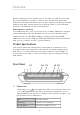
Overview Rear Panel (10) (6) 6. (7) (8) (9) Power Jack – GRAY Connect the included 5V DC power supply to this jack. 7. Connections to Computers (LAN Ports) – BLUE Connect your wired (non-wireless) computers to these ports. These ports are RJ45, 10/100 auto-negotiation, auto-uplinking ports for standard UTP category 5 or 6 Ethernet cable. The ports are labeled 1 through 4. These ports correspond to the numbered LEDs on the top of the Router. 8.
Overview 1 Resetting the Router Restoring the Factory Defaults Press and hold the “Reset” button for at least 10 seconds then release it. The lights on the Router will momentarily flash. When the lights stop blinking, the reset is complete. 2 3 4 5 10. Rotating Antennas Both antennas can rotate 180 degrees and swivel up to 90 degrees to allow for optimal positioning of the antennas in either a desktop or wall-mount application. For best wireless performance, the antennas should always be pointing up.
Overview System Requirements • Broadband Internet connection such as a cable or DSL modem with RJ45 (Ethernet) connection • At least one computer with an installed network interface adapter • TCP/IP networking protocol installed on each computer • RJ45 Ethernet networking cable • Internet browser Easy Install Wizard Software System Requirements A PC with: • Windows ® 98SE, Me, 2000, or XP, or a Mac ® computer running Mac OS ® 9.
Connecting and Configuring the Router Setting Up the Router with the Easy Install Wizard If you do not have a CD-ROM drive or one of the required operating systems, please continue to the “Alternate Setup Method” section of this manual to install the Router. 3 4 5 6 Modem Requirements Your cable or DSL modem must be equipped with an RJ45 Ethernet port. Many modems have both an RJ45 Ethernet port and a USB connection.
Connecting and Configuring the Router Step 1 Install Important: Run the Easy Install Wizard software first! 1.1 Do not connect the Router at this time. From the computer that is directly connected to your high-speed cable or DSL modem, shut down any programs, firewall, and Internet-sharing software applications that are running. 1.2 Windows Users: Insert the Easy Install Wizard software CD into your CD-ROM drive. The Easy Install Wizard screen will automatically appear on your screen within 15 seconds.
Connecting and Configuring the Router 1.3 You will now see the first of a 2 3 4 1.4 The next screen will tell you that the Wizard is examining your network settings. When the Wizard is finished examining your settings, click “Next”. 5 6 7 8 1.5 You may see the Multi NICs screen. This screen will appear ONLY if you have more than one network adapter installed in your computer.
Connecting and Configuring the Router Step 2 Connect Connect your Router to your computer and modem. 2.1 This step instructs you to locate the cable connected between your modem and the networking port on your computer. Unplug this cable from the computer and plug it into the GREEN port on the Router. Click “Next” to continue. (The color of your modem cable may vary from this setup image.) 2.2 This step instructs you to locate the BLUE cable that is included with your Router.
Connecting and Configuring the Router Step 3 1 Check The Easy Install Wizard software will verify your connections. connecting the Router, the Wizard will check the connection to the Router and then go on to determine what type of Internet connection you have. 2 3 4 5 6 3.2 If you have a connection type that requires a user name and a password (from a high-speed carrier that may require you to log on to access the Internet), you may see this screen.
Connecting and Configuring the Router 3.3 The Wizard will now transfer all of the configuration information to the Router. This will take approximately one minute. During this time, do not turn off the Router or computer. The Router will restart itself at the end of this step. 3.4 The Wizard will now check for an Internet connection. This can take a few minutes. The Wizard may not detect a connection right away. If not, it will retry 10 times.