
Installation manual


8. Commissioning
Operation and Installation Manual for SOLIVIA 2.0/2.5/3.0/3.3/3.6/5.0 EU G4 TR
48
➔
-------------------
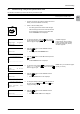
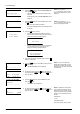
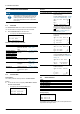
Load swap data
Load settings
-------------------
Load USB data
8. Press the buttons to select Load Swap Data and
then press the
button.
→ The solar inverter will then search for les on the
USB drive.
When les are found, the Select RS485 ID menu is
displayed.
NOTE: If the message No les
found is displayed, make sure the
les are in the main directory of the
USB drive.
➔
ID: 1
Select RS485 ID
9. Press the buttons to select the ID and then press
the
button.
→ The data is then veried and loaded.
A message is displayed when the loading process is
successful.
NOTE: If the message Pendrive
error is displayed, make sure the
USB drive is properly inserted.
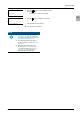
Press ENTER
Successful
Load data
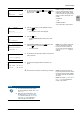
10. Press the button to conrm.
→ If the asymmetrical grid load balancing was acti-
vated on the solar inverter from which the data was
loaded, the following message appears.
activated
Power balancing is
→ If active or apparent power limitation was activated
on the solar inverter from which the data was
loaded, the following message appears.
##.#W/##.#kVA
been limited to
of that inverter has
The maximum power
11. If the above mentioned messages appear, press the
button to conrm each.
➔
-------------------
No
Yes
-------------------
Change loaded values
12. Press the buttons to select No and then press the
button.
→ The Date and Time menu is displayed.
NOTE: If you wish to change the
loaded values, select Yes. Commis-
sioning then continues with the grid
selection and is the same as the initial
commissioning.
➔
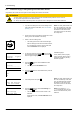
Time: 14:26:51
Date: 25.05.2012
-------------------
Date and time
13. To change the value, press the button and then set
the value using the
buttons. Press the button to
apply the value.
➔
continue
Time: 14:26:51
Date: 25.05.2012
-------------------
-------------------
Date and time
14. Press the buttons to select continue and then
press the
button.
→ The RS485 menu is displayed.
➔
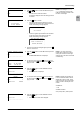
Baudrate: 19200
ID: 1
-------------------
RS485
15. To change the value, press the button and then set
the value using the
buttons. Press the button to
apply the value.
NOTE: If multiple solar inverters are
to be connected via RS485, select a
different ID for each inverter. The ID
is also used when saving and loading
settings in order to identify the solar
inverter.
Available IDs:
1 - 254
Available baudrates:
2400 | 4800 | 9600 | 19200 | 38400