
Installation manual


8. Commissioning
Operation and Installation Manual for SOLIVIA 2.0/2.5/3.0/3.3/3.6/5.0 EU G4 TR
42
➔
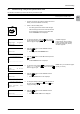
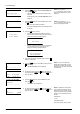
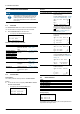
Smax: _._kVA
Pmax: _._kW
-------------------
Locked power limit
10. To change the value, press the button and then set
the value using the
buttons. Press the button to
apply the value.
NOTE: If you change one of the val-
ues, you must ll out the provided
label after commissioning and place it
next to the type plate
NOTE: The congured values can
only be changed with a PIN after com-
missioning.
NOTE: The congured values are
displayed after commissioning in the
131 View Grid Setup menu.
➔
continue
Smax: _._kVA
Pmax: _._kW
-------------------
-------------------
Locked power limit
11. Press the buttons to select more and then press
the
button.
→ The Power Balancing menu is displayed.
➔
continue
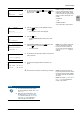
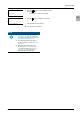
Balancing: Off
-------------------
Power balancing
12. To change the settings, press the button and then
select the option using the
buttons. Press the
button to apply the setting.
NOTE: The grid load can only be
balanced with a SOLIVIA Gateway M1
G2. If no gateway is connected, the
Balance option will always be set to
Off. Otherwise the solar inverter will
not feed into the grid.
➔
-------------------
continue
Balancing: Off
-------------------
Power balancing
13. Press the buttons to select continue and then
press the
button.
→ The Format menu is displayed.
➔
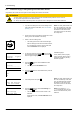
Time: 24h
Date: DD.MM.YYYY
-------------------
Format
14. To change the value, press the button and then set
the value using the
buttons. Press the button to
apply the value.
Available date formats:
DD.MM.YYYY | DD/MM/YYYY
DD-MM-YYYY | MM.DD.YYYY
MM/DD/YYYY | MM-DD-YYYY
YYYY.MM.DD | YYYY/MM/DD
YYYY-MM-DD
Available time formats:
12h | 24h
➔
continue
Time:
24h
Date: 25.05.2012
-------------------
-------------------
Format
15. Press the buttons to select continue and then
press the
button.
→ The Date and Time menu is displayed.
➔
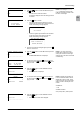
Time: 14:26:51
Date: 25.05.2012
-------------------
Date and time
16. To change the value, press the button and then set
the value using the
buttons. Press the button to
apply the value.
➔
continue
Time: 14:26:51
Date: 25.05.2012
-------------------
-------------------
Date and time
17. Press the buttons to select continue and then
press the
button.
→ The RS485 menu is displayed.