
Installation manual


27
Operation and Installation Manual for SOLIVIA 2.0/2.5/3.0/3.3/3.6/5.0 EU G4 TR
7. Installation
EN
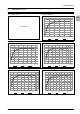
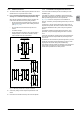
7.2.2 Installing Mounting Plate
You can use the mounting plate as a template for marking the posi-
tions of the holes to be drilled.
12
6,5
12
200
320
38
90
150
319,5
410 ± 0,5
∅12
A
A
A
A
B
B B
CC
Fig. 7.4: Mounting plate scale drawing
1. Attach the mounting plate to the wall using at least four screws
(avg. 6 mm) and dowels. Use the four holes A or the four
holes B for the four screws (see Fig. 7.4, p. 27).
2. Screw the screws tightly into the wall.
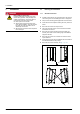
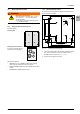
7.2 Mounting Solar Inverter
WARNING
Risk of injury due to weight
The solar inverter is very heavy (see “15 Techni-
cal Specications”, p. 80). Incorrect handling
can lead to injuries.
► The solar inverter must be lifted and carried
by at least two people.
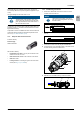
7.2.1 Required Tools and Accessories
Included in delivery:
Mounting plate
Mounting nuts and washers: 2
pcs. each for mounting the solar
inverter to the mounting plate
Not included in delivery:
▪ Screws (avg. 6 mm) + dowels for attaching the mounting
plate to the wall. At least four screws are required.
▪ Drill and drill bits suitable for the wall material and size of the
dowels.
▪ Screwdriver or wrench tting the screws.