
Combustible Ceiling Installation Instructions

Information is subject to change without notice or obligation. M-59988 Rev. C
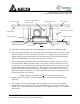
Notes: Dimensions denoted by ( ) are in millimeters.
Ceiling Radiation Damper SMT-CRD
Combustible Ceiling Installation Instructions
5. If fan is not equipped with a lighted grille this bracket is to be installed as seen in Figure 2.
Ensure that the bracket covers the notch in the frame.
6. Install the fan Suspension Brackets on the fan/damper assembly.
7. Position the fan/damper assembly in the ceiling construction so that the fan Suspension
Brackets mount flush with the fan support 2x4’s installed in step 3. Drive in the 6D nails at
the ends of the fan Suspension Brackets into the 2x4’s to secure the assembly in the ceiling.
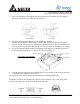
8. Secure the supplied support angles to the damper frame using the pre drilled holes in the
frame using the supplied # 8 x ¼” long screws as seen in Figure 4.
Support Angles #8 x 1/4” Screws
FIG.4 Support Angles Installation
Support Angles
9. After the gypsum ceiling has been installed make sure it is resting on the support angle that
is installed on the damper frame on step 6.
10. Install the fan’s grille according to the standard fan installation documents.
Installation is valid for the following UL rated wood truss ceilings: L521, L546, L558, L562,
L574, L576, L581, L583, L585, P522, P533, P538, and P545.