LDB-1 Little Drummer Boy Analog Drum Machine User Manual The most up-to-date version of this manual can be found at: http://delptronics.com/documents/LDB1UserManual.
LDB-1 User Manual 2 Introduction The LDB-1 “Little Drummer Boy” is a modern recreation of the classic analog drum machines of the 80's, like the Roland TR-606 and TR-808. Our goal was to recreate the warm sounds of the classics, using all analog circuitry - not samples. The brain of the LDB-1 is a powerful digital microcontroller that triggers the analog drum sounds and provides the sequencer, programmability and connectivity features.
LDB-1 User Manual 3 Quick Start This manual gives you all the information you need to use every one of the many features of the LDB-1 Drum Machine. But, before diving into the details, here is a quick start so you can begin playing rhythms right away. Power Up 1. Insert a 9V battery, or plug in an AC adapter (AKA wall wart). The power jack on the LDB-1 is a center-negative, type-M power jack. You can use just about any standard 9 to 10 volt pedal power supply.
LDB-1 User Manual 4 Drum Machine Basics The LDB-1 has a very simple interface for playing and editing rhythms. If you have used one of the classic drum machines such as the TR-606, TR-808, or TR-909, then the LDB-1 will be very familiar to you. If this is your first drum machine, then the information below will help you get started. First, let’s define a couple of drum machine terms: Step, Pattern, and Song. A step is one beat, typically a sixteenth note. A pattern is a sequence of beats.
LDB-1 User Manual 5 Drum Machine Basics (continued) Accents In drumming, an accent is when a drum or cymbal is hit a little harder and louder. In drum tabs, an accented instrument can be indicated with a capital X or O whereas the unaccented drum will be indicated with a lowercase letter. Drum tabs written specifically for drum machines sometimes show the accent as a separate instrument. In that case, when there is an X or O in the accent row, it means that all instruments on that beat should be louder.
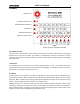
LDB-1 User Manual 6 Controls Tempo Knob → Run Button & Run LED → Mode Button & Mode LED → Ctrl Button → Alt Button & Alt LED → Measure Indicator LED → Selector (Drum or Step) Buttons & LEDs Quick Reference Grid The grid on the control panel is a quick reference that shows the modes and what the Ctrl (control) and Alt buttons do in each of the modes.
LDB-1 User Manual 7 Controls (continued) Mode Button The Mode button changes the basic mode of operation of the drum machine. You can press the Mode button at any time to see what the current mode is. When you press the Mode button only one of the Selector LEDs will be illuminated, indicating the current mode. Release the Mode button to stay in the current mode, or hold down the Mode button while pressing one of the eight Selector buttons to switch to a different mode.
LDB-1 User Manual 8 Play Drums Mode When you turn on the LDB-1, it starts in Play Drums mode. Sel Drums: Pressing the Selector buttons will play the corresponding instrument. Alt As Hit / In Time: Pressing the Alt button toggles between the As Hit and In Time behaviors. The Alt LED will be illuminated when the In Time behavior is selected. As Hit means that the instrument will play when you press the Selector button. To play the same instrument again, you must release and re-press the button.
LDB-1 User Manual 9 Play Patterns Mode There are 64 patterns organized into eight banks of eight patterns each. Sel Patterns: Pressing one of the eight Selector buttons selects the pattern to play within the current pattern bank. The LED corresponding to the currently playing pattern is illuminated. If a pattern is playing when a different pattern is selected, the new pattern will not start playing until the current pattern finishes.
LDB-1 User Manual 10 Play Songs Mode A song is a sequence of patterns. There are 16 songs, organized into two banks of eight songs. Each song can be up to 24 patterns long. Unlike pattern chains, a song can contain patterns from multiple pattern banks, and can repeat patterns. For example, a song could play pattern 1 twice, then pattern 2, then pattern 1 twice, then pattern 48, etc. This is explained in more detail in the description of the Edit Song mode.
LDB-1 User Manual 11 Edit Pattern Mode This is one of two modes in which you create and edit rhythm patterns. In the Edit Pattern mode you select a drum and set the steps on which that drum will play. In the Write Pattern mode, you go through each step sequentially, and select the drums that will play on that step.
LDB-1 User Manual 12 Edit Pattern Mode (continued) Selector LEDs For example, let us just consider the first Selector LED, which represents step 1 and step 9. If the drum is off in both step 1 and step 9, then the first Selector LED will be off regardless of which half of the measure you are editing. The chart below describes the state of the Selector LED for each scenario.
LDB-1 User Manual 13 Edit Pattern Mode (continued) Advanced Edit Pattern Functions Several advanced functions are available in the Edit Pattern and Step-Write Pattern modes that are not shown on the control panel quick reference grid. Ctrl + Alt Set Pattern Length: When you press and hold both the Ctrl and Alt buttons simultaneously, one of the eight Selector LEDs will be illuminated, indicating the current pattern length. To leave the pattern length unchanged, release both buttons.
LDB-1 User Manual 14 Write Pattern Mode This is one of two modes in which you create and edit rhythm patterns. In the Edit Pattern mode you select a drum and set the steps on which that drum will play. In the Write Pattern mode, you go through each step sequentially, and select the drums that will play on that step. Selecting which pattern to write works the same as in Edit Pattern mode. Please see the first four paragraphs of that section.
LDB-1 User Manual 15 Edit Song Mode This is the mode in which you compose songs by specifying a list of patterns. There are 16 songs (two banks of 8) with up to 24 patterns (or measures) per song. If a song is currently playing when you select the Edit Song mode, then the LDB-1 will assume that you want to edit the current song, and it will not ask you which song you want to edit. The song will stop playing, and you are now editing it.
LDB-1 User Manual 16 Edit Triggers Mode The LDB-1 can send trigger signals to a modular synthesizer connected to the Trigger Out jack. Triggers can be sent on any steps and/or instruments that you specify. See the Connectivity section of this manual for the electrical characteristics of the Trigger Out jack. Run Start / Stop: The Run button starts or stops playing the current pattern or song (depending what was playing when you entered the Edit Triggers Mode).
LDB-1 User Manual 17 Setup Mode Sel On / Off: The Selector buttons and LEDs represent the state of the various options. Pressing a Selector button toggles the Selector LED on or off. The meaning of each LED is described below along with easy to read quick reference grids. Alt Options / MIDI: Pressing the Alt button toggles between Options setup and MIDI setup. The Alt LED will be illuminated when you are editing MIDI setup.
LDB-1 User Manual 18 Setup Mode (continued) MIDI Setup ① ❾ BD Clock Enable Off On ② ❿ LT ③ ⓫ HT Map Mode All Drums Specific Notes Octaves ④ ⓬ SD All Channels Off On ⑤ ⓭ ⑥ WB ⓮ ⑦ CP ⓯ ⑧ CH ⓰ OH MIDI Channel 1 2 3 4 5 6 7 8 9 10 11 12 13 14 15 16 MIDI Clock: When the MIDI clock is disabled, any MIDI clock signals
LDB-1 User Manual 19 Connectivity Power The LDB-1 runs on 9 to 10 volts. You can connect a 9 volt battery, and/or an AC adapter (AKA wall wart). The power jack on the LDB-1 is a center-negative, type-M power jack. You can use just about any standard 9 to 10 volt pedal power supply. Do not use a center-positive power plug, or a power supply that exceeds 10 volts, or you could permanently damage the circuitry of the LDB-1. At Delptronics, we are partial to the “Danelectro DA-1 9.
LDB-1 User Manual 20 Connectivity (continued) DINsync DINsync is a standard used by older drum machines, primarily from Roland. DINsync provides a clock signal and a gate (on/off) signal. The DINsync jack and the MIDI jack are one and the same, so you cannot use them both at the same time. The clock input pin on the DINsync jack, and the signal pin on the Clock In jack are connected. Likewise, the gate input pin on the DINsync jack, and the signal pin on the Gate In jack are connected.
LDB-1 User Manual 21 Built-in Patterns Bank 5 1 2 3 4 5 6 7 8 Bank 6 Rock A 1 2 3 4 5 6 7 8 9 I0 II I2 CH x x x x x x x x x SD o o o o BD o o o Rock B 1 2 3 4 5 OH x CH x x x SD o BD o o 1 I3 x o I4 I5 x o I6 x o 2 6 7 8 9 I0 II I2 x x x x x o o o o o o o Bossa Nova A 1 2 3 4 5 6 7 8 9 I0 II I2 CH x x x x x x WB o o o o LT o BD o o o o o o Bossa Nova B 1 2 3 4 5 6 7 8 9 I0 II I2 CH x x x x x x WB o o o o o LT o BD o o o o o o Mambo A 1 2 3 4 5 6 7 8 9 I0 II I2 CH x x x x x x WB o o o HT o
LDB-1 User Manual 22 Built-in Patterns Bank 7 1 OH CH SD BD 2 3 OH CH SD BD 5 6 7 Sample Rock 1A 1 2 3 4 5 6 7 8 9 I0 x x x x x o o o o o Sample Rock 1B 1 2 3 4 5 6 7 8 9 I0 OH CH SD BD 4 Bank 8 x x o x o o x o x Sample Rock 2A 1 2 3 4 5 6 7 8 9 I0 x x x x x x x x x o o o o Sample Boogie 1 2 3 4 5 6 7 8 9 I0 OH x x x x SD o o BD o o o Amen Break 1 2 3 4 5 6 7 8 9 I0 CH x x x x x SD o o o BD o o Amen Break Fill A 1 2 3 4 5 6 7 8 9 I0 CH x x x x x SD o o o BD o o Amen Break Fill B 1 2 3 4
LDB-1 User Manual 23 Default User Patterns Bank 1 1 Pop 1 1 2 3 4 5 6 7 8 9 I0 II I2 CH x x x x x x SD o BD o o o o o o o o 2 OH CH SD BD Pop 2 1 2 3 4 5 6 7 8 9 I0 II I2 x x x x x x x o o o o o o o o OH CH SD BD Pop 3 1 2 3 4 5 6 7 8 9 I0 II I2 x x x x x x x o o o o o o o o 3 4 Pop 4 1 2 3 4 5 6 7 8 9 I0 II I2 OH x x x CH x x x SD o BD o o o o 5 OH CH SD BD 6 Pop 5 1 2 3 4 5 6 7 8 9 I0 II I2 x x x x x x o o o o Pop 6 1 2 3 4 5 6 7 8 9 I0 II OH CH SD BD 7 Bank 2 x x x x x x x x x o o o o o
LDB-1 User Manual 24 Default User Patterns Bank 3 1 2 3 4 5 6 Rock 1 1 2 3 4 5 6 7 8 9 I0 II I2 CH x x x x x x SD o o o BD o o o o 1 I3 x o I4 I3 x o I4 Rock 3 1 2 3 4 5 6 7 8 9 I0 II I2 CH x x x x x x SD o BD o o o o o o o I3 x o I4 Rock 4 1 2 3 4 5 6 7 8 9 I0 II I2 CH x x x x x x SD o BD o o o o o I3 x o Afro-Cuban 1 2 3 4 5 6 7 8 9 I0 II I2 CH x x x x x x x WB o o BD o o Reggae 1 1 2 3 4 5 6 7 8 9 I0 II I2 OH x CH x x x x x SD o BD o o o I5 x I6 o Rock 2 1 2 3 4 5 6 7 8 9 I0 II I2 C