XM is America's number one satellite radio company. Broadcasting live daily from studios in Washington, DC, New York City, Chicago, the Country Music Hall of Fame in Nashville, Toronto and Montreal, XM's lineup includes more than 170 digital channels of choice from coast to coast: commercial-free music, premier sports, news, talk radio, comedy, children's and entertainment programming; and the most advanced traffic and weather information.
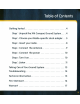
Getting Started 4 Step 1: Unpack the XM Compact Sound System 4 Step 2: Choose your Radio-specific dock adapter 5 Step 3: Insert your radio 8 Step 4: Connect the antenna 9 Step 5: Connect the power 10 Step 6: Turn it on 10 Step 7: Listen 11 Taking Care of Your Sound System 13 Troubleshooting 14 Technical information 15 FCC Statement 16 Warranty 17
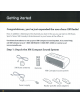
Congratulations, you've just expanded the use of your XM Radio! Now, in addition to listening to the channels you love in the car, you can listen to XM Music, Sports, News, Talk, Comedy & Entertainment in your home, at the office, etc. Use these instructions to set up your XM Compact Sound System. If you need help, call XM Listener Care at 1·800·XM·RADIO (1·800-967-2346) or contact us at www.xmradio.com.
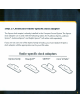
Step 2: Choose your Radio-specific dock adapter The Xpress dock adapter is already installed in the Compact Sound System. The Xpress dock adapter can be used with the following radios: the Audiovox Xpress, Audiovox Xpress EZ, Audiovox Xpress R, and Delphi Xpress RC (all radios sold separately). If you are not using one of the Xpress fam ily of radios, you must replace the Xpress dock adapter with the appropriate one for your XM radio.
1 To remove the Xpress dock adapter, lift both sides of the adapter at the same time. 2 Insert the dock adapter for your radio. If your radio is a Pioneer inno~ or a Sam sung Helix~, you will also need the XM2go Boombox Adopter XMPA 1 (Sold separately). After installing the dock adapter, plug the special XM2go Boombox Adapter into place.
Adapter for the inno™ and Helix™ inno~/ Helix~ XM2go Boombox Adapter XMPAI (Sold separately) Included inno~/Helix~ Dock Adapter
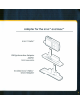
Step 3: Insert your radio To insert your XM Radio into the Compact Sound System, align the radio's connector with the Sound System's connector, then carefully but firmly press to secure the radio in place. D~ 00000000000 TIP! Although designed to fit snugly, we recommend that you remove the radio before moving the Sound System.
Step 4: Connect the antenna 1 Place the antenna: • Position the antenna for best reception, most likely near a south-facing window. 2 Plug the antenna into the jack labeled Antenna.
Step 5: Connect the power 1 Plug the AC power adapter into the jack labeled 12V DC on the Sound System. 2 Plug the other end into any 110 - 120V wall outlet or power source. \ I' Step 6: Turn it on • • 1 Press the power button on the Sound System. 2 Turn on your XM Radio. TIP! For some radio models, you can enable the Auto-ON feature for ease of use. Refer to your radio's menu settings and User Guide for instructions. The Helix and inno need to be powered down manually.
Step 7: Listen 1 Operate your XM Radio according to its User Guide. 2 Use the volume buttons on the Sound System or remote control to adjust the sound level. 3 To control both your XM radio and Sound System use the remote that is included with your sound system. (see page 12) If desired, plug in your headphones to the phones jack. Use the volume buttons on the Compact Sound.5ystem to control the headphones. The Sound System's speakers are muted when the headphones are in use.
Remote Control functions Power Button * ((I)(Ml») 60-Minute Replay Buttons Pause and replay up to 60 minutes of live XM broadcast. Select menu entries, change channels. XM Button Display Confirms selection for channel and menu items. ----f-t-t--r+tr Customize the way you view content on the display. Menu info Displays either your personal stock or info extras information. Number Keys Enter a channel directly, select your favorite channels, or access songs saved in SongSaver.
Placement Do not place the Sound System or XM radio near heat sources or in direct sunlight. Do not place the Sound System on an inclined or unstable surface, in areas of excessive dust, or areas prone to mechanical shock. Do not block the speakers or ventilation ports. Because the speakers contain powerful magnets, keep credit cards, mechanical watches, and other devices that might be affected away from the Sound System.
If this happens My XM radio is not receiving a signal. Try this Use the"antenna aiming"feature on the XM ra- dio and move the antenna to another location. My XM radio will not turn on. Check whether the power cord is plugged into the wall. If applicable, make sure Auto-ON is enabled. I only receive XM channels 0 and 1. Make sure your radio is activated. Contact XM at www.xmradio.com or 1-800-XM-RADIO. The radio and Sound System are on and receiving a signal but I can't hear anything.
Dimensions XM Compact Sound System Adapter Remote 300mm(W) X 93mm(H) X 120mm(D) 11.80 in(W) X 3.66 in(H) X 4.72 in (D) 49mm(W) X 78mm(H) X 35mm(D 1.93 in(W) X 3.07 in(H) X 1.37 in (D) 40mm (W) X 119mm(H) X 14mm (D) 1.57 in (W) X 4.68 in (H) X 0.55 in (D) Weight XM Audio System Adapter Remote 2.27 Kg 0.14 Kg 0.04 Kg Inputs and Outputs XM antenna input Aux In Headphone output 5MB connector 3.5mm diameter mini stereo jack 3.
The user is cautioned that changes or modifications not expressly approved by XM Satellite Radio Inc. can void the user's authority to operate this device. This device complies with Part 1S of the FCC Rules. Operation is subject to the following two conditions: (1) This device may not cause harmful interference. (2) This device must accept any interference received, including interference that may cause undesired operation.
~AUDIOYO~ 12 Month Limited Warranty AUDIOVOX ELECTRONICS CORPORATION (the Company) warrants to the original retail purchaser of this product that should under normal use and conditions, be proven defective in material or workmanship within 12 months from the date of original purchase, such defect(s) will be repaired or replaced with new or reconditioned product (at the Company's option) without charge for parts and repair labor.
This Warranty is in lieu of all other express warranties or liabilities. ANY IMPLIED WARRANTIES, INCLUDING ANY IMPLIED WARRANTY OF MERCHANTABILITY, SHALL BE LIMITED TO THE DURATION OF THIS WRITIEN WARRANTY. ANY ACTION FOR BREACH OF ANY WARRANTY HEREUNDER MUST BE BROUGHT WITHIN A PERIOD OF 24 MONTHS FROM DATE OF ORIGINAL PURCHASE. IN NO CASE SHALL THE COMPANY BE LIABLE FOR ANY CONSEQUENTIAL OR INCIDENTAL DAMAGES FOR BREACH OF THIS OR ANY OTHER WARRANTY.
Notes:
XM Compact Sound System IMPORTANTI NOTE: This XM Compact Sound System is now compatible with the Pioneer XMp3'M portable radio. An additional radio-specific dock adapter is included with this system (see underside of each adapter to identify the proper one for your radio). Consult the Getting Started section of the User Guide for information regarding use of dock adapters and set up of sound system.
XM Compact Sound System IMPORTANT! NOTE: To achieve the optimal performance from this sound system, be sure to adjust the "Line Out Level" of your XM radio to the maximum level, using the "Menu" settings on your device. See your XM radio user guide for additional information. iIMPORTANTE! NOTA: Para optimizar el sonido en su XM Compact Sound System, maximiza el nivel de sonido a traves de la opcion de menu I/Line Out Level" en su radio XM. Refiere al gufa de usuario de su radio XM para mas informacion.