SKYFiTM Audio System & Installation Operation Guide This symbol is intended to alert the user to the presence of important operating and maintenance (servicing) instructions in the literature accompanying the appliance.
Warning To prevent fire or shock hazard, do not expose the boom box to rain or moisture. This symbol is intended to alert the user to the presence of uninsulated “dangerous voltage” within the product’s enclosure that may be of sufficient magnitude to constitute a risk of electric shock to persons. This symbol is intended to alert the user to the presence of important operating and maintenance (servicing) instructions in the literature accompanying the appliance.
Table of contents SKYFiTM Audio System Set-Up……….…………….......…….….4 Antenna Set-Up……………......................…….........…...….….6 Using the SKYFiTM Audio System………..………..…..…...……8 Precautions………….. …………………………...….…..……...10 Troubleshooting…………………………………....……..……...11 Maintenance……………………………………...………..….....11 Specifications……………….………………………...….……...
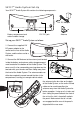
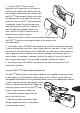
SKYFiTM Audio System Set-Up Your SKYFiTM Audio System Kit contains the following components: 12V. DC Adaptor Battery compartment and 12V. DC jack Antenna antenna cable storage Set-up your SKYFiTM Audio System as follows: 1. Connect the supplied 12V DC power adapter to the socket on the rear of the Audio System, and the other end to a wall outlet. 2. Connect the XM Antenna to the antenna jack located inside the battery and antenna cable storage compartment located on the bottom of the Audio System.
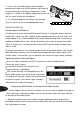
3. Insert the SKYFiTM Receiver (sold separately) by first pressing in on the back of the black inset cradle in the Audio System and then letting the cradle tilt forward, carefully slide the SKYFiTM Receiver down into the tray so that the alignment tabs on the sides of the tray lineup with the slots on SKYFiTM and the connector is completely seated. Push on the top center above the display of the SKYFiTM Receiver so that it tilts back into the Audio System until a click is heard.
3. Insert six D size (R20) batteries into the battery compartment. Make sure that the batteries are facing the correct direction by verifying that the positive (+) and negative (-) symbols in the battery compartment match up with the same symbols on the batteries. 4. It is recommended that the batteries be removed when it is not in use for an extended period of time.
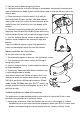
2. Fold the antenna down flat against its base. 3. Position the antenna so that the XM logo is upside down, then place the antenna base against the back of the Audio System so that the four pegs line up with the four slots in the antenna base. 4. Place the antenna so that the base is flush with the back of the Audio System, and then slide down approximately 3/8ths of an inch so that the tab at the base of the Audio System lines up with the slot in the bottom of the antenna. 5.
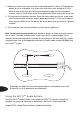
2. Attach four screws to the wall using the screw-locator pattern in figure 6. Photocopy the pattern to use as a template. Use screws with head sizes small enough to fit in the center of each of the four holes but large enough not to pop out of the elongated sections. Leave 1/8 inch of the screw shanks behind the heads sticking out of the wall. 3. Tilt the antenna fully back on the base. Place the antenna base on the four screw heads with the antenna pivot at the top.
Volume Volume can be adjusted using the volume knob on the SKYFiTM Audio System. In addition, when the SKYFiTM Receiver is connected to the Audio System, the + and – controls on the remote control can also be used to increase (+) and decrease (-) the volume.
Precautions: 1. On power sources. For AC operation, it is recommended that only the supplied AC power adaptor is used; If you need to use another one, make sure it is a 12V, 1500mA DC adaptor with a unified polarity-type jack. The satellite radio unit (SKYFiTM) is not disconnected from the AC power source (mains) as long as it is connected to the wall outlet, even if the satellite radio unit (SKYFiTM) itself has been turned off or detached.
The supplied AC power adaptor is not water resistant. To prevent shock hazard, avoid using the SKYFiTM Audio System near water during AC operation. Water in the headphone jack may cause rusting and possible malfunction. Troubleshooting General: 1. The power is not on. Connect the AC power adaptor to a wall outlet securely and make sure the wall outlet has the 110V AC output. Make sure the batteries are inserted correctly. Replace all the batteries with new ones if they are weak. 2. There is no audio.
Specifications ITEM 1 2 3 4 5 Sensitivity Frequency Response Signal To Noise Ratio SPECIFICATION REMARK Nominal Limited W >4 > 3.5 % > 0.6 > 1.0 Output: 0.5w mV 180 140 ~ 235 Line Input Hz 65 ~ 22K 70 ~ 20K -3dB dB >65 >60 >45 >40 Rated Output (10%) at 1 KHz Frequency: 70Hz - 20KHz Frequency: 70Hz~20KHz 0dB: 0.775V/1KHz Level 1 0db: 2.0V/1KHz 6 Channel Separation dB - - Normal Input 7 Input Impedance Ohm - - Floating Input mV >4.7K 3 >4.
Delphi Corporation 1441 West Long Lake Road Troy, MI 48098-5090 USA Technical Assistance: [1] 877.GO DELPHI Customer Service: [1] 866.227.9071 www.delphi.com 2002 Delphi Corporation. All rights reserved. DAO-02-E-103 The SKIFiTM name, XM name, and related logos are trademarks of XM Satellite Radio Inc.