
Specifications

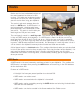


Creating a GOTO Route from the Cursor
This will create a GOTO route to a point on the plotter that you have indicated by moving the
crosshair cursor on the
Plotter screen.
1. While viewing the Plotter screen, use the Arrow joystick causing the eXplorist to go
into Cursor mode.
2. Continue using the
Arrow joystick to move the crosshair cursor to a point on the
plotter that represents where you want to go to.
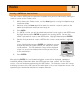
3. Press
GOTO.
4. If a GOTO is active, you will be asked to deactivate it and create a new GOTO route.
Highlight
Yes and press ENTER to overwrite the existing GOTO. You are then
asked if you want to create a new GOTO route. Highlight
Yes and press ENTER.
5. Confirm that you want to create a GOTO to the current cursor position. Highlight
Yes.
(If you highlight
No and press ENTER, the eXplorist assumes
that you still want to create a GOTO, just not to the current
cursor position. The POI database screen will be displayed
so you can search the database for the POI you want to use
as the destination.)
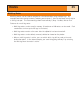
6. Press
ENTER.
After pressing ENTER, the last viewed navigation screen will be displayed, updated as
needed to provide information about the GOTO route you have created. On the Plotter
screen, a line will be drawn representing the GOTO route. The Compass screen will change
to display the name of the POI used as the destination in the screen header bar and an icon
representing the destination outside the compass diameter.
Routes
34
Attention
Yes No
Goto
current
cursor
position?
Creating a GOTO using the
cursor confirmation