
Specifications


Routes
33
Creating a GOTO Route
The instructions here describe the most common, and easiest way to create a GOTO
route.
1. Press
GOTO.
2. Use the Arrow joystick to highlight Nearest or
Alphabetical.
3. Press
ENTER.
4. Use the
Arrow joystick to highlight the POI you
want to go to.
5. Press
ENTER.
6. If you already have a GOTO you will be asked to
confirm the creation of this GOTO.
After pressing
ENTER, the last viewed navigation screen will be displayed, updated as
needed to provide information about the GOTO route you have created. On the
Plotter
screen, a line will be drawn representing the GOTO route. The Compass screen will
change to display the name of the POI used as the destination in the screen header
bar and an icon representing the destination outside the diameter of the compass.
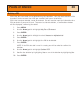
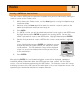
On the
Plotter screen you may notice two lines pointing to your destination. The
thicker lline is the original, computed GOTO from your position to the destination. As
you travel, it is unlikely that you can stay on this straight line so the path you need to
follow is constantly changing. The second displayed line is the path that you should
attempt to follow as you are moving. It is constantly updated and always shows the
shortest path from your present position to the destination.
1.60mi
352
o
M
4.3
M
H
Heading
Speed
OakTree
CA
Plotter screen with an
active GOTO.