NAVIGATION Portable Navigation Nav100 ENGLISH
CONTENTS 3 Nav100 Controls Feature highlights System requirements Packing contents 5 INFORMATION AND SAFETY Driving precautions General precautions Storage precautions Accessories and repair precautions Cleaning Note 7 OVERVIEW Controls 10 INSTALLATION Setting up the Nav100 on a vehicle 20 MULTIMEDIA MODE Multimedia mode overview MP3 mode Operating MP3 Photo mode 23 CONTACTS MANAGEMENT Contacts Using contacts 25 SYSTEM CONFIGURATION System settings overview Volume Power Backlight Date Time System Info
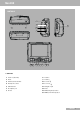
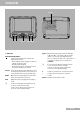
Nav100 CONTROLS 3 4 2 1 7 5 6 8 9 10 12 13 11 14 15 ■ CONTROLS 1 Power on /Standby 8 Volume – 2 Reset 9 Volume + 3 External aerial interface 10 Zoom in k 4 Headphone socket 11 Zoom out k 5 USB interface 12 Navigation pad 6 AC adapter port 13 Enter 7 SD slot 14 MAP (navigation) button 15 MENU (main menu) button ENGLISH 3
Nav100 ■ FEATURE HIGHLIGHTS POWERFUL SYSTEM Microsoft Windows CE .NET 4.2 operating system Samsung S3C2410 266 MHz application processor SiRF Star II LP chipset with Xtrac v2 7 7 7 ■ SYSTEM REQUIREMENTS Your computer should meet the following conditions for processing music files and loading data onto your Nav100. Microsoft Windows 2000, XP Microsoft Outlook 2000 or later Intel Pentium II 233 MHz or AMD K 6-2 266 MHz or higher 65 MB RAM (128 MB recommended) USB interface (USB 2.
INFORMATION AND SAFETY ■ DRIVING PRECAUTIONS When using the device in a vehicle, the vehicle operator is solely responsible for operating the vehicle in a safe manner. It is your responsibility to comply with all traffic laws. Failure to follow the directions below could result in death or catastrophic bodily injury to you or to others. Do not attempt to enter information or configure the device while driving.
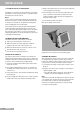
INFORMATION AND SAFETY CAR MOUNT PRECAUTIONS Some countries prohibit the mounting of any electronic device in any location on the vehicle dashboard. Be sure to check the local laws for applicable mounting before installing the car mount. Some newer vehicle models may have a heat reflective shield embedded in the windshield. This may in some cases obstruct the GPS signal reception. If you encounter this problem in the vehicle, you need to purchase an external GPS antenna.
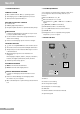
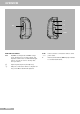
OVERVIEW Speaker – + Joystick MAP MENU ■ CONTROLS REAR AND FRONT PANELS Power status LED indicator. Indicates the battery power status. – Green: battery is fully charged; the device is running on battery power. – Orange: battery charging. – Red: battery charge is near depletion level. You need to recharge your device. Display MENU Joystick Multi-directional joystick. Move in a left-right (»a« and »s«) or up-down ( »A« and »S«) direction to scroll through displayed items.
OVERVIEW É 0 Slot ( 5V DC RIGHT AND LEFT PANELS Slot SD/MMC slot. Accepts SD and MMC storage cards, allowing you to use audio, image, and map files stored in it for use with internal applications. You can also use it to back up data from your device. 0 Earphone jack (earphones/headphones). ( USB port. Connects the device to computer running on the Microsoft Windows platform. 8 ENGLISH 5V DC Ω É Power connector. Connects the device to an AC power outlet. External aerial interface (MMCX input).
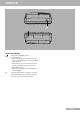
OVERVIEW Z TOP AND BOTTOM VIEWS Power button/backlight control. As a power button: – If the device is off, press the button to turn it on. The power LED indicator on the front panel lights up green. – If the device is on, press the button to turn it off. The power LED indicator also turns off. As a backlight control: – Press and hold to activate or deactivate the screen backlight. Z Soft reset button. Press to perform a soft reset if the device freezes (i.e.
INSTALLATION ■ SETTING UP THE Nav100 ON A VEHICLE The Nav100 comes with a car mount kit and a car charger with which you can set up the device on a vehicle. Fasten the bracket in a secure location. Notes Some countries prohibit the mounting of any electronic device in any location on the vehicle dashboard. Be sure to check your local laws for acceptable mounting areas before installing the car mount bracket. 5 Make sure that the suction bond is strong enough before proceeding to the next step.
PREPARATION ■ RECHARGING THE Nav100 Nav100 uses a high-density rechargeable 2200 mAh Lithium Ion battery. The stauts icon located on the top right corner of the main menu panel indicates the level of the device’s battery power: – Battery full charged – Battery charging – Battery level low 3 Once charging is complete, as indicated when the power LED indicator lights up green, disconnect the AC adapter cord from the device.
STARTING UP ■ START UP THE Nav100 2 Tap the »Language« icon on the »System« menu panel. After mounting the Nav100 on a vehicle it is ready to be used. Turn it on to calibrate the screen. After screen calibration, proceed to system settings configuration (refer to the sections on the pages 25 to 27). If you intend to start using Nav100 at once, we recommend configuring the language and date/time settings first. The rest of the user preferences can be set up later.
STARTING UP 5 Tap »Time«. TURNING OFF THE DEVICE 1 Turn off the device by pressing the power button » « on the top right panel of the device. – The power LED indicator on the front panel turns off. – The main menu panel disappears. 6 Tap »<« or »>« under the »Hour« and »Minute« settings to set the time values. Ȃ 7 Tap » « to apply the changes made. 8 Tap »Time Zone«. 9 Tap »<« or »>« for the time zone of your choice.
BASIC FUNCTIONS ■ USING THE HOT KEYS ■ USING THE TOUCH SCREEN All seven hot keys ligth up when pressed for easier operation under low light conditions. The Nav100 touch sensitive screen allows for a more natural way of entering information into the device using fingers instead of a stylus. The actions are done by: Tap - Touch the screen once with your finger to open items and select options. Hold and drag - Tap a slider icon and drag it across the screen.
OPERATION WITH A COMPUTER ■ CONNECTING TO A COMPUTER 3 Select your desired language. – The window »Please select your task« will appear. ( 1 Plug the USB cable supplied into the USB port » « on the left panel and into the USB interface of the computer. Note ActiveSync has to be installed before (refer to the section below). 2 Use File Explorer to copy digital music and image files into the device’s SD/MMC card and access them when in Multimedia mode.
OPERATION WITH A COMPUTER ■ CREATING A PARTNERSHIP After completing the installation procedures of ActiveSync and Contacts Manager, set up a partnership between the Nav100 and the computer with the help of the New Partnership setup wizard. Once you have created a partnership, you will be able to synchronize contact information using ActiveSync. 1 If you want to upload files into a SD/MMC card for use with your Nav100, insert the card to the device.
OPERATION WITH A COMPUTER 6 Click »OK«. – The settings you have selected would apply to all future contacts synchronizations. 7 Click »Sync« icon to start contacts synchronization. – Contact information located on the Nav100 and the computer will now be synchronized. EXPORTING CONTACTS FROM YOUR COMPUTER 1 Insert a SD or MMC storage card into the device. – Exported contact files will be saved to this storage card for later access from your device.
OPERATION WITH A COMPUTER IMPORTING CONTACTS FROM YOUR Nav100 1 Insert a SD or MMC storage card containing the contact files you wish to import into the computer. 9 Click »OK«. – Contacts will now be imported to your computer. 2 Connect the device to the computer using the USB cable supplied. Note ActiveSync has to be installed before (refer to the section “Installing ActiveSync” on page 15). 3 Open File Explorer to check that the device is now displayed as a USB mass storage device.
MAIN MENU FUNCTIONS ■ THE MAIN MENU 1 Turn on the device by pressing the power button » « on the top right panel of the device. – The power LED indicator on the front panel lights up green. – The main menu panel displays. OPERATING THE MAIN MENU There are five program icons on the main menu panel. 7 - Tap »MP3« to launch the MP3 panel for music mode operation. 7 - Tap »Navigation« to to display the Navigation Panel.
MULTIMEDIA MODE ■ MULTIMEDIA MODE OVERVIEW ■ OPERATING MP3 In addition to it’s navigating function, the Nav100 is also a mobile entertainment tool that lets you enjoy the digital music and image collection on the road. MP3 and Photo extend the device’s functions to the multimedia scene. OPENING MP3 1 Tap »MP3« on the main menu panel. – The MP3 playback pad displays. Note The device’s multimedia programs - MP3 and Photo - are not available in navigation mode.
MULTIMEDIA MODE 2 Hold and drag the slider »a s« of the progress bar to adjust the progress of the current track. 3 Tap »aa« to skip backward to the previous track. – If the current file is the first track in the list, the last track will be played. 4 Tap »ss« to skip forward to the next available track. – If the current file is the last track in the list, the first track will be played. Note You can also move the joystick left/right to skip to the previous/next track.
MULTIMEDIA MODE Notes When the file is located in the root directory, tap the file for playback. OPENING PHOTO 1 Tap »Photo« on the main menu panel. – The Photo playback pad displays. When the file is located inside a sub-directory, tap the sub-directory icon, then tap a file for playback. 4 Tap » « « or use the joystick left to display the previous available image file. « 5 Tap » « or use the joystick in a right direction to display the next available file.
CONTACTS MANAGEMENT ■ CONTACTS Contacts maintains a list of your friends’ and colleagues’ contact information. These include email address, street address, multiple phone numbers and other related information, such as birthday or anniversary date. EDITING CONTACT INFORMATION 1 In the Contacts control pad, tap the contact you wish to edit. 2 Tap »Edit«. Contacts maintains a list of your friends’ and colleagues’ contact address. You can enter multiple address entries for each contact.
CONTACTS MANAGEMENT EXPORTING CONTACTS FROM YOUR Nav100 1 Insert a SD or MMC storage card into the device. – Exported contact files will be saved to this storage card for later access from your computer. 2 Tap » 4 Tap »Import«. « in the Contacts control pad. 5 Tap »OK« on the completion dialog box. – Selected contact file will be added to the Contact list. 3 Select whether to export all contacts, or just the currently selected one.
SYSTEM CONFIGURATION ■ SYSTEM SETTINGS OVERVIEW ■ VOLUME You can adjust the settings of the device to suit the way. Adjusting certain settings, such as those for system volume, power LED and hot keys/touch screen backlight may increase the standby time. 1 Tap »–« or »+« to adjust the volume level. Ȃ 2 Tap » « to apply the changes made. 1 Tap »System« main menu panel. – The system menu panel displays. 3 Tap the »Enable sounds for taps« checkbox. Ȃ 4 Tap » « to apply the changes made.
SYSTEM CONFIGURATION ■ BACKLIGHT 1 Tap »–« or »+« to adjust the screen backlight level. Ȃ 2 Tap » « to apply the changes made. Notes The Nav100’s user interface supports nine languages. This includes English, Italiano, Français, Castellano, Deutsch, Português, Nederlands, Dansk and Svenska. If you change the menu language (default setting »English«), the menu options will no longer correspond with the English menu options listed in this instruction manual.
SYSTEM CONFIGURATION ■ RESETTING Nav100 OR LOADING THE FACTORY ■ RESETTING THE GPS FUNCTION DEFAULT SETTINGS You may have to perform a reset if the device freezes (i.e., the device no longer responds to the buttons on the screen). A soft reset allows your device to get a fresh start, similar to rebooting a computer. This will restart your device and adjust memory allocation. All records and entries are retained after a soft reset. GPS settings are also retained.
INFORMATION ■ TECHNICAL DATA This device complies with the EU directive 89/336 EEC.
INFORMATION SOFTWARE SPECIFICATIONS Operating system: Microsoft Windows CE .NET 4.2 7 Navigation Software: Destinator DG 7 Address book: Contacts – Maximum capacity of 500 contacts entries – Integrated with Destinator DG for faster navigation using address entries as destination points 7 ■ TROUBLESHOOTING If a fault occurs, first refer to this information before you take the device for repair. If you are unable to rectify the fault using the information given here, contact your specialist dealer.
INFORMATION ASPECT QUESTION ANSWER Audio No sound is coming from the device Touch screen The touch screen is not responding to the finger taps Multimedia mode Picture files cannot be viewed If the earphone is plugged into the device, the speaker is automatically shut off. Disconnect the earphone Check that the device’s volume settings are not muted. Tap »Volume« in the system menu panel The screen may have lost its calibration. Recalibrate the screen.
INFORMATION WEB SERVICES You will find full information about Delphi Grundig Programme on the Internet at: www.delphigrundig.com If you have any questions, e-mail: info@delphigrundig.com IRELAND Car Phonics Ltd. 35 Blackhall Place IRL-Dublin 7 Phone: 00353 1 633 4722 Fax: 00353 1 633 4781 e-mail: carradio@eircom.net DELPHI EUROPEAN SERVICE CENTRES BENELUX Electronics By Knowledge B.V. Marconiweg 15 NL-3899 BR Zeewolde Phone: 0031 36 521 8400 Fax: 0031 36 521 8490 e-mail: info@ebknl.
Delphi Deutschland GmbH • Beuthener Str. 41 • D-90471 Nürnberg, Germany • http://www.delphigrundig.